
New! Small Group Classes over Pattern Projecting Software
Hey Friend,
After probably a full year of y’all asking, I am thrilled to announce the launch of my new small group classes teaching you PDF Stitcher and Affinity Designer! These classes will be 3-5 students at a time meeting “live” online for 6 weeks at a time. I’ll schedule a regular day and time to meet, for example Fridays at noon my time, and we’ll meet all 6 of those Fridays at noon my time. The hope is to have several classes running at different times to help accomodate all those who are interested but are in various time zones. These classes will be paid. They will cost $150USD for the entire 6 weeks of class.
If you even maybe might possibly be interested, I’d love for you to fill out this form so I can better determine the days and times to schedule classes. Time zone math gets a bit hairy but I think I’ve figured out a system that is helping me loosely group people by availability.
Here’s a quick question and answer that may preemptively answer any questions you have:
What will we cover in these classes?
Session 1 will only cover PDF Stitcher and Affinity Designer. We can talk about other programs in the future if there is a big interest but these two have been most requested.
Class 1 will be an introduction where we first make sure everyone’s technology is working, I’ll introduce the software and make sure everyone has it downloaded and is ready to go, we’ll all introduce ourselves, and we will get familiar with how the classes will run.
Class 2 will be us all using the same free pattern to learn the basics of these two programs.
Classes 3-6 I’ll turn you loose with your own patterns but be there to answer questions and help you accomplish the things you need to accomplish. Doing this in a small group setting will be great because everyone can hear the answers to everyone else’s questions and we will be able to cover more information that way but we won’t get overwhelmed with too many different things going on at once.
How will you host these classes?
After a lot of deliberation and consulting with the expert (ie my brother), I’ve decided to host this on Discord. Do NOT let this intimidate you. I will have a video that walks you through how to Discord and remember class 1 is all about making sure everyone is ready to go. Discord will let us see each other and each others’ screens during class and let us post pictures and questions via text during the week between classes.
Any special requirements for attending?
You’ll need to be on your computer, not a mobile device, so that we can screen share.
You’ll need a webcam and a microphone. Ones built into your computer are fine and you can buy a webcam/microphone combo for pretty cheap on Amazon if necessary.
The better your internet connection, the better your experience will be but I’m not setting a minimum requirement or anything like that.
You’ll need to download and install the following on your computer: PDF Stitcher (free), Affinity Designer (one time paid), and Discord (free). I’m happy to share resources with you to help you do this before class begins.
I’ll be working on a Windows computer and am most familiar with Windows set ups. You may absolutely join with a Mac but there may be some differences in programs that we will have to work out.
Approach this with confidence. You can absolutely do this and I will help you do it!
I’m so excited about these classes. Hope to see you there!
Till next time friends,
Branalyn
Pattern Projecting Programs
Read to find out what software is recommended when using a projector to project your sewing patterns rather than print them on paper.
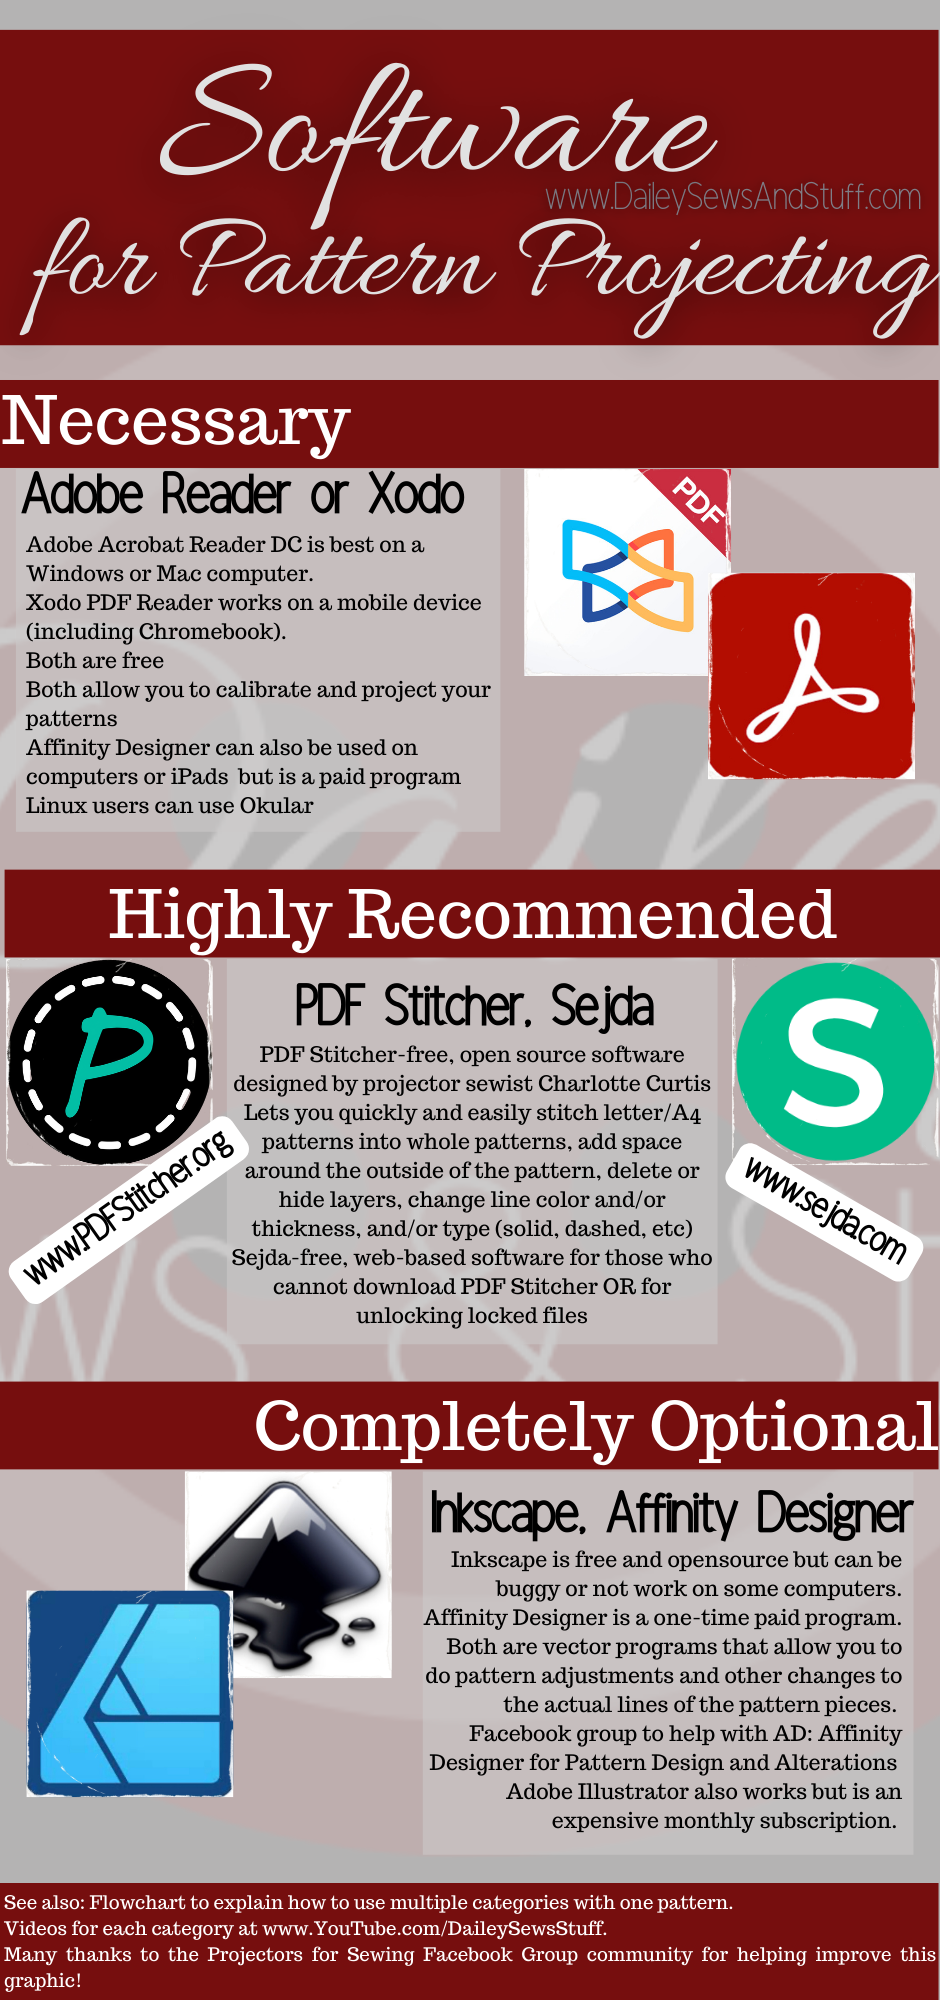
When we project patterns, we are using the projector as a second screen for our computer, so the computer programs we need to project patterns aren’t really any different than the ones we need to view a pattern on our computer…with a few caveats thrown in.
The program used to view the pattern on the projector needs to be able to turn layers on and off and needs to be precisely zoomed to the correct size. And we can use programs that make adjustments to the patterns digitally so that we can project exactly the pattern we want to use, rather than print, tape, then adjust the paper pattern.
Through the wonderful collaboration of the many members of the Projectors for Sewing Facebook group, we’ve learned which programs work best (and new programs have even been written!) for different devices and different needs. The group also helped me to create the graphic and flowchart (pictured below) that became the basis for this video:
If you’d rather just see the graphics and not watch the whole video, here’s the graphic:
And here’s the not-really-final-still and also very grainy flowchart (broken in two pieces):

Bottom/Left/Start of flowchart

Right/Top/Continuation of flowchart
And the full flowchart (super grainy!)
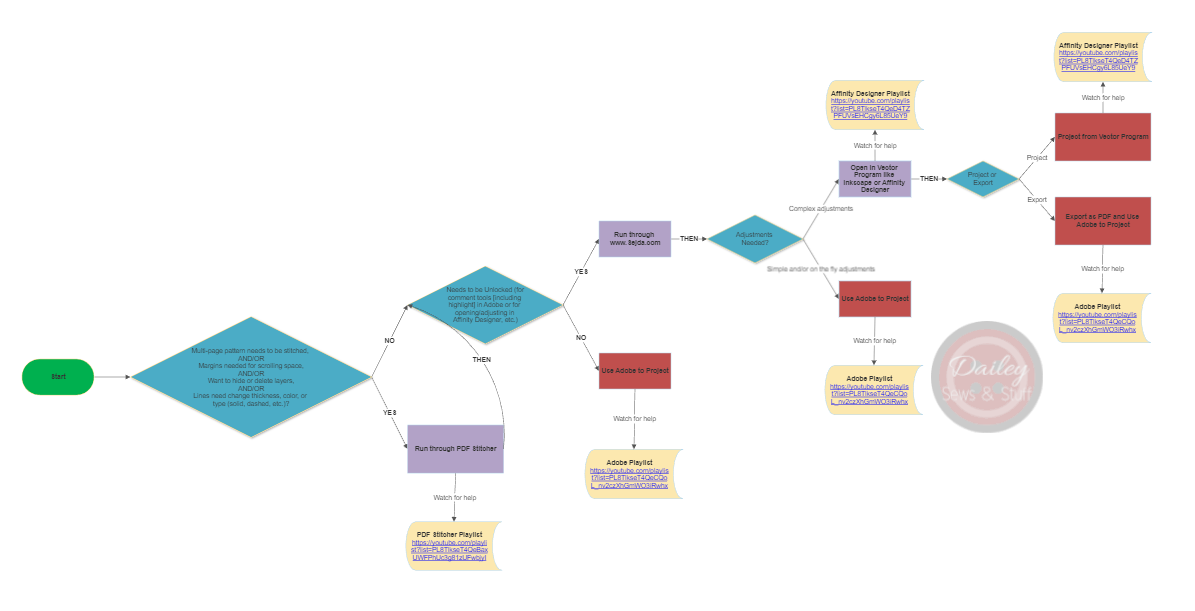
Grainy whole flowchart
And here’s a list of resources that may help you learn more about each type of program:
Group for users of Affinity Designer
The OG projector group, best place to find the good information

The 5 Don’ts of Pattern Projecting
When thinking about the things I want people to know before they get started using a projector for sewing, and needing a catchy YouTube title, I came up with the 5 Don’ts for Pattern Projecting. I go into more detail in the video but below it, I’ll hit the highlights.
When thinking about the things I want people to know before they get started using a projector for sewing, and needing a catchy YouTube title, I came up with the 5 Don’ts for Pattern Projecting. I go into more detail in the video but below it, I’ll hit the highlights.
1 Don’t jump in without a tiny bit of research first
You don’t have to spend hours upon hours of research (though I certainly enjoy that!) but you do need to make sure you’ve figured out what kind of projector works best for your space before buying one.
2 Don’t expect it to be a super quick process to set it up the first time
I don’t mean to minimize the issues people sometimes have, but calibration is not usually as bad as people are dreading. But trying to set it up in a hurry while on a deadline is setting yourself up for failure. Give yourself time to do it one step at a time without feeling rushed for time. Once it’s set up, you’ll be saving time every time you go to cut something (especially something new!). If you intend to break down the set up every time you use it, I promise you’ll get faster at it and you can optimize your set up to be easy to set up each time. Give your self grace because it is a new, confusing thing to do the first time you do it!
3 Don’t do it alone!
I have video walkthroughs of setting up each type of projector (UST, ST, mini/Amazon). The Facebook group Projectors for Sewing is amazing! And Missy Pore, who founded the group, has a service to help people set up via Zoom. If you’ve got a friend with a projector already set up, they may also be able to help.
4 Don’t get defeated
Calibration dread is real but don’t let it get to you! Get started, take it one step at a time, ask for help when you need it, and persevere until you are going from buying a pattern to cutting it in minutes!
5 Don’t forget to prep
This is actually the most important thing. Take these 4 steps before you get started and you’ll set yourself up for success.
Flat, level surface
Level isn’t actually super important, your projector has to be level to the cutting surface but it doesn’t have to be level according to the bubble on a level. However, it is very important that your cutting surface is flat. I go into a lot more detail in the video! But the shorter the throw, the more important it is that your surface is flat. Using a marble can help you determine if there are any high or low spots in your surface. And I give a couple suggestions for flattening your mat.
Sturdy mount or solution
You want to make sure that when you set your projector, it will stay where it is set.
All the necessary cords
Before you start trying to calibrate, you’ll want to make sure you don’t get stymied before you can really begin due to a missing cord! Check both the projector and your computer to make sure the cord, or perhaps something like a Chromecast, is ready to go when you set up.
Know your offset and where to mount
I go into this more in other posts, but decide where you are mounting your projector and test it out before you permanently attach anything. Also, know that projectors only project landscape and CANNOT project portrait.
I know you can set up your projector if you start off on the right foot and take it step by step! Don’t forget all the resources to help you and don’t get defeated!
Until next time friends,
Branalyn

Troubleshooting PDF Stitcher
I’ve done several videos over PDF Stitcher-(playlist here: )-and this one is adding to that list with a troubleshooting video. PDF Stitcher is a very simple program to use. But that can make it all the more frustrating when things don’t go quite right. So today we are talking about what to do when PDF Stitcher gives you trouble.
Sometimes, when I stop to think about it, it seems impossible that projector sewing, as a growing trend, has really only been around for a little over 3 years. We have come so far in such little time! Projector sewing patterns have become far more common and I hardly ever use PDF Stitcher for it’s original intent of digitally piecing together A4/Letter files into a full pattern anymore. But it can still be used for that original purpose and has had several awesome updates since that help us make any pdf pattern-A4/Letter, A0/copyshop, projector, or otherwise-just a little more projector friendly.
I’ve done several videos over PDF Stitcher-an interview with Charlotte Curtis, the projector sewist who programmed PDF Stitcher, a tutorial that mostly covers how to stitch patterns with PDF Stitcher, a tutorial that shows the newer functions that make patterns more projector friendly in the layers tab, and how to start a pattern in PDF Stitcher and move it on through to a vector software like Affinity Designer to adjust it digitally to fit you-and this one is adding to that list with a troubleshooting video.
PDF Stitcher is a very simple program to use. But that can make it all the more frustrating when things don’t go quite right. So today we are talking about what to do when PDF Stitcher gives you trouble.
Step 1: Update to the newest version
There are a couple different ways to do this. The newer versions actually have a built in alert when a new version is released and you can download from that. Or you can also always go to the website, www.PDFStitcher.org, and download directly from there. It may not fix your issue, especially if you already have the newest version, but at times there are bugs that have been fixed and a fresh download will solve your troubles!
Step 2: Double check your settings
This one sounds easy and obvious but sometimes it’s a little something that’s throwing everything off. Make sure you have a new name for your finished pattern and you’re saving it the proper place. Make sure you haven’t clicked the inches when you meant centimeters and vice versa. Check you haven’t forgotten to add 0s as blank pages where needed. Just be a little bit meticulous about each setting to make sure you’ve entered things correctly, which brings me to my next point…
Step 3: Use the PDF Pattern Assembly Spreadsheet
There’s a spreadsheet created by a member of Projectors for Sewing called PDF Pattern Assembly Spreadsheet. It’s a really great collaborative effort by projector sewists to help each other out. When someone figures out how to assemble a pattern, they can enter the info on the spreadsheet so that others can use the same info on their same pattern. Often, several of the settings are the same across and entire brand of patterns so several settings can be copied for the same brand, even if it’s not the same pattern.
Step 4: Post on Projectors for Sewing
At this point, if you still need help, turn to the hive mind at Projectors for sewing. You can try searching the group for your problem and/or post to ask your question. Make sure you include all the relevant details-pattern company, pattern name, settings you’ve entered, problem you’re having, etc. so that you can get the help you need. Screenshots are super helpful as well! You can always ask in my Facebook group as well!
Step 5: Send Bug Report to Charlotte
And, lastly, if all other options have failed you, it’s likely a bug that needs to be fixed. It’s important to let Charlotte know when there’s a bug to fix since she can’t possibly use every pattern file out there to discover all the possible issues. But it’s equally important to make sure you work through steps 1-4 first because she’s a busy lady and we want her to be able to use her time wisely. Charlotte has a great write up about using the bug report feature already at https://www.pdfstitcher.org/bug-reporting/ so I won’t write the instructions here but I do show the steps in the video.
So, in conclusion, I know it can be intimidating to use a new program or to have something go wrong when using a program that’s worked just fine before but hopefully this helps you if you ever have an issue with PDF Stitcher.
Till next time friends,
Branalyn
Ditto Projector vs DIY Pattern Projecting
Have you heard about the launch of Ditto Patterns? It's made quite a splash in the sewing world but is it really a brand new, "revolutionary" idea as they've claimed? Is it the future of patterns? Is it better than the DIY set ups we've been doing?
Is Ditto really a brand new, "revolutionary" idea as they claim?
***Edited on 2/21/2023 after 10pm to add a section at the end to include my thoughts after watching a live demonstration plus Q&A done on Instagram***
Have you heard about the launch of Ditto Patterns? It's made quite a splash in the sewing world but is it really a brand new, "revolutionary" idea as they've claimed? Is it the future of patterns? Is it better than the DIY set ups we've been doing?
In this blog and related video, I discuss what we know about Ditto, some hearsay that may or may not be true, and some educated guesses (based on what we know, what we've heard, and my knowledge of pattern projecting) about what's in store, list some pros and cons, the cost breakdown of the different options, and my opinions. To be clear, I have NO affiliation with Ditto, Singer, or Joanns and I have NOT seen one in person nor had a chance to test it out.
In the end, I think that, for most people, a DIY set up is still the better option for pattern projecting. However, Ditto is a high end option that may be right for some sewists. Check out the video here or read on to see how I came to this conclusion. If you choose to watch the video, this is a good one to listen to as you do a project or wash dishes but do be sure to check out the description box and the comment section!
First, let’s figure out what Ditto even is so we can adequately compare it to our DIY set ups. (If you’re unfamiliar with the DIY set ups, check out this page for more info.) If you’re already familiar with both Ditto and a DIY set up, feel free to skip down to the sections where I discuss my opinions, cost breakdown, and pros and cons. I also have resources listed at the bottom where you can find all the references I used in making this video/blog.
Stuff we know
Let’s start with things I know from reading on websites belonging to Ditto, Joanns, or Singer, from watching YouTube videos put out by Ditto, reading press releases put out by Ditto, and from reading the responses to questions on their Instagram and Facebook pages. (Again, I’ve got links to everything I used at the bottom of this page.)
Ditto, a joint venture from Singer, Joanns, and Ditto, is a new to the market pattern projecting system. Sold through both Singer authorized dealers and Joanns, it costs $799.00 and comes with a projector, a mount, a 24x36 branded self-healing mat, a rotary cutter, pattern weights, “pattern target stickers,” a cord, and cord covers and is currently only available for pre-order (February 2023) with preorders shipping in early March and available for wide purchase at the end of March.
In all of their marketing, they have claimed to be the first innovation in patterning in 160 years. They are making this claim for two reasons 1) the projecting of patterns directly onto fabric for cutting and 2) the digital customization of their patterns based on you entering your body measurements. (We will revisit this idea in the opinions section.)
On their website, you can purchase Ditto patterns, which allow for the custom measurements, and patterns from other indie designers (Liesl + Co, Madelynne, StyleARC, Straight Stitch Society, Named, and maybe the Big 4), which do not allow for custom measurements. We know this because when asked, they commented “At this time, customizations are only available for Ditto branded patterns.” They were also asked if you can project your own designs and replied “Great question. At launch, Ditto projects the patterns available on Dittopatterns.com. Ditto will continue to evolve and input like this is how we will add new capabilities in the future like design uploads!” On the website, pattern prices seem to range from $7-$17 per pattern, and you can also do a $10/month subscription to have access to all of them. If you subscribe, that means you will lose access to the full catalog when you cancel the subscription but you’ll keep the ones you’ve bought individually. Oddly, even though Ditto patterns are customizable to your measurements, you must choose a size when purchasing a pattern.
The size chart lists the following 17 points for choosing a size:
Height
Neck circumference
Bust circumference
Under Bust circumference
Waist circumference
Hips circumference
Thigh circumference
Knee circumference
Upper arm circumference
Wrist circumference
Shoulder width
Bust height
Front length
Back length
Back width
Belly protuberance
Buttocks
All heights are listed as 5’7”. The next 14 measurements change according to size from size 0 to size 28. To give you an idea of the size range, bust measurements start at 32.5” and go up to 55”, waist 26”-53”, and hips 33 7/8”-57”. “Belly protuberance” has letters A-D listed as you move up in size across the size chart similar to how Bootstrap Patterns has you enter your belly shape for the body double dress form pattern. “Buttocks” has the word “average” for every size and I assume there will be choices such as “flat” or “full” but you cannot yet buy patterns from their website so I’m not sure how that will be entered.
Watching the available videos on their YouTube channel, it appears that you must use their mat to calibrate, which right now is only available in the kit with the whole system and is only available in the 24x36” size. It also appears that calibration is pretty simple because you set up your projector, get it close with physical manipulation, and then take a picture for the app and projector to work together to finish calibration for you.
In the videos, it also looks like you can use your finger with the app to place the pattern pieces anywhere you want by dragging, can use your fingers to rotate them, and it has buttons for both horizontal and vertical mirroring.
Educated guesses
While everything in the last section was verifiably true, in this section I’m going to take things that have been said in those places and pair it with what I know of pattern projecting to make some good guesses about what things mean.
With the way patterns are manipulated and changed, and because Ditto has said you cannot use your own patterns, I think it’s pretty clear that Ditto uses a proprietary software and pattern format so it’s unlikely that we can buy patterns from them and use them in our own way AND the projector cannot be used to do anything other than project their patterns through their app. So you couldn’t use your Ditto projector to do anything other than project patterns purchased on their website and you couldn’t use any patterns purchased on their website for anything other than the Ditto projector.
In reading comments made by and asking several people I would consider experts in the Projectors for Sewing group, no one who really understands pattern projecting was consulted for this. However, I have learned since making the video that Elizabeth Caven was involved in developing Ditto and has also been using a projector for sewing for some time. (More on this in the opinion section.)
As we previously learned, there are 17 measurements on that size chart and the hearsay from the launch is that there are 17 customization points for patterns. I would guess that means that the size chart is the list of customization points. As someone who is very short (4’11”) and comparatively short waisted, I’m concerned there are not enough length measurements to properly size a pattern for your specific height. I would want side waist length, rise, and inseam included at the very least. As someone who is also rather full busted, I also don’t think it’s clear how they plan to implement full or small bust adjustments with the measurement points given.
Based on an FCC report found online and their YouTube videos, it looks like the way they handle pieces too big for the projection size (which seems to be limited to 24x36), is to have them pre-sliced and you must work with the pieces as they have them already cut. While you can place multiple small pieces on your fabric at once, pre-sliced pieces cannot be included with them and no pieces can be cut unless they fit fully within the 24x36 box. It seems like this would make pattern tetrising fairly difficult but it also seems like a pretty simple solution.
Hearsay
And moving on to the last section of things we know, well…these are things we think we know. All of this is based on comments and stories from people who were at the Ditto launch and is frankly hearsay. Some of it may not be true but I did see it in several different places and it stands to reason that it may be true based on the things we know.
It seems as if it is all cloud based so you won’t actually download and store any pattern that you buy through them. While this does make it easy for you to find your patterns within the app, it also could limit you to only working when wifi is available and would mean you are relying on their servers to be working in order to use your patterns.
In the same vein, I heard that you’ll make your account with your sizing and any pattern you buy will be customized for your sizing only. It seems that if this is true, you’d have to re-purchase the pattern if you want to use it for a person who is a different size than you (say if you make a dress for both yourself and your sister but you aren’t the same size).
People have been told that there are 17 customization points, which fits in with the size chart as previously discussed.
And this is less hearsay and more a bit of a shot in the dark based on the videos I’ve watched but it looks like you can place the pattern pieces where you want and they have mirroring built in but you can’t unfold pieces yet and they seem to be all cut on fold. The opinions on cutting on the fold vary greatly in the pattern projecting world but many people are strongly against it!
Others’ opinions
I’ve read over and over from others in various comment sections that Ditto looks good in a space. That seems to be a definite selling point for a lot of people. It certainly seems like Ditto is aiming to be a high-end projecting solution at their price point and I think that the high-end look definitely fits with that image. People are also saying it looks very simple to set up and use.
However, there are a lot of people feeling a bit of sticker shock with that $800 price tag and quite a lot of them are hating on the proprietary nature of the system. I saw a ton of comparisons to Cricut, especially in the early years of Cricut, and none of them really seemed favorable.
My opinions
In response to Ditto’s marketing claim that they are the first pattern innovation in 160 years, in my opinion, the digitization of pattern making changed patterning over a decade ago with the advent of pdf patterns and indie designers and is a MUCH bigger innovation. In addition, this digitization of patterns led to the projectors for sewing movement, which started in 2019 and I’ve personally been using a projector for over 3 years now. Several pattern companies already exist that allow you to customize patterns to your measurements. Ditto has not innovated either of these ideas and it’s quite a stretch for them to claim they are the first innovation in 160 years as projecting patterns isn’t new and neither is customizing patterns. Apostrophe patterns, for example, allows you to buy a basic pattern (such as leggings or a tshirt) and then enter your measurements to get a fully customized pattern. You can also enter measurements for other people and use the pattern over and over for as many people as you like.
Them hitting “160 years” in so much of their marketing bothers me because I feel like it takes away from what companies like Apostrophe have been doing, and away from people who have been projector sewing for years now. I’m especially upset that Missy Pore isn’t getting the credit for actually starting this revolution. The way that Ditto’s press release speaks about DIY set ups feels a bit insulting. I get they are selling it but I really love the way we’ve collaborated to make such a wonderful thing and it bothers me to see it denigrated. And really takes away from the people who have put SO MUCH into PFS. I also found out after this video was complete that the person, Elizabeth Caven, who applied for the patents for Ditto also filed a patent in 2017 for something similar. That something never went anywhere it seems until Ditto came along. 2017 is before the founding of the group Projectors for Sewing. Missy Pore states in her interview with me that she had heard the idea for using a projector to project patterns but had searched fruitlessly to find something already created, which is what led her to DIY a solution and share it with the world. I do not know if there is any connection there but I do still believe Missy Pore (along with Sasha Sewist and countless other people in the Projectors for Sewing Facebook group) deserve credit for making pattern projecting what it is today!
Ditto says you have access to their whole pattern library if you subscribe and, if you drop your subscription, will still keep access to the ones you’ve purchased. That makes sense but many of us in the sewing world remember when Craftsy was bought by Blueprint and then bought back by Craftsy. One of Craftsy’s selling points was that you could keep your class “forever” but “forever” turns out to be only as long as the company is in business. If Ditto is all cloud based, then “forever” with Ditto will also only mean as long as Ditto is in business. To be clear, I don’t wish for Ditto to go out of business, but I’m a little worried about having my entire pattern library and ability to project patterns wrapped up in their proprietary cloud based world when “forever” could end anytime their business model changes or ends.
Many online are comparing Ditto to Cricut and I see the similarities with proprietary software, etc. There is room to grow as Cricut did, it’s now less proprietary and has more options, you don’t have to have a subscription, etc. But joining Ditto right now still seems like a bit of a risk to me for the reasons previously discussed.
I also have to wonder, for the non-Ditto patterns offered on their website, how in the world can you use them if you don’t fit a straight size?! With a DIY set up, we have loads of options for on-the-fly adjustments, making adjustments within Adobe (yes, the free version we project with), or using a vector software to make digital pattern adjustments. With Ditto, none of those seem like they will be possible. So if you don’t fit into the straight size of a pattern, how can you use their system?
As far as calibration is concerned, it looks incredibly easy if everything goes to plan. But I know as someone who has calibrated and helped calibrate a lot of projectors that having a fully flat surface is imperative for a good calibration and sometimes we have to take a “finished is better than perfect” attitude. (See more about close enough calibration here.) So how does calibration work in Ditto with less than ideal circumstances? Are you able to fine tune it or adjust manually? Or does it just tell you it can’t calibrate and then you've got an $800 piece of equipment that you can’t use? If your proprietary mat that is necessary for calibration gets bent or warped from the heat of an iron, can you still calibrate? If not, can you buy a new mat on its own? What will that cost? Will they make other size mats available at some point? While 24x36 is certainly the most popular size mat in the Projectors for Sewing group, many of us are now enjoying much bigger mats after getting a projector and fitting even more of a pattern on our mat at once.
In a video, Ditto shows cutting with scissors but I don’t think that’s realistic for projecting. When you project, lifting the fabric, even enough for the scissor blades to fit underneath, distorts the projection. Notice that they only show a short, straight seam where the user is cutting away from herself at a 90 degree angle and then uses a rotary cutter for the curves. While Ditto includes both a mat and rotary cutter in the box so you will have everything you need to use a rotary cutter instead of scissors, it does seem to be a bit misleading on their part to say you can cut with scissors.
Most often, when I bring up pattern projecting to people who aren’t familiar with it, I see responses that say “I could never do that because I adjust my patterns too much” or “I could never afford that.” While Ditto is bringing pattern projecting mainstream, which is great, it also kind of reinforces those preconceived notions people have. Projectors don’t have to be $800 to work for patterns. They don’t even have to be half that! Ditto being so expensive I’m afraid will reinforce that idea that projectors are always expensive. I also think them hitting their pattern adjustments so hard means that people will believe it’s difficult to adjust patterns when using a projector, which isn’t the case at all. Hopefully, people will hear the idea and search for other, less expensive options and discover the wide world of pattern projecting rather than immediately dismiss the idea based on Ditto’s cost or the notion that they can only adjust patterns if they pay for Ditto.
I feel pretty certain that I am not their target audience. And I don’t think their target audience is as big as they think it is. Sewists are by nature DIYers. We are the kind of people who show up to craft shows and know we can make that ourselves. Sometimes, we do buy it because we want to support that business or really think the concept is great or for the shear convenience of it being done for you. But when It comes to convenience, I think doing it yourself is more convenient in the long run because it will work out best for your space and give you the most flexibility. I also think most people are more likely to be drawn to the lower cost of DIYing a solution versus buying the whole Ditto system.
Which brings us to…
Problems Ditto is attempting to solve
I’ve certainly not been a part of the development of Ditto, but it seems to me as if Ditto looked at the DIY pattern projecting set ups and saw three issues and then attempted to solve those. And I think they accomplished that, for the most part, but, in doing so, introduced a few new issues.
It seems like Ditto noticed the people who want a quick answer of “buy this exact projector” and not wanting to have to figure out which would be best for their situation or to DIY a set up. And then Ditto created a solution of a one-size-fits-most projector for their set up. As long as you fit into the parameters they set (7.5 to 10 foot ceiling height, flat ceilings), then their projector should work for you. But it leaves anyone outside of those parameters out of options and doesn’t give any flexibility for projection size, etc. that a DIY set up will give.
Ditto also seemed to notice that people get hung up on calibration. Not to dismiss the many people who do have issues with calibration, but I certainly feel like there are a lot of people who see the Projectors for Sewing Facebook group and don’t realize how many people quickly and easily calibrated and never had to post asking for help. All they see is the people who do need help and assume calibration is going to be awful. This creates what I dubbed in the video “calibration dread.” People put it off and are scared to try when, many, many times, calibration is actually fairly simple. It’s a matter of having a flat surface to project onto, having your projector completely perpendicular to your flat surface, and doing a bit of adjusting. There are loads of resources to help you with this and, for many people, calibration is a one time thing that opens up so many doors for your sewing! For those that will move their projector often and do it again and again, it is something that definitely gets easier with practice. So, yes, Ditto saw the problem of calibration dread and solved it, but again we don’t know for sure how well that calibration really works and I don’t view calibration as a insurmountable problem.
The third issue with pattern projecting that Ditto seemed to want to solve is the issue of “how do I do pattern adjustments now?” that seems to occur to all of us as we think about pattern projecting. As it turns out, we have lots of great options for doing this with the DIY method of pattern projecting as I previously discussed, plus we can use any of the companies that already offer custom sized patterns. Ditto, again, seems to have solved this issue so long as you use their pattern brand but I’m not sure it is such an insurmountable problem to begin with.
How those problems can be solved without Ditto
If you found yourself as a person who agreed with Ditto about the problems pattern projecting can present, maybe you are Ditto’s target audience but I want to make sure I’ve covered the ways DIYing your set up can solve those same issues so you can make a decision with as much information as possible.
A good way to be sure you’ll have a set up that works is to use a tried and true set up from the Projectors for Sewing Facebook group. There are some recommended projectors and you can see how others who have similar spaces as you have set up their projectors. I also have a resource on my website with a graphic that can help you decide which type of projector will work best for your space and then guide you into setting it up and calibrating. Projectors for Sewing remains the best place to find information on which projectors work best and creative solutions for lounging projectors. There are non-permanent solutions if that is part of your problem, including using a tension rod just like Ditto does.
Calibration dread is definitely real but for many people, calibration isn’t as bad as people fear it will be. Whether you’re using Ditto or a DIY set up, the biggest key to an easy calibration will be starting with a completely flat surface.
Apostrophe Patterns is one example of an indie pattern company that will customize your patterns to your measurements and you can download and own the pattern as a PDF to print, project, or whatever you’d like. There’s a free resource at the bottom of the references that also will allow you to do this and there may be other companies that exist. There are also many ways to adjust patterns digitally. I have a playlist showing several options here.
Cost breakdowns
We know that Ditto costs $800 for their all-inclusive set up plus whatever you spend on patterns and/or a pattern subscription. But what does it cost for a DIY set up? Aren’t projectors super expensive? Well…unfortunately, the answer is “it depends.” While I think most set ups can be achieved for less than half what Ditto costs, costs do vary based on what you choose.
With a DIY set up, assuming you already own a mat, rotary cutter, and pattern library, you can expect to spend anywhere from about $100-200, maybe up to 300, on your projector and mount. Even with the cost of a 24x36 mat and rotary cutter, you’re still paying half the cost of Ditto and you can use the patterns you already own.
Pros and Cons
To wrap up this post, I’m going to list 3 pros and cons for both Ditto and a DIY set up. While I have concluded that Ditto is not the solution for me and I much prefer a DIY set up, maybe these pros and cons weigh differently for you and you end up with a Ditto. I’d love to hear what you decide, especially if you decide to get a Ditto and can answer a few of the questions that we don’t have answers for yet!
Ditto
P-All in one solution-you buy the box that Ditto comes in and the only other thing you need is a device to run the app.
P-Taking pattern projecting mainstream-Ditto has opened the conversation surrounding pattern projecting to an even wider audience, which is awesome!
P-Easier for mobile users-One thing I haven’t spoken about much yet is that Ditto does look extremely easy for mobile users to use a pattern projector. While it is certainly possible to use a phone or tablet to project with a DIY set up, it is less convenient than using a computer.
C-Expense-Ditto has quite a sticker shock price of $800 and, right now especially, that price is hard to swallow.
C-Proprietary-The all in one solution comes with the side effect of using proprietary software. You cannot use any other patterns with your Ditto projector.
C-Limited-In that same vein, Ditto is limited in what you can do with it. You aren’t able to use your Ditto projector to do anything other than project patterns. You aren’t able to projector other patterns. If you fall outside the usefulness of the tension rod set up, (it works on flat ceilings with a height of 7.5-10 feet according to their website so if you have a drop ceiling, if you have a particularly low or high ceiling, if you have plaster ceilings or tile ceilings that cannot take pressure) this option likely won't work for you. As far as we know, you are limited to a 24x36 inch mat and projection size.
DIY Set up
P-Infinitely more customizable-You can customize for your budget, your patterns, choose your own mat size and projection size based on what kind of projector you choose, you can hack and mash patterns, you can make sure whatever you use will work best in your space, and more.
P-Flexibility-You can use your own pattern library and/or design patterns for yourself. You can use the projector for anything you’d like-not just projecting patterns-and if you decide you don’t like pattern projecting, you can easily resell it for someone to use for another purpose.
P-lngenuity-You can use your own ingenuity to get your best set up but you can also take advantage of the ingenuity of many fellow pattern projector sewists who have innovated such things as PDF Stitcher and Projector View software, created mounts that work great for our purposes, etc.
C-Research-One bad side to the pure flexibility and customization of the DIY set up is that you first have to do your research before buying. It’s not a simple “buy this one thing” answer. But, all of the research others have done for you definitely shortens the time you spend researching!
C-Calibration dread-DIYing the set up and the calibration dread really does stop people from using their projector and that is really unfortunate. No one has a Ditto yet but I do think people are less likely to let their Ditto sit in a box for months before setting it up!
C-Mobile use-Mobile users can and do pattern project with DIY set ups but it can be a bit more complicated and I do think the Ditto app looks much more simple to use than the solutions we have come up with to DIY with a mobile set up.
Links to all the things I referenced in the video/blog
https://www.dittopatterns.com/how-ditto-works/
https://www.dittopatterns.com/brands/
https://www.dittopatterns.com/projector-instruction-manual.html
https://www.dittopatterns.com/tutorials/
https://www.trendhunter.com/trends/ditto-sewing
https://fcc.report/FCC-ID/2AYJ8-DITTO/5500039.pdf
https://www.bakercityherald.com/ae/entertainment/video_992c5b88-78f6-5c96-bff9-ca0f97a02a07.html
Ditto's Facebook, Instagram, and YouTube pages
Others' stories on Instagram, especially about the launch party/demonstration
Comments in the Projectors for Sewing Facebook group (www.Facebook.com/groups/projectorsforsewing)
Apostrophe Patterns https://apostrophepatterns.com/pages/my-projects
Free Customizable Patterns https://freesewing.org/designs/
Thoughts after watching a live demonstration/Q&A on Instagram
Ditto and one of their ambassadors That’sSewMonica had a live on Instagram where both she and a Ditto representative showed a demonstration of Ditto and answered questions. I didn’t catch most of it live but went back and re-watched, taking notes. Honestly, I don’t feel like we know much more now than we did before the live, but here’s what I gleaned. Definitely go watch it for yourself and see if something different stands out to you!
Representing Ditto was Maya, who said she’s spent the last year designing patterns for Ditto. From what she said, it seems that Ditto has really focused on having a huge pattern library at launch.
Both Maya and Monica said that Ditto uses a tension spring and that it “stays in place perfectly.” While a tension rod is a great option for set up, it does have limitations I brought up previously. You must fit into their range of 7.5-10ft ceilings and you have to be able to put pressure against your ceiling, ruling out anyone with dropped ceilings, tile ceilings, plaster ceilings, and it may cause issues if you live on a pier and beam foundation that has some flex in it (this is pretty common in my area for older homes because we have clay soil that shifts often and may be less common in other areas).
I found it interesting that they both felt the need to dim the lights, at nighttime, in order to show the projection. Occasionally, I will do that for filming purposes but I project with ambient daylight from my huge windows and don’t typically turn off the overhead lights when projecting. Mileage varies depending on projector, however.
When asked about the mat, they said you can use another mat for cutting BUT you’re limited to a 24x36 workspace regardless and the proprietary mat is necessary for calibration. They did not answer what would happen if something happened to that mat or if it wasn’t flat. When asked about having a flat surface, they gave an answer about needing a level surface but did not speak at all to the question of having a flat surface. These are not the same thing in the pattern projecting world. A level surface is nice but we can adjust our projectors to be level TO our surface rather than according to a level. What is more necessary is a flat surface without ridges or dips in it. That question about how Ditto will handle less than ideal situations or not-flat surfaces remains to be answered.
The mystery of the “pattern target stickers” was answered and it is, as suspected, for using when you do fabric shifting. Monica spoke about how innovative the idea is but it is the same exact method we’ve been using for years-Ditto places a marker automatically on your screen instead of you doing it with the comment tool on Adobe and you place stickers on your fabric to mark it and then you shift both the fabric and the projection to line them back up and continue cutting.
When asked to list the benefits of Ditto, Maya’s response certainly encapsulated the reasons projector sewing is superior to paper patterns (see my video here where I expound on that) but none of them really answered why Ditto might be superior to a DIY set up. One thing they did mention more in passing is how easy Ditto is to transport. I definitely give them points for that one. I *can* take my UST anywhere I want but it is rather bulky and heavy.
In several places throughout the live, they did reinforce that Ditto is a closed system-your patterns save to your Ditto account and don’t download, Ditto patterns only work within their projector system, only patterns sold on the website work with the projector, you cannot trace paper patterns into the system or add PDF patterns you already own, and Maya made a statement that sounded like they intend for it to stay a proprietary system. They did state they’d be willing to speak to indy designers about adding them to the library but my understanding is that you’d then have to rebuy any patterns you already own and that they intend to add a feature where you basically build your own designs from presets in the system but that it wouldn’t be live as of the release. However, in one answer they contradicted this saying there would be an option to print patterns purchased from the website, which implies you could save them on your computer and project them with your own DIY set up.
Maya said you’d save money by using the Ditto system over a DIY set up because of the pattern subscription. You’d have to make up at least $400 worth of patterns, minus what you spend on the subscription and replacing patterns you already own, for that to begin to be true. She also called a DIY set up “homegrown” and inaccurate. We always aim for at least 99% accuracy with our “homegrown” projector set ups. I sincerely doubt there is a noticeable difference between that and Ditto but we would need a side by side comparison.
They hit the 17 points of measurement and customization several times, mentioned there will sometimes be options for inseam length, and said several of their measurements were the “nitty gritty.” As someone who has used a truly customized pattern company before, I don’t think they have nearly enough measurements to call any of it “nitty gritty.” They also said they were working to add upper bust measurements in order to do FBAs (and I assume SBAs). When asked about sway back adjustments, there was no clear answer given.
Another thing they said they would consider adding is a feature to unfold pattern pieces so you can cut on the flat.
When asked what you could do if you didn’t have a smartphone, tablet, or wifi, Maya stated that you had to have a device with a camera to complete calibration and wifi is an integral part of the system.
It sounded to me, based on comments and stated answers, that Ditto is either currently available or will be available on 3/1 to demo at Singer authorized dealers and will be available to demo at Joanns on 3/31. I am not fully confident I understood this correctly. I also understood them to say you can download the app on 3/1 and use the website with all of it’s functions then but you cannot test using their patterns without the projector, which leads us back to the closed system and Ditto patterns only being able to be used with the Ditto projector.
While a few things did get clarified and another pro to Ditto (ease of transportation) was raised, nothing I saw in this live leads me to change my overall opinions about Ditto. Monica said several times that Ditto is “for sewists, by sewists” but I am still left feeling like they missed a whole group of sewists who could’ve given them some really important feedback prior to launching their projector.

Calibrating a UST with your Dailey Woodworks DIY mount
A quick overview to calibrating with the Recreational Woodworker/Dailey Sews & Stuff collaboration mount. Video linked.
Still wondering why you should use a mount for your UST?
Or wondering how to use the DIY UST mount I’ve been talking about?
This is the post/video for you!
I collaborated with my husband, Robert Dailey of Dailey Woodworks and The Recreational Woodworker, to design a mount for Ultra Short Throw projectors. A mount isn’t really necessary with a UST projector but it can be really helpful in keeping your projector calibrated if you put it away each time you use it, in getting your calibration right to begin with, in positioning your projector where you want it vertically, etc. I have another post on The Trouble with Mounts detailing why most mounts don’t end up working well for our pattern projecting purposes. BUT this mount? It’s tailor-made for pattern projecting!
The feet on the bottom give you the control to level each corner of your projector, making it easy to physically adjust out the keystone during calibration.

The easy-to-turn screw thingies on the back make adjusting your projector up and down, therefore adjusting the size of your projected image, a breeze.

And if you add some masking tape or otherwise mark where your projector belongs, it’s pretty easy to set it right back up every single time.

Other than these simplifications, there’s not much difference in calibrating with this mount than without a mount. But, just the same, I’ve made a video walking you through the calibration steps with the mount. Be sure you checkout the links in the description box for all of the links to helpful calibration tools and tips!

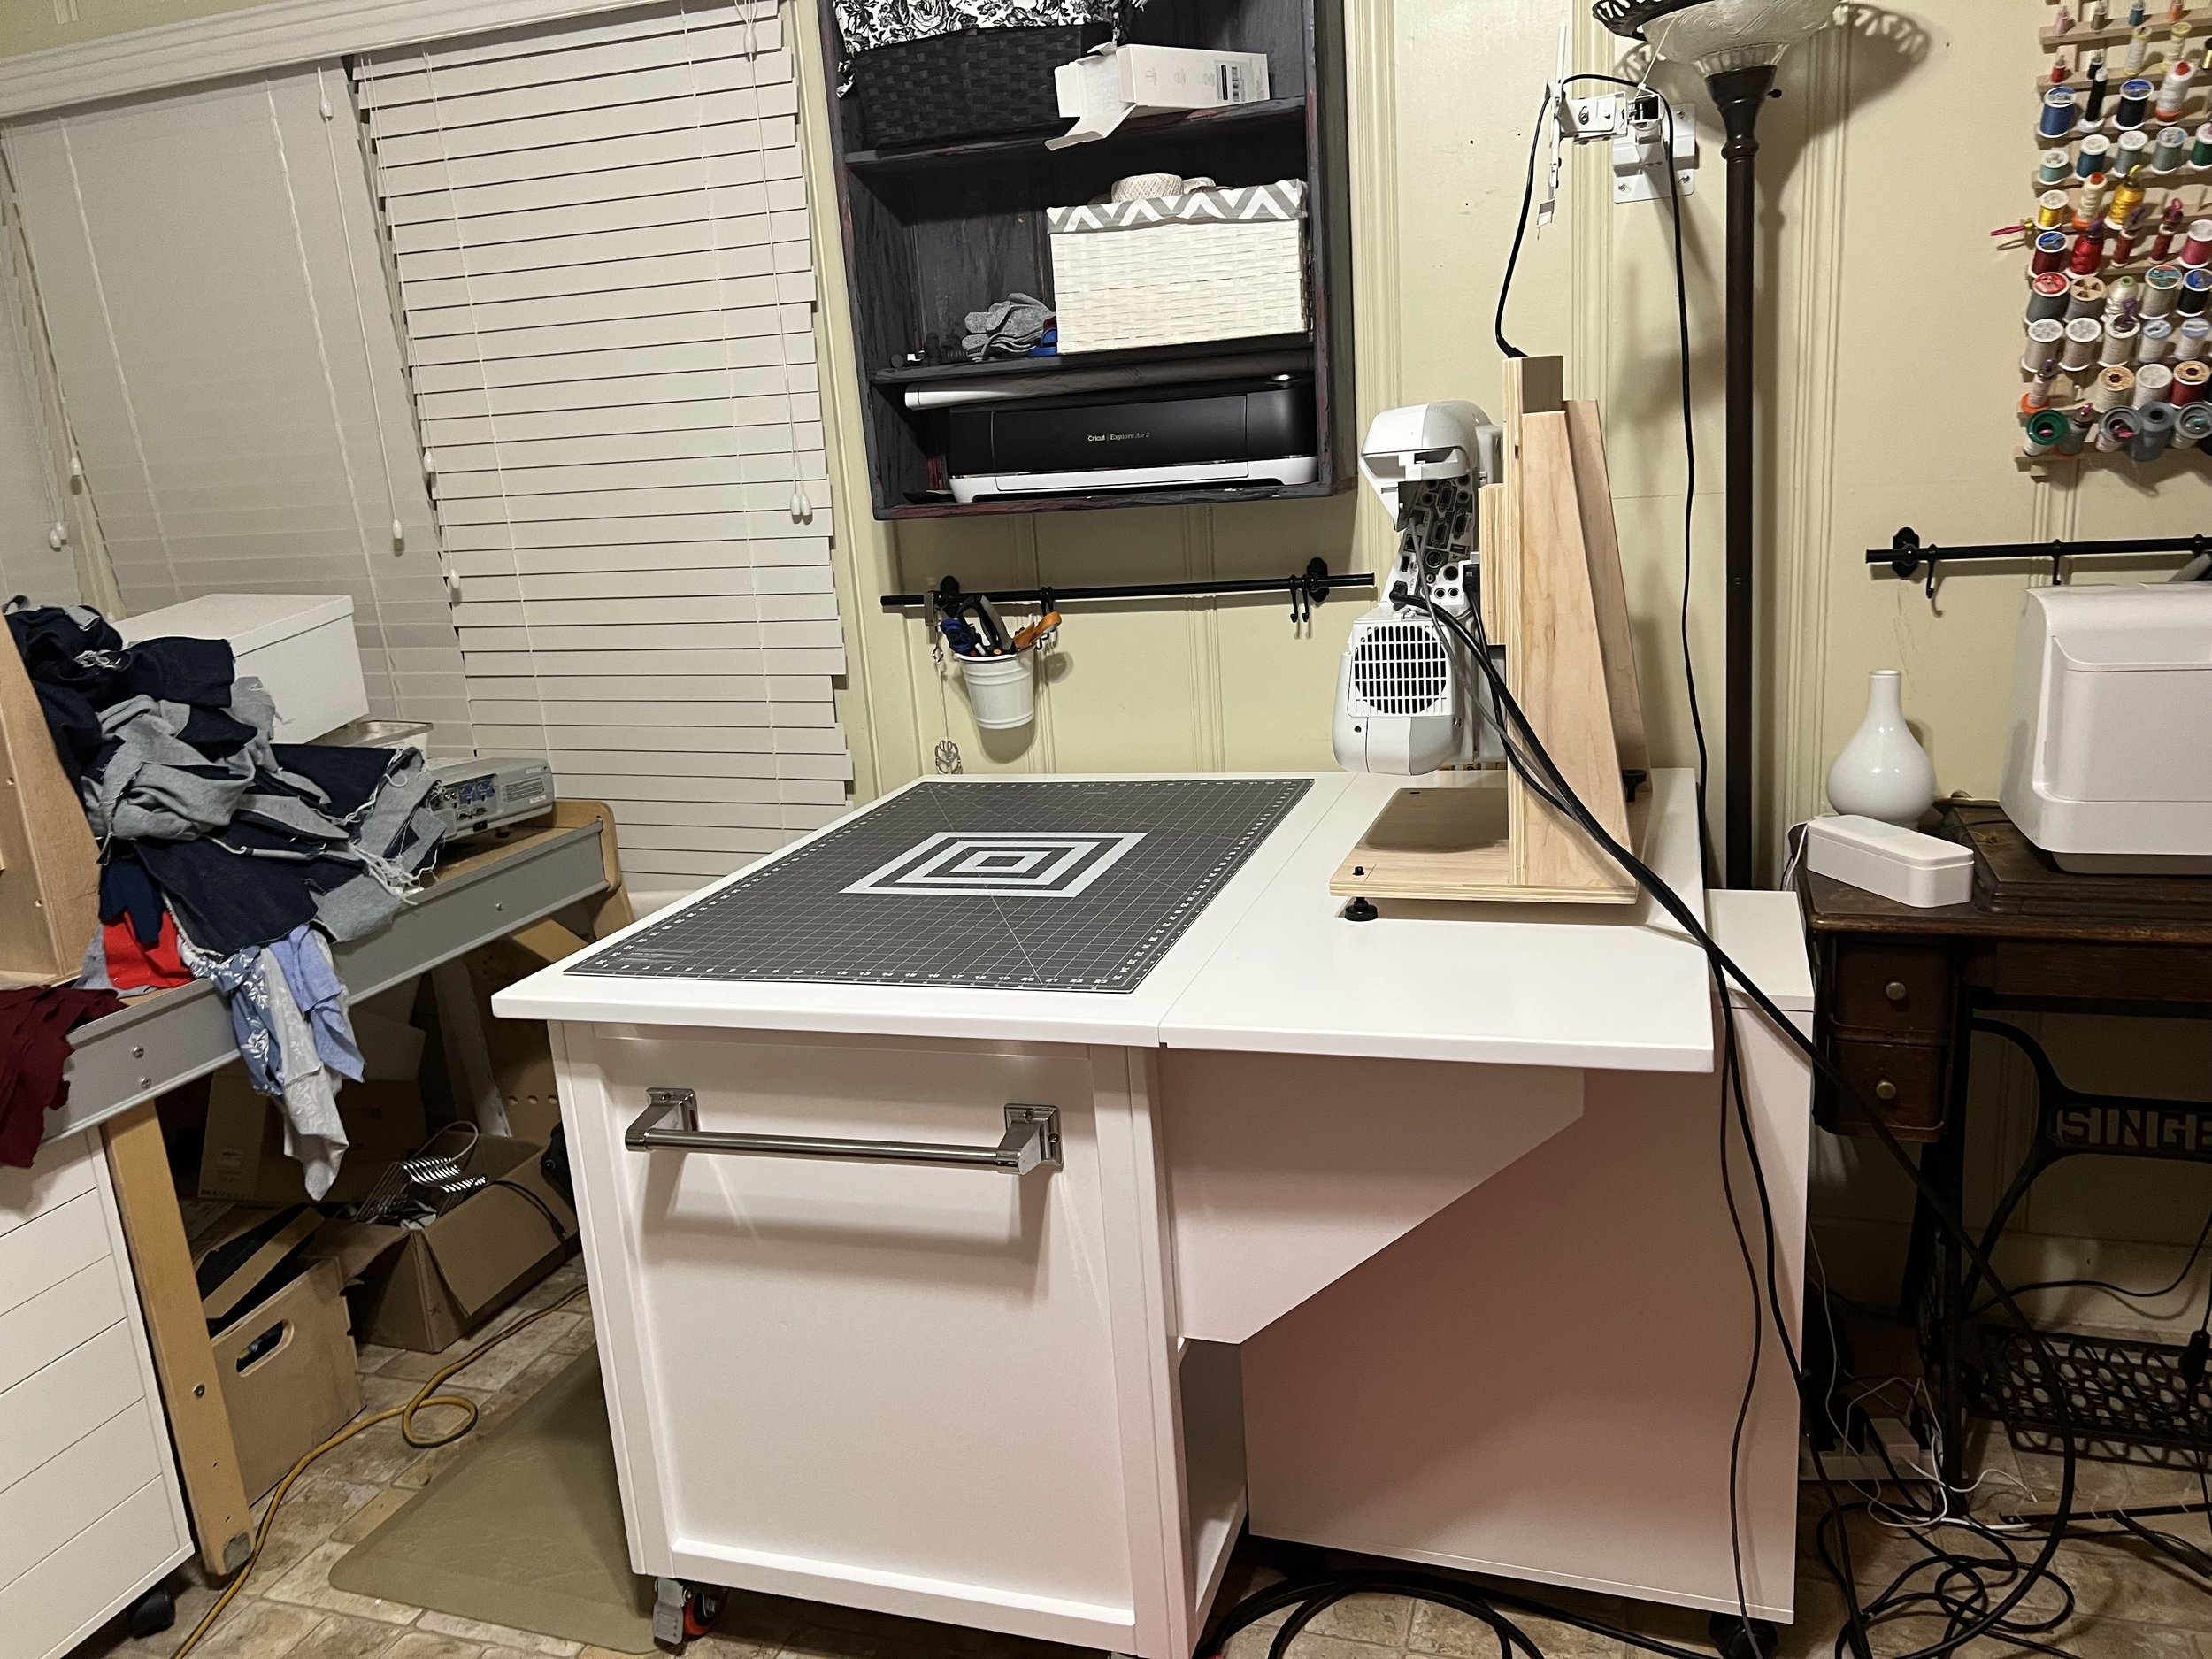
My New Cutting Table & UST Mount (And How To Get One For Yourself!)
A tour of my new cutting table, UST mount, and where to buy plans to get one for yourself.
If you’ve been around for awhile, you’ve heard me talk about my husband, Robert Dailey of Dailey Woodworks. His business is building custom furniture. And, occasionally, he makes stuff for me, too.
About 10 years ago, before he was woodworking professionally, I asked for a cutting table for Christmas. At the time, I had just begun to really get into sewing. I wanted to learn to draft patterns, not to sell but just for my own body. (I quickly switched from that to quilting and was heavily into quilting for many years before switching back to garment sewing with indie designers and PDF patterns, which is most of my sewing these days.) I wanted a cutting table that would allow me to draft, store the supplies needed for drafting, cut, store the supplies needed for cutting, and would be versatile and mobile because my craftroom was also our spare room and we were living 8 hours from family then and would have guests fairly often. I also wanted it to fit the 24x36” cutting mat, I wanted to be able to remove that and replace it with a pressing board to press on it, and I wanted it the right height for my short self. And so my first cutting table was born!
(Shown below is the old cutting table, sitting on our driveway, at the end of it’s life with me, another sewist has her now!)


Moving several times plus kids had worn the old girl out a bit and a lot of things have changed in 10 years, including Robert’s woodworking skills and the way I use my cutting table. So, after a lot of discussion of how I use it and what I’d like different about a new version, Robert designed and built a new-and-improved cutting table specifically for pattern projecting!
Just ignore the mess on the left please.
I am SO EXCITED to say it ticks ALL the boxes! The size, the height, the storage, the space for a projector, it’s ALL there!
AND!!!!
You can have one, as well! Robert not only builds custom furniture, but he also makes and sells plans for other woodworkers. You can buy plans for the cutting table here. They are $20 and Robert has several supporting videos to make sure woodworkers of all levels (yes, even beginners!) can make this pattern projecting cutting table.
If you would rather have a highly skilled woodworker make your cutting table for you, Robert will be taking custom orders at his website. He said prices would begin at $2300 with customizations, finishing, and shipping added.
But that’s not all!!!
Did you spot that UST mount? You can have one of those, too! Robert is not currently offering these for sale BUT you can buy the plans to make your own for only $5 right here! And this one anyone can make! I will be releasing a video in the near future making this with limited woodworking skills and limited tools. If you can follow a sewing pattern, you can follow the plans for this UST mount. (Of course, making that will mean I have a serious surplus of UST mounts, so stick around for what I plan to do with the extras.)
Check out the video below to see an in-depth dive into my new table and mount and click the links to get your own!

Affinity Designer Basics for Pattern Projecting
New video is FINALLY out! It’s a long one, but I used the description box to give you timestamps so you can skip around as needed. I go over all the basics of using Affinity Designer for pattern projecting-setting up your screen, what tools do what, etc. If you watched the Lives and still feel a little lost, this is the video for you!
New video is FINALLY out! It’s a long one, but I used the description box to give you timestamps so you can skip around as needed. I go over all the basics of using Affinity Designer for pattern projecting-setting up your screen, what tools do what, etc. If you watched the Lives and still feel a little lost, this is the video for you! It releases Saturday, 8/19/2022 at 8:45pm Texas time. As always, clicking the link will take you to YouTube and they will figure out for you when that is your time!
Writing a blog post for this video would include WAY too many screenshots to be reasonable so you’ll have to watch the video to get the good information. Here’s a list of timestamps that shows what I cover:
00:00 - Channel Intro
00:13 - Video Intro
02:46 - Installing Affinity Designer New
03:19 - Reinstalling AD on a New Computer
04:39 - Installation
05:09 - Opening for the first time
05:48 - Setting up the screen
06:29 - Opening a File
08:20 - Move/Arrow Tool
08:35 - Artboard Tool
09:07 - Node Tool
11:32 - Top Menu while using Node Tool
13:23 - Corner, Contour Tools-not used
13:46 - Pen Tool
14:29 - Pencil, Brush, Fill, Transparency, Image, and Vector Crop Tools-not commonly used
17:03 - Rectangle Tool
17:23 - Transform Panel
22:32 - Transform Origin Tool
23:19 - Other Shape Tools
24:10 - Text Tool and Top Menu when Text is Selected
25:17 - Text that isn't text
26:28 - Color Picker Tool
27:02 - Hand & Zoom Tools
27:39 - Righthand Color Menu
28:11 - Stroke Menu
30:17 - Layers Panel
32:03 - History & Navigator Righthand Toolbar, More Zoom
34:02 - Mouse Shortcuts
35:11 - Other Useful Top Menu Tools
36:30 - Common Keyboard Shortcuts, More Mouse Shortcuts
38:53 - Saving a Document
39:17 - Exporting to PDF
41:54 - New Documents
42:46 - Other Resources
44:19 - Wrap Up
45:44 - Outro
This one was a lot of work and I really hope y’all find it helpful!
Till next time, friends,
Branalyn
Epson UST Projector Menu Settings
An overview of the Epson UST Projector Menu. Find the settings you need to change.
Have you already calibrated your projector but you think there may be some settings you’d like to change? And you’re scared to play around too much because you might irrevocably change something that totally ruins your calibration?!
Well, fear not, friend, I’ve gone through the menu and played around with each one and bring you the overview in this video:
PLEASE NOTE-I’m using an Epson UST 595wi. Some menus may be slightly different, especially if your projector does not have an interactive feature or is another brand. You can always Google for your specific projector’s user manual to read about your specific projector.
Use the timestamps in the description box to find each of the different options covered:
Image Menu
Color Mode (can help with clarity)
Brightness (can help with brightly lit rooms)
Contrast (can help make lines more stark)
Sharpness (can help make lines sharper),
Color Temp,
Reset (for only the Image Menu settings)
Signal Menu
Aspect Ratio (can help when squares measure as rectangles)
Settings Menu
Keystone (can help with rectangles that look like trapezoids)
Quick Corner (can help with fine tuning calibration)
Zoom (can help make the entire projected image bigger or smaller)
Image Shift (can help fine tune the projected image on your mat)
Pointer Shape,
Volume,
Mic Input Level,
Remote Receiver,
User Button,
Pattern (can help line up projector and mat in the center),
Reset (for only the Signal Menu settings)
Extended Menu-Different for Interactive vs Non-interactive
Easy Interactive Function (necessary when using USB-B and wanting to use the pens)
Display,
Closed Caption,
User's Logo
Projection (used to change the orientation of the projected image-WILL ALWAYS BE LANDSCAPE but it will flip the screen in several ways)
USB Type B (necessary when using USB-B for display),
Language (for changing the display language of your projector),
Reset (for resetting all of the Extended Menu settings)
Network Menu-largely unhelpful for us
Eco Menu
Power Consumption,
Light Optimizer,
Sleep Mode,
Sleep Mode Timer,
A/V Mute Timer,
Standby Mode,
ECO Display (all can be used in various ways to control your power consumption, does affect brightness and how fast your screen turns itself off),
Reset (reset the Eco Menu settings)
Info Menu
tells you about your projector, most helpful can be the
Resolution (so you can make your computer match the resolution, especially for duplicated displays),
and Lamp Hours (to see if you may be needing to replace your lamp soon)
Reset Menu
allows you to Reset all settings at once
Until next time, friends!

Using Quick Corners on an Epson UST
A cheat for Epson UST projector calibration-Quick Corners! Learn the hows and whys in this blog and video.
Two parts of pattern projecting are both critcal and daunting:
Choosing the right projector for your space/situation
Calibration
I have this page for helping you choose a projector.
And a few posts/videos to help with calibration-UST, ST, Amazon/Mini, How Close is “Close Enough”
AND today I’m bringing you a calibration cheat!
It only works on Epson USTs (my 410wi ST does not have Quick Corners but some other ST models might) but it’s very handy for those last minute adjustments that you just can’t seem to get.
As I say in the video, it’s important to do as much physical calibration as possible before using Quick Corners. Quick Corners works by turning off and on some pixels and warns you that it can degrade the image. We don’t want to rely too heavily on that because it can end up distorting the very image we are trying to calibrate!
But if you’ve been trying to get that last little bit of a corner lined up and you’re so close but not quite close enough, Quick Corners is a great option!
Slightly uncalibrated, check the corners
You access it by clicking Menu on your projector or remote and then scrolling to Settings.

Menu>Settings
Once you click Enter on Settings, it will highlight Keystone.

Menu>Settings>Keystone
Click Enter again and the Keystone menu opens. Scroll to Quick Corners.
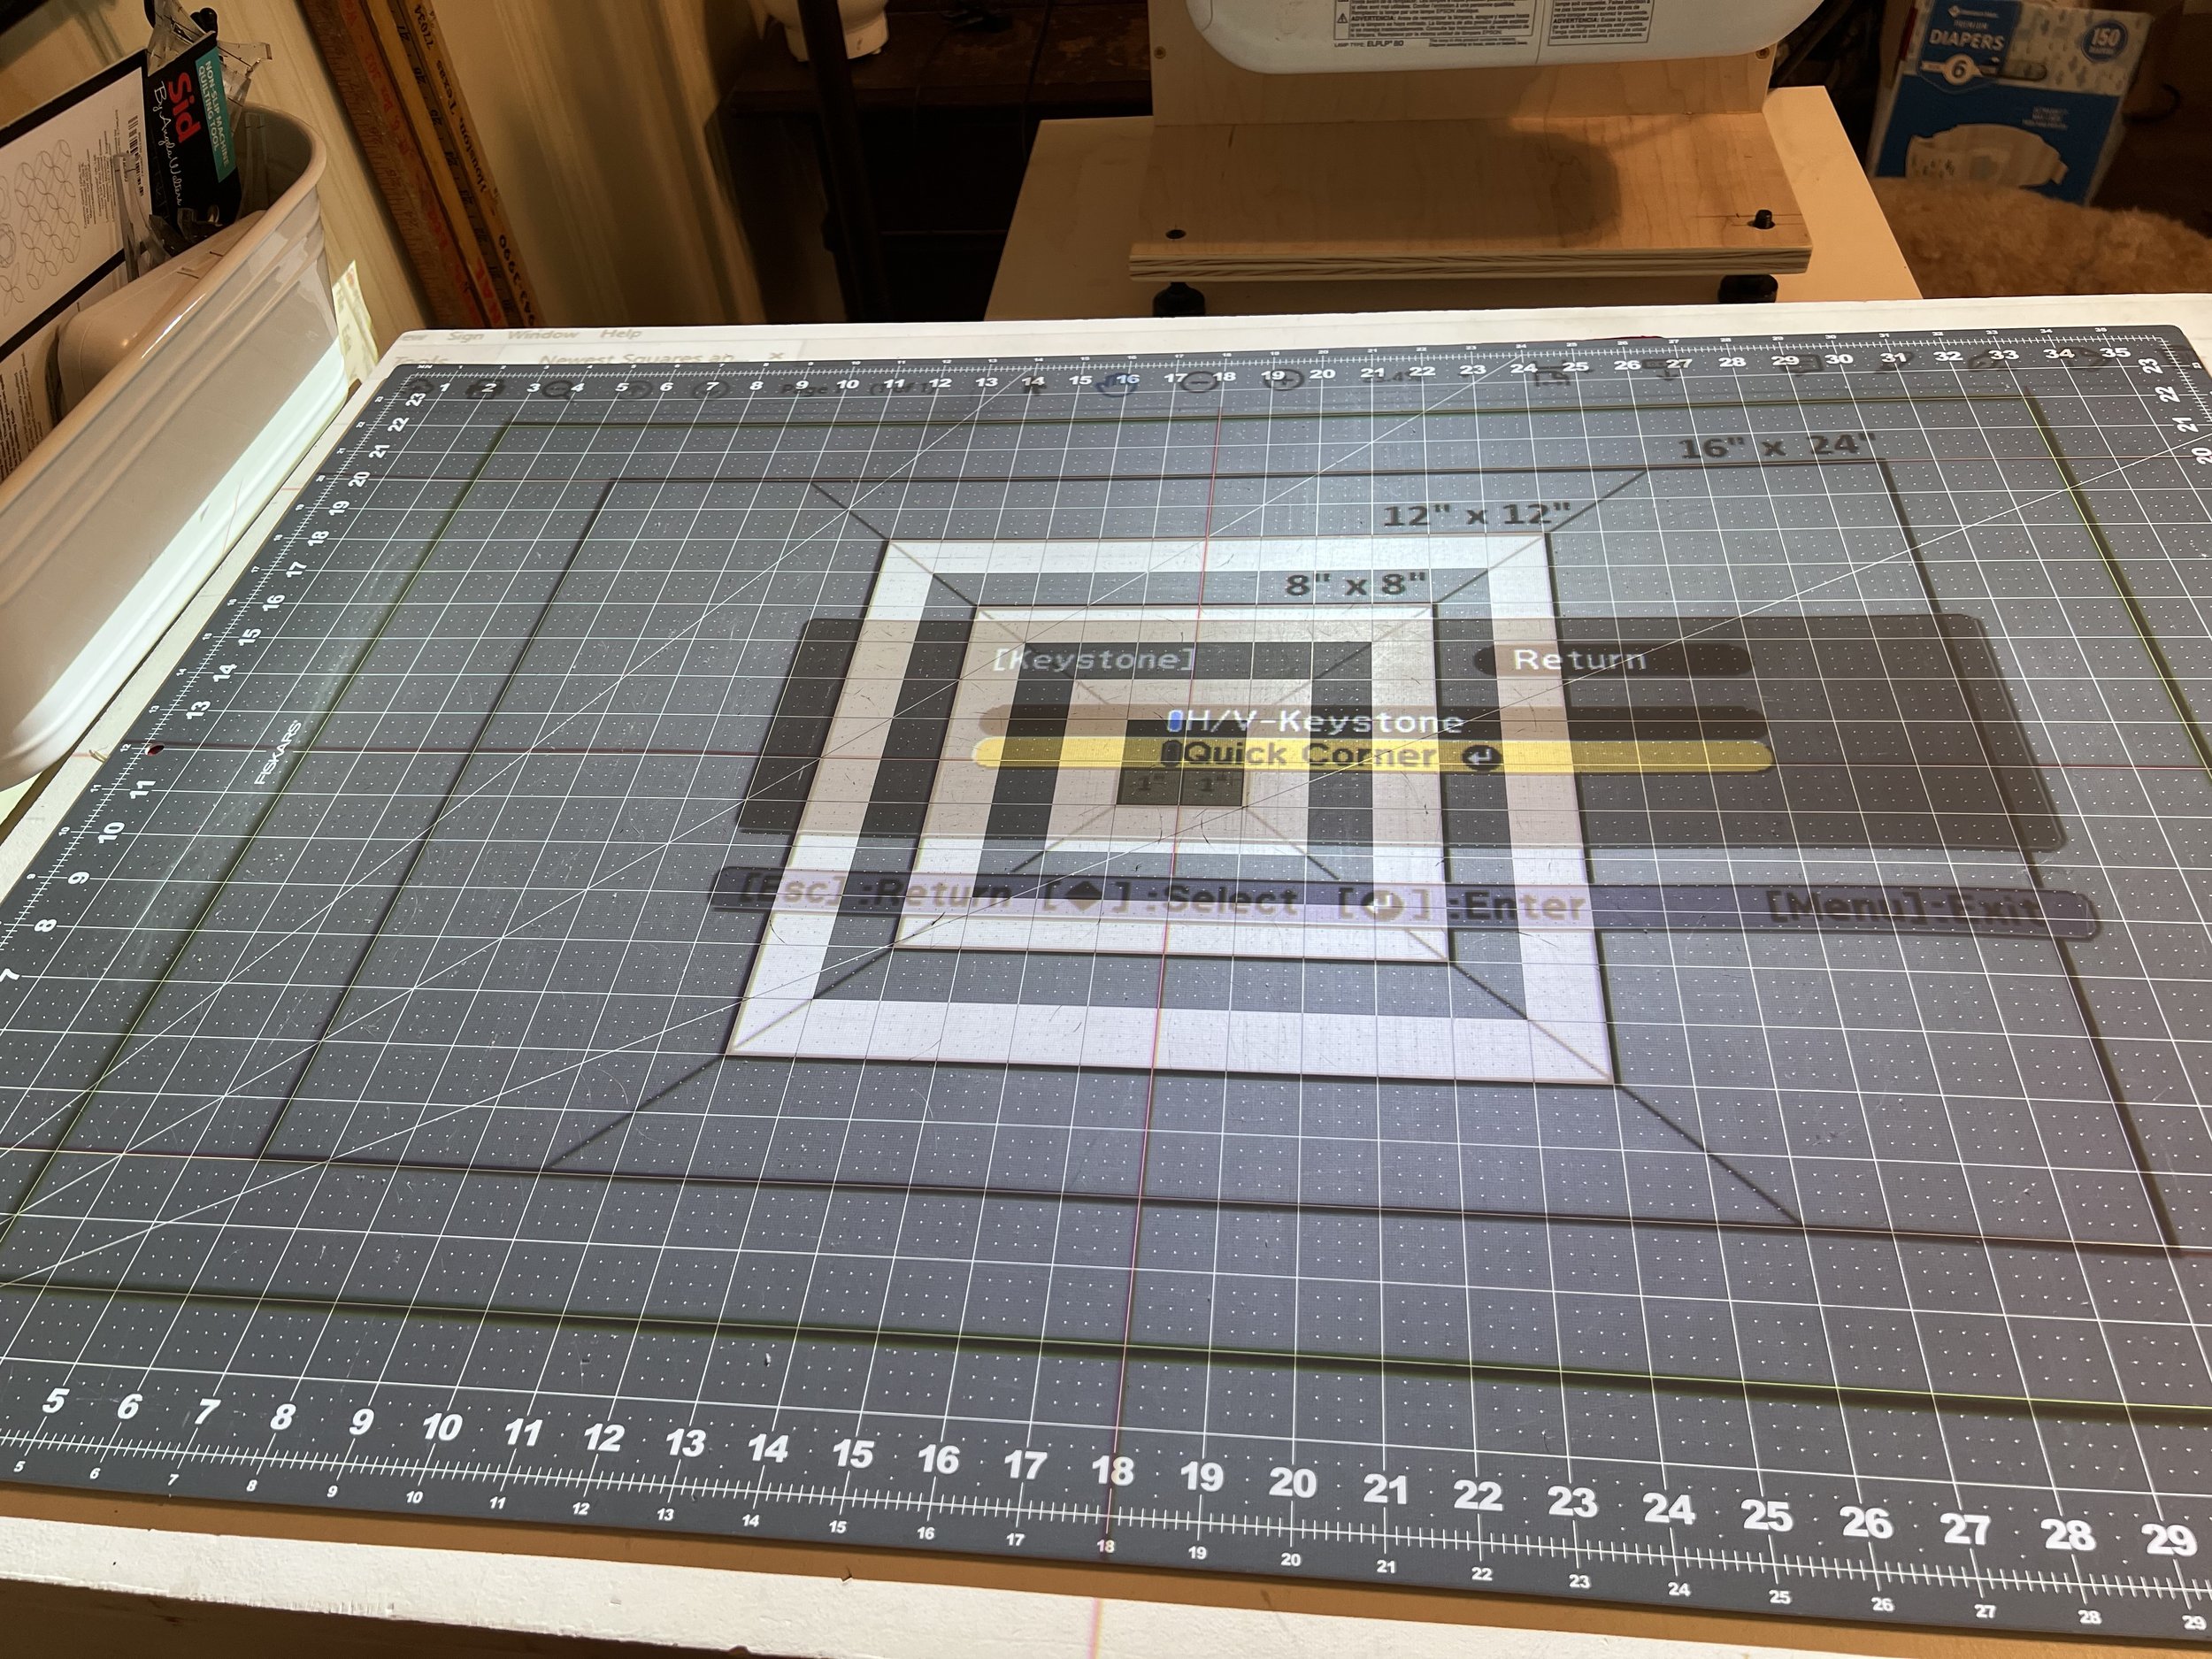
Keystone Setting
Enter into the Quick Corners and you’ll get this warning:
[Keystone]
If this setting is changed, the image may be distorted.
This is why we save it for a last resort. The less it has to adjust here, the better your image will be. Also, it just won’t allow you to make drastic changes.

Warning!
Click Enter one more time to finally enter the Quick Corner menu. It will highlight the top left corner by default.

Quick Corner Menu
Click enter and then you can use the up and left arrows to slowly change where the top left corner’s point hits.
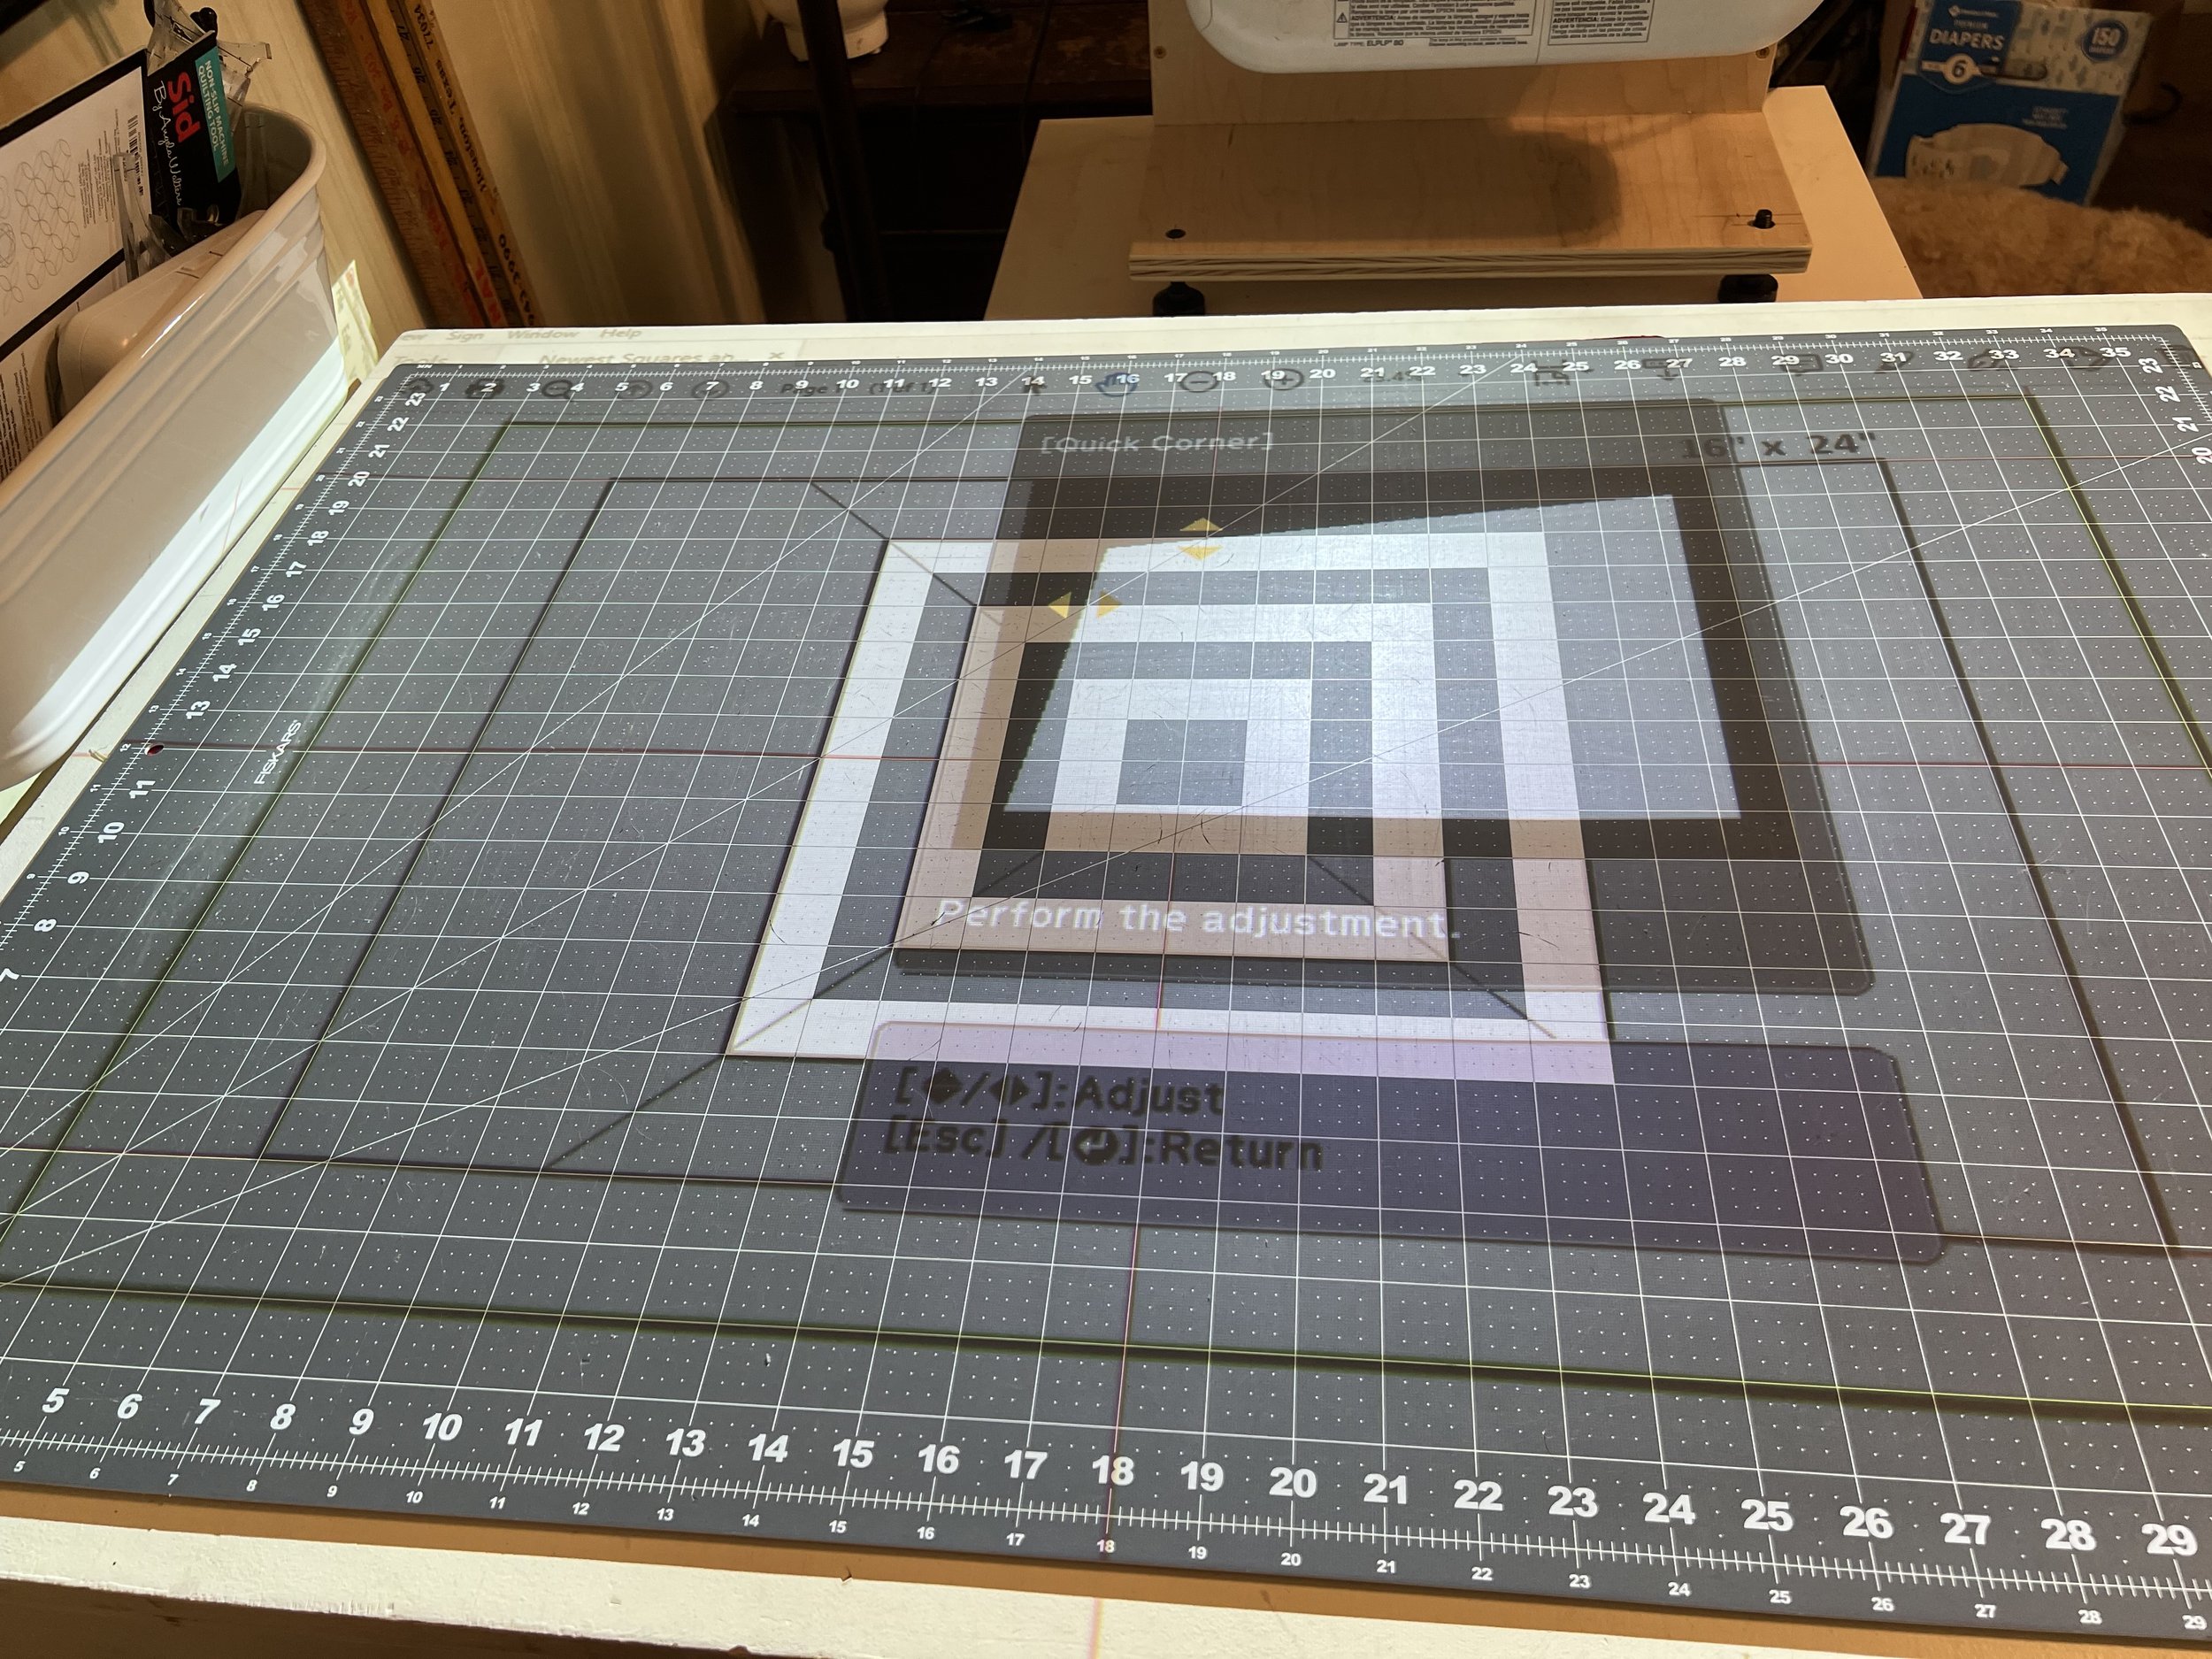
Corner chosen
When you’re happy, click Escape to go back to the Quick Corners menu and move over to the next corner.
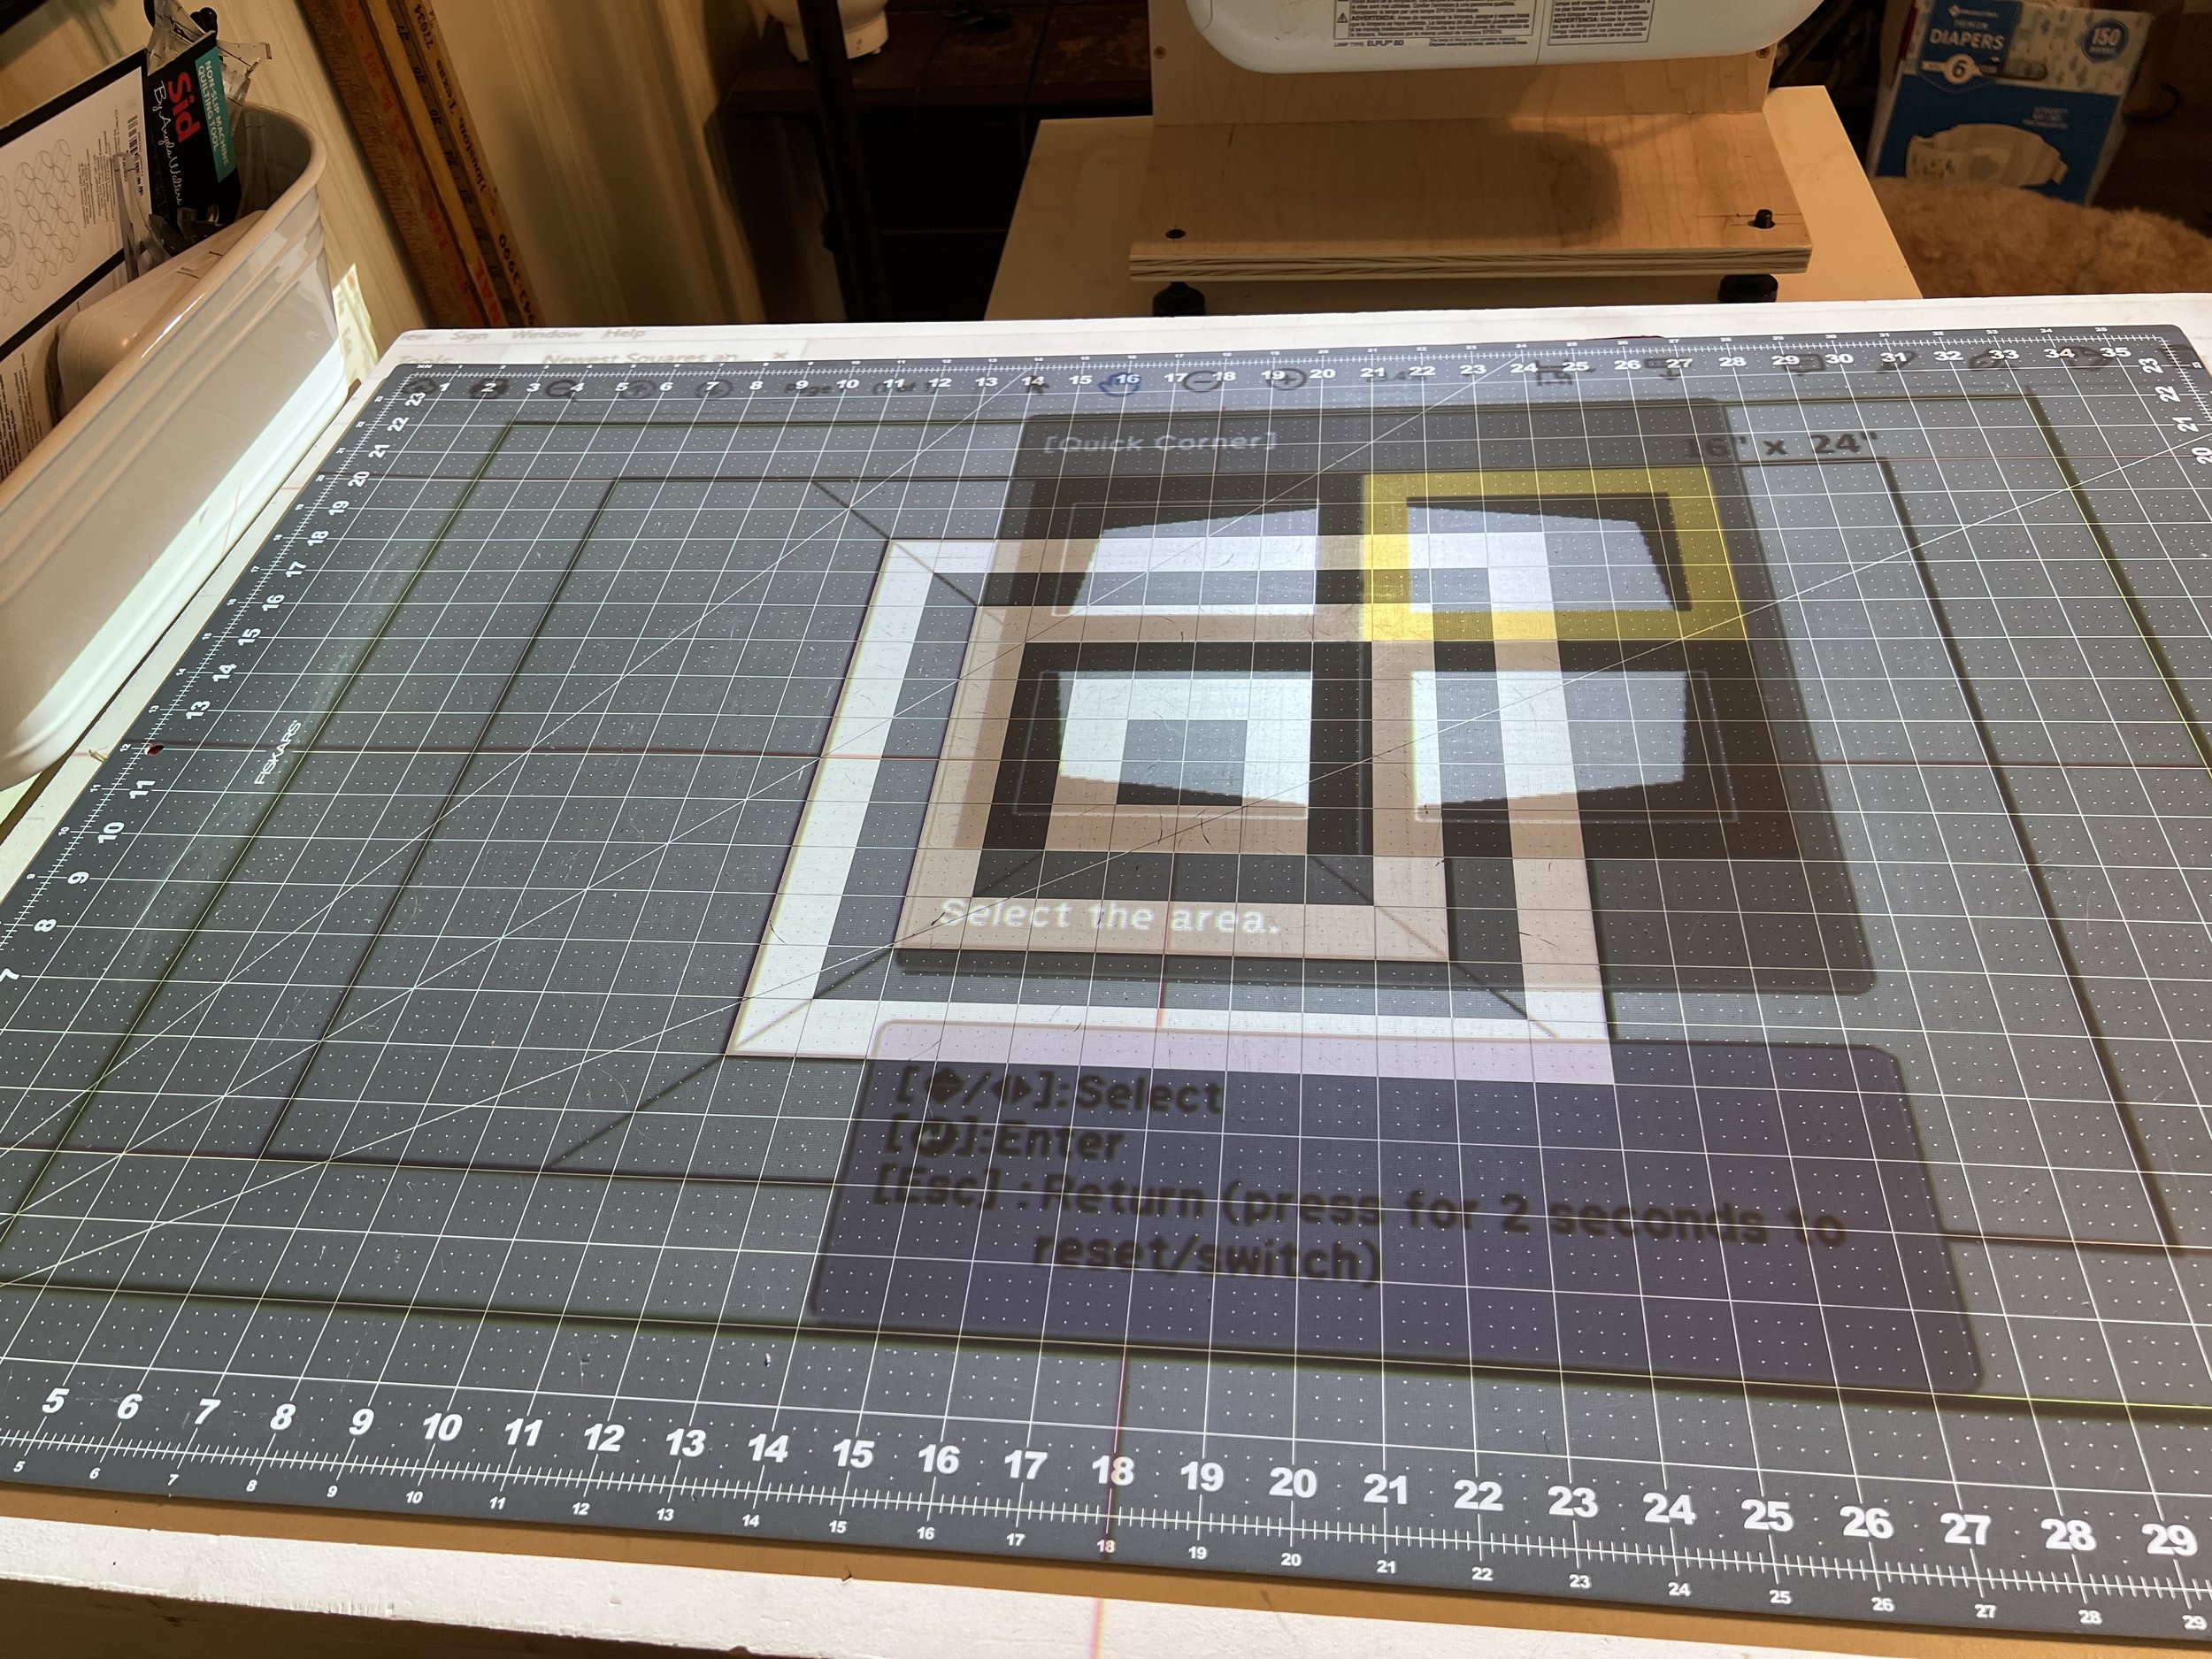
Do each corner
Continue until you’ve moved all the corners to be square and match your mat.

It’s OK if you don’t have to adjust every corner. In my example, I didn’t move the bottom left corner at all!
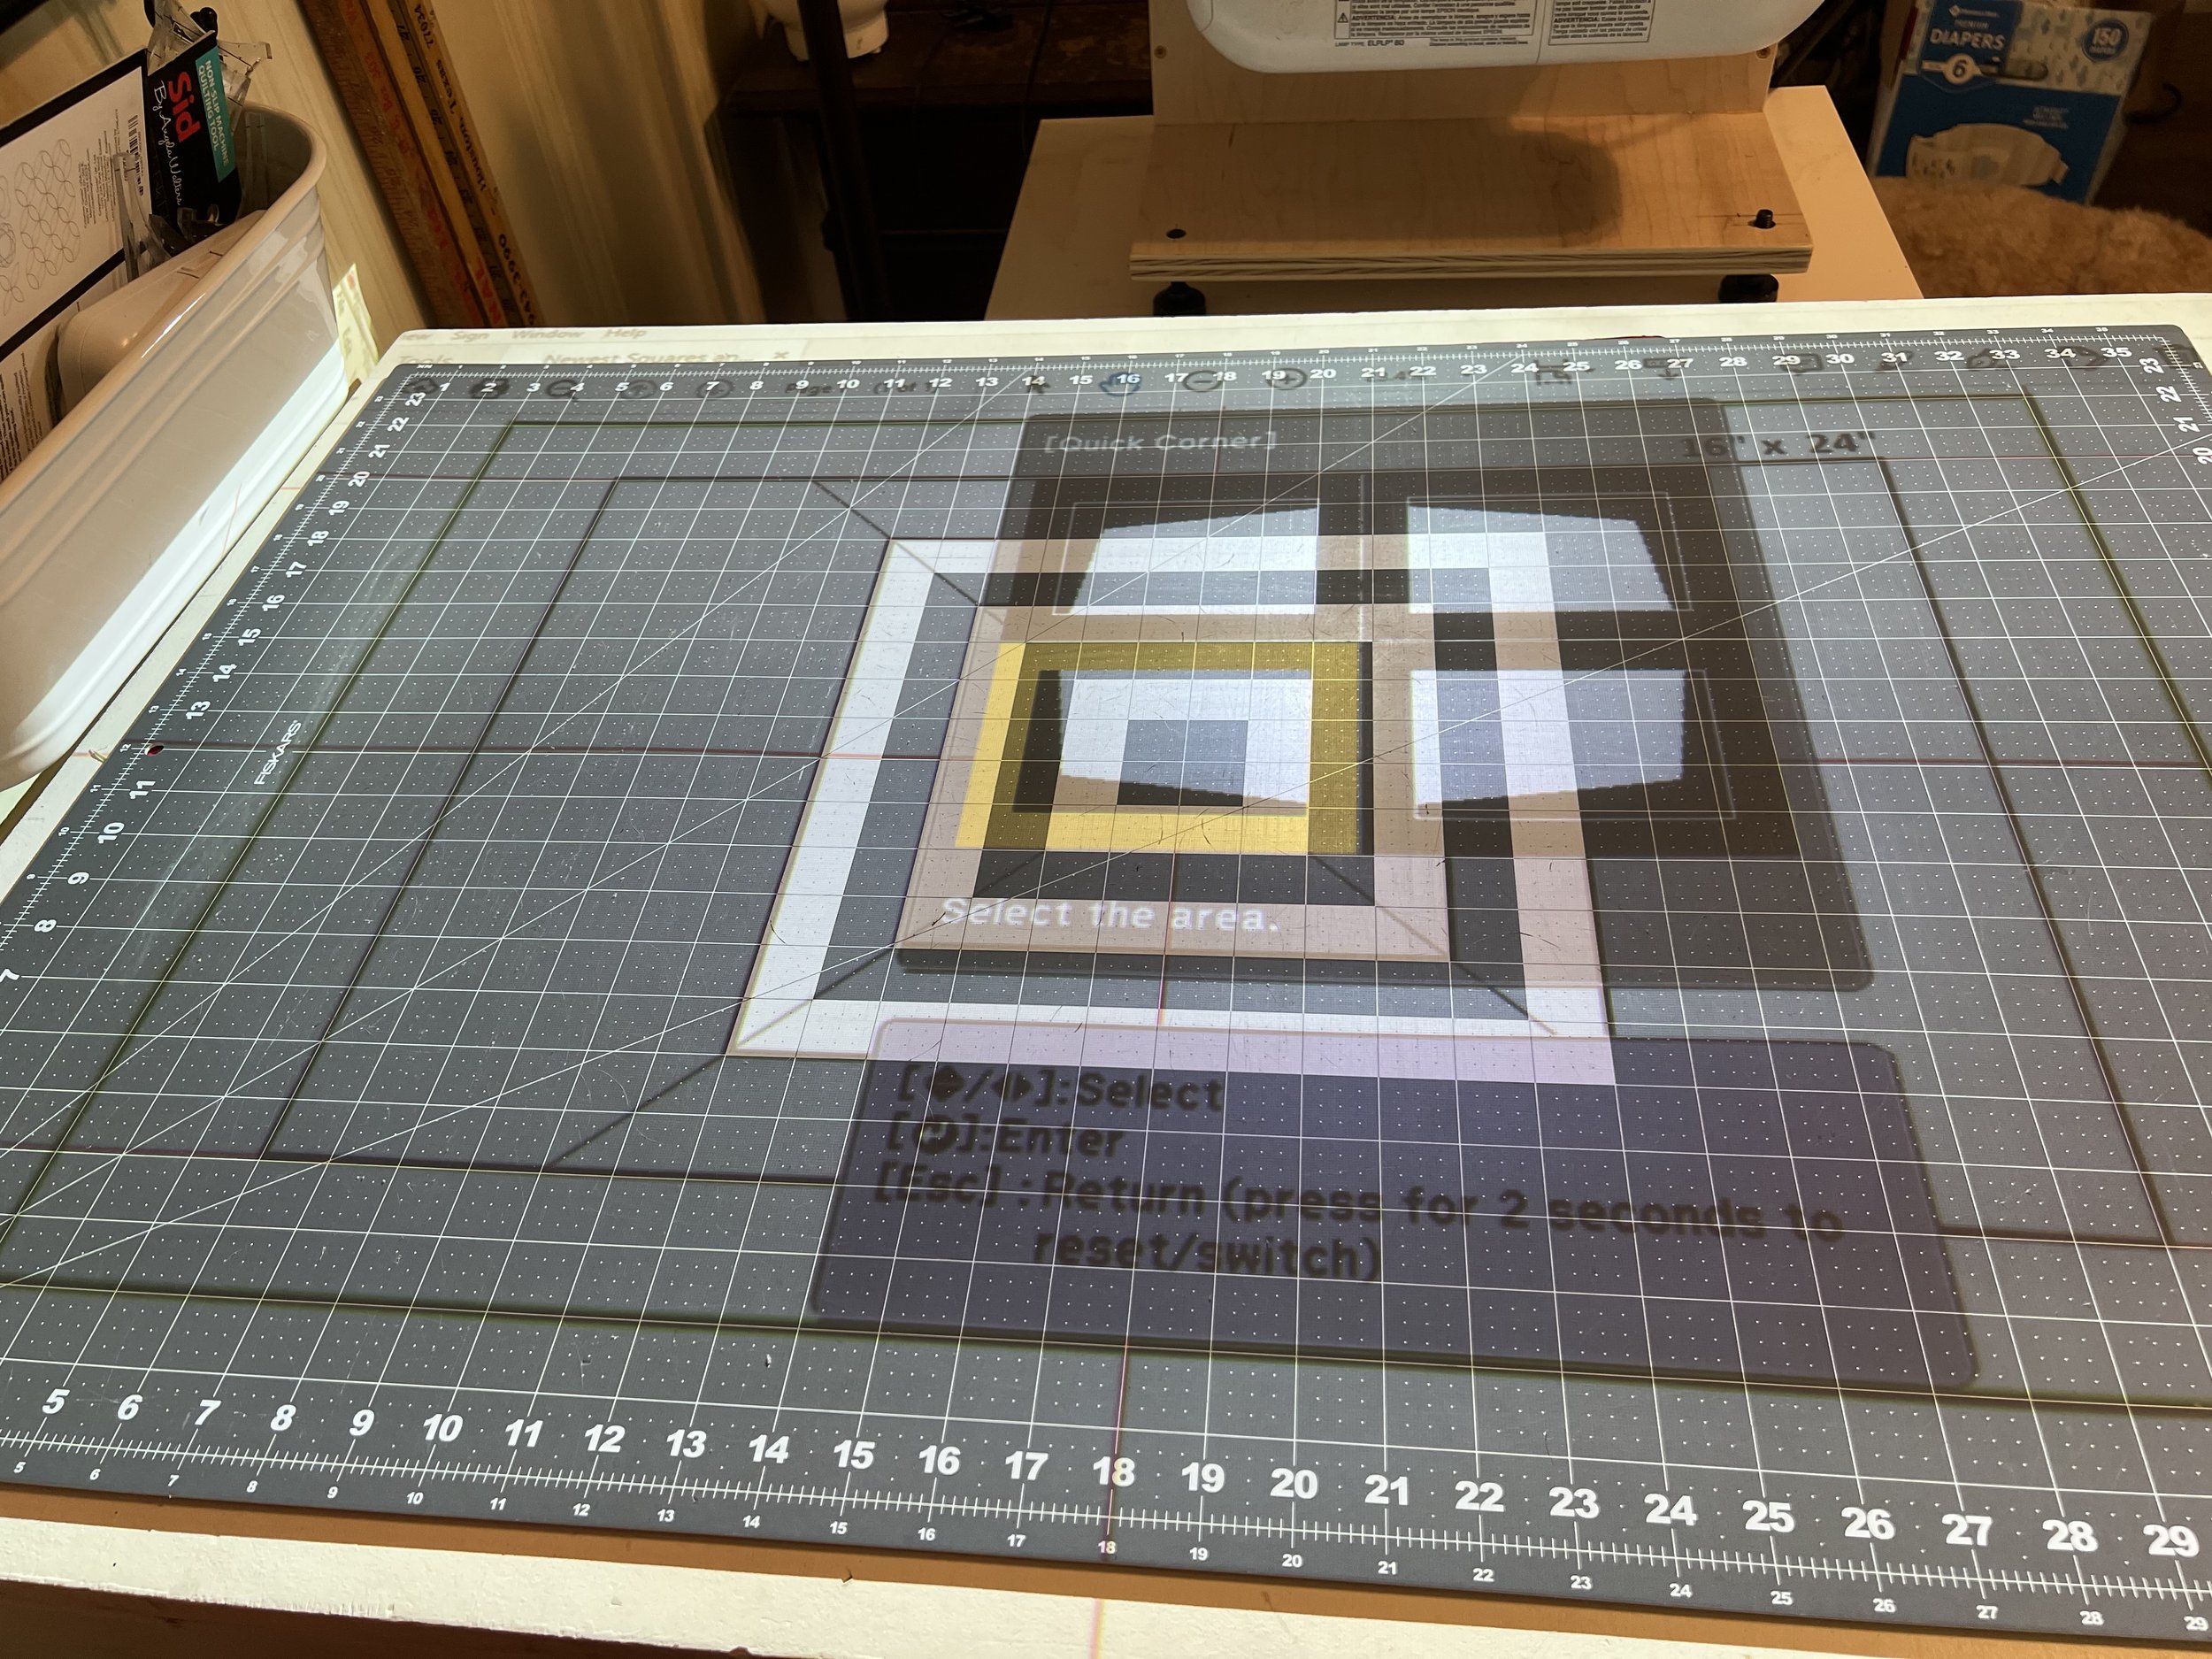
You can go back to each corner and adjust further if necessary. But once you’re done adjusting, Escape out of all the menus and you’ll be left with a beautifully calibrated image!
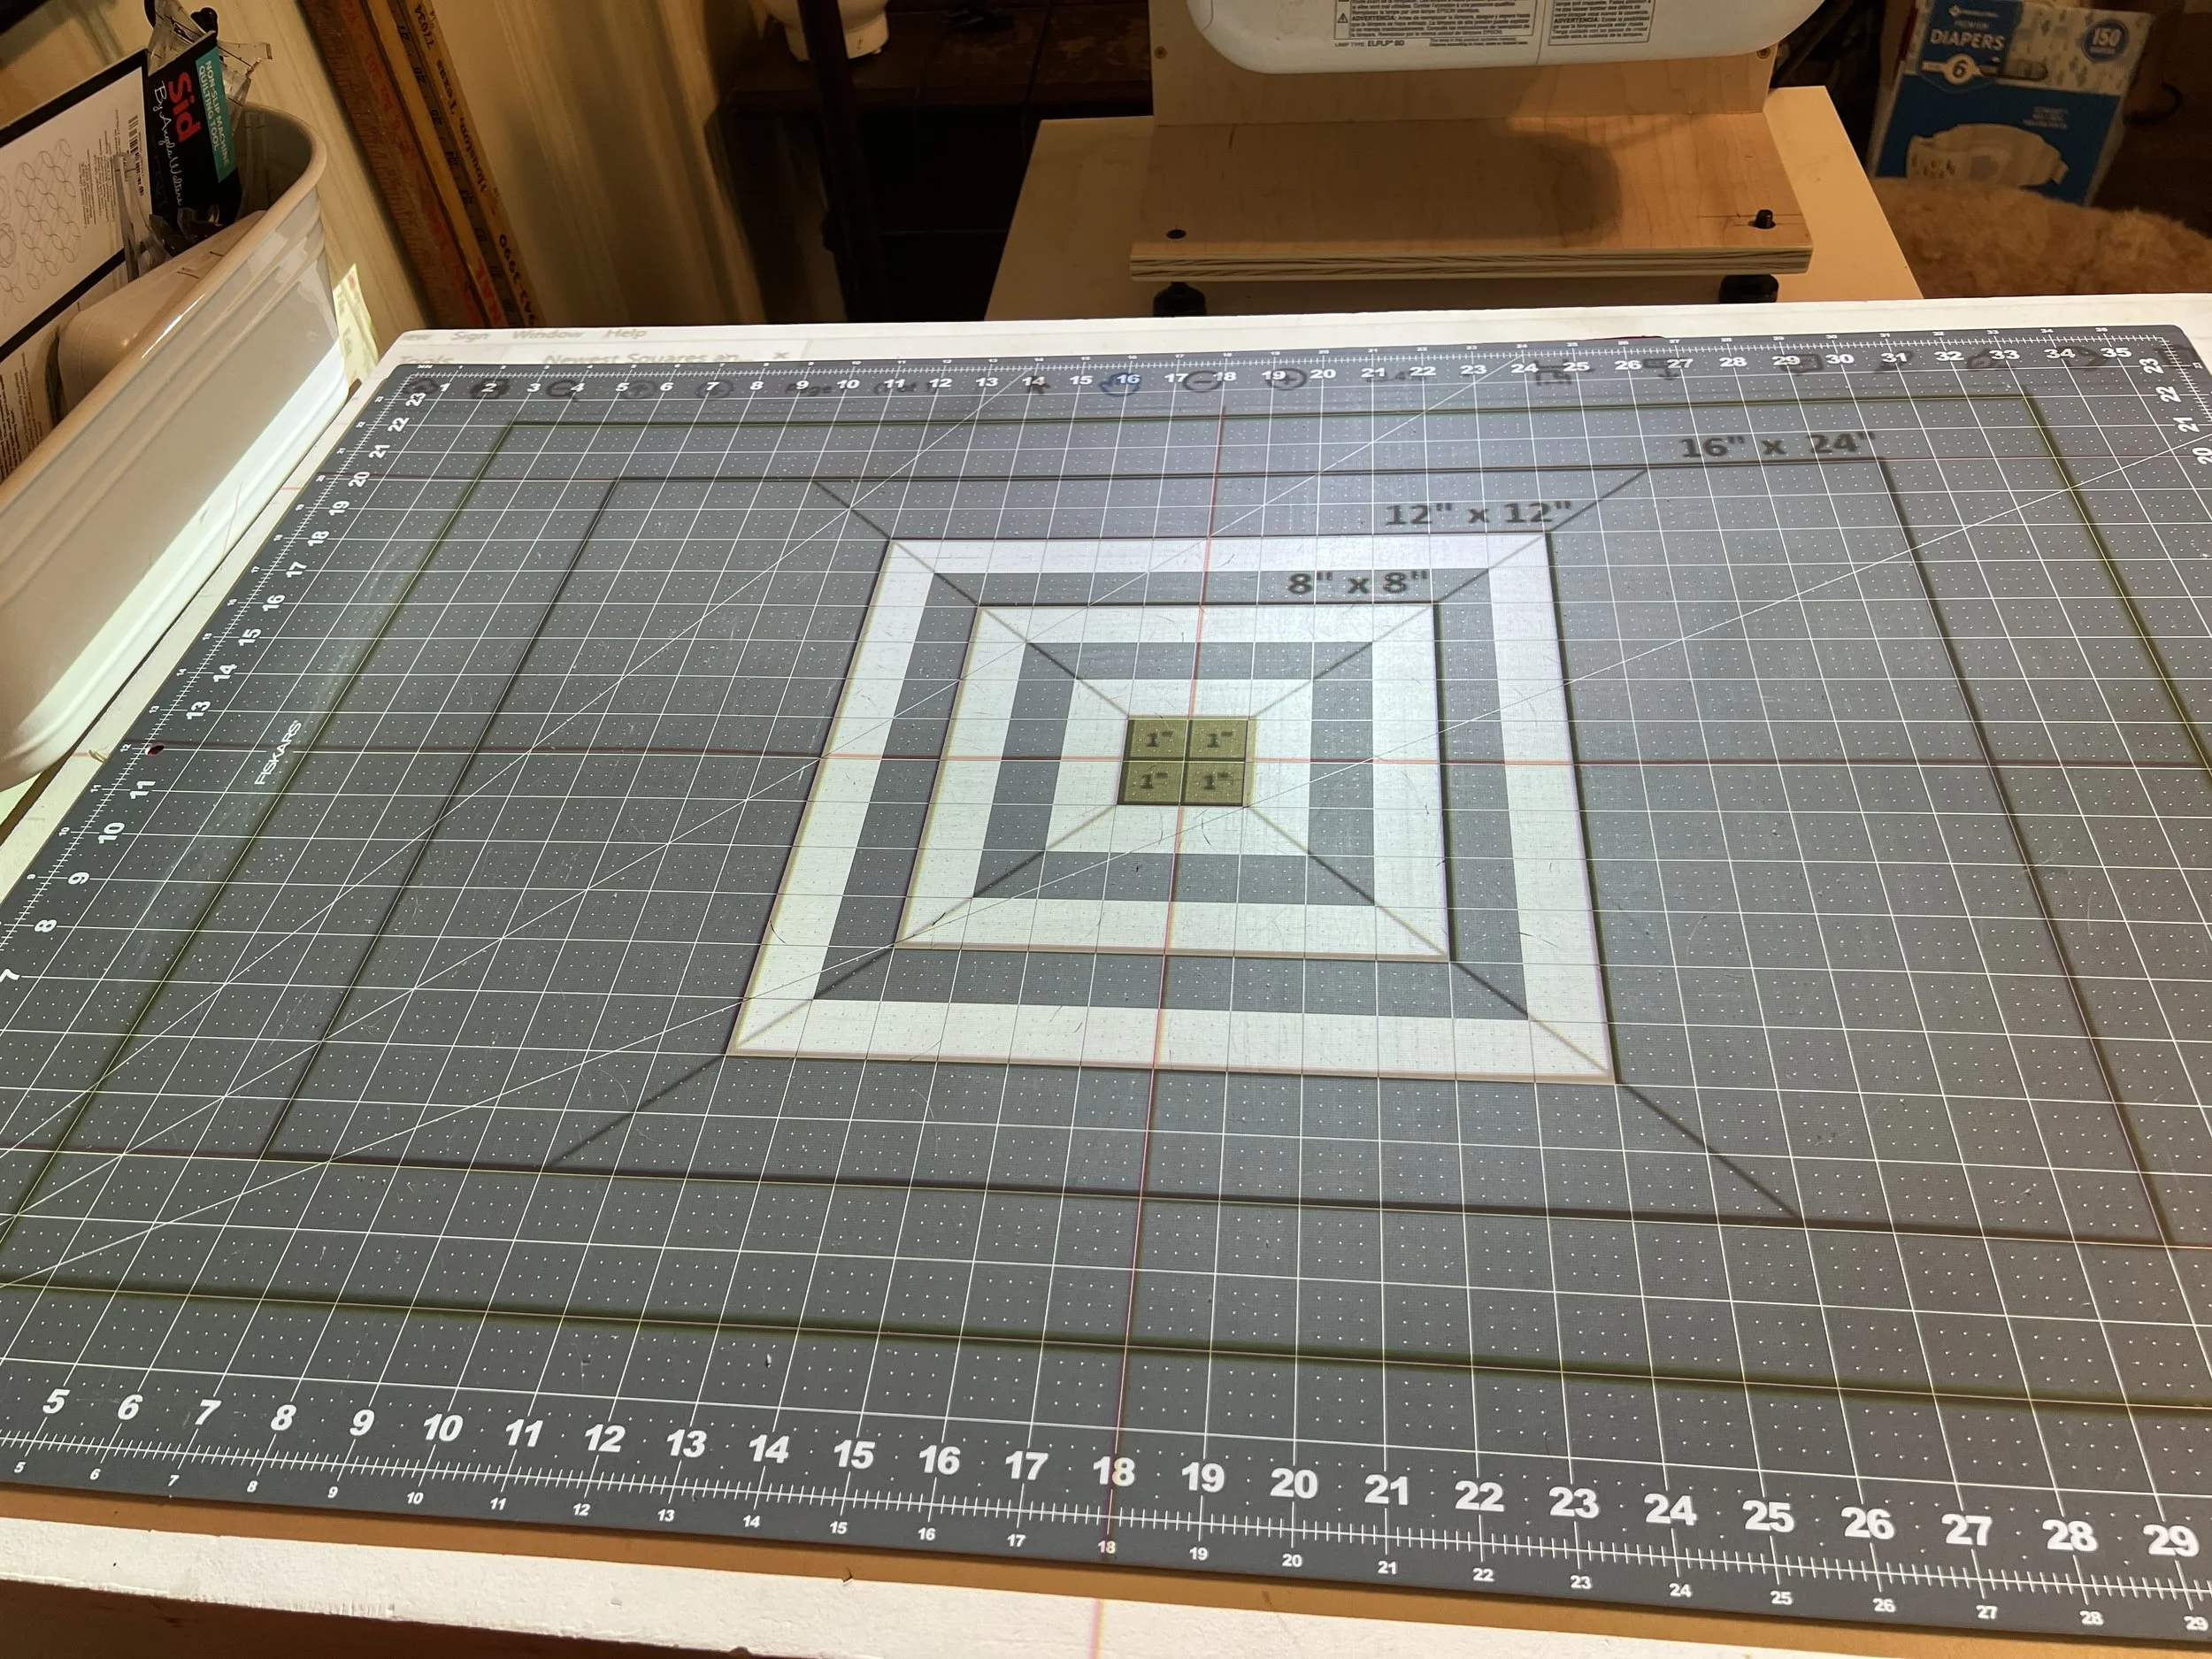
Ta-da!
Remember that the biggest way to set yourself up for success is a flat mat. If you’ve got wrinkles, press them down with your hand as best you can.
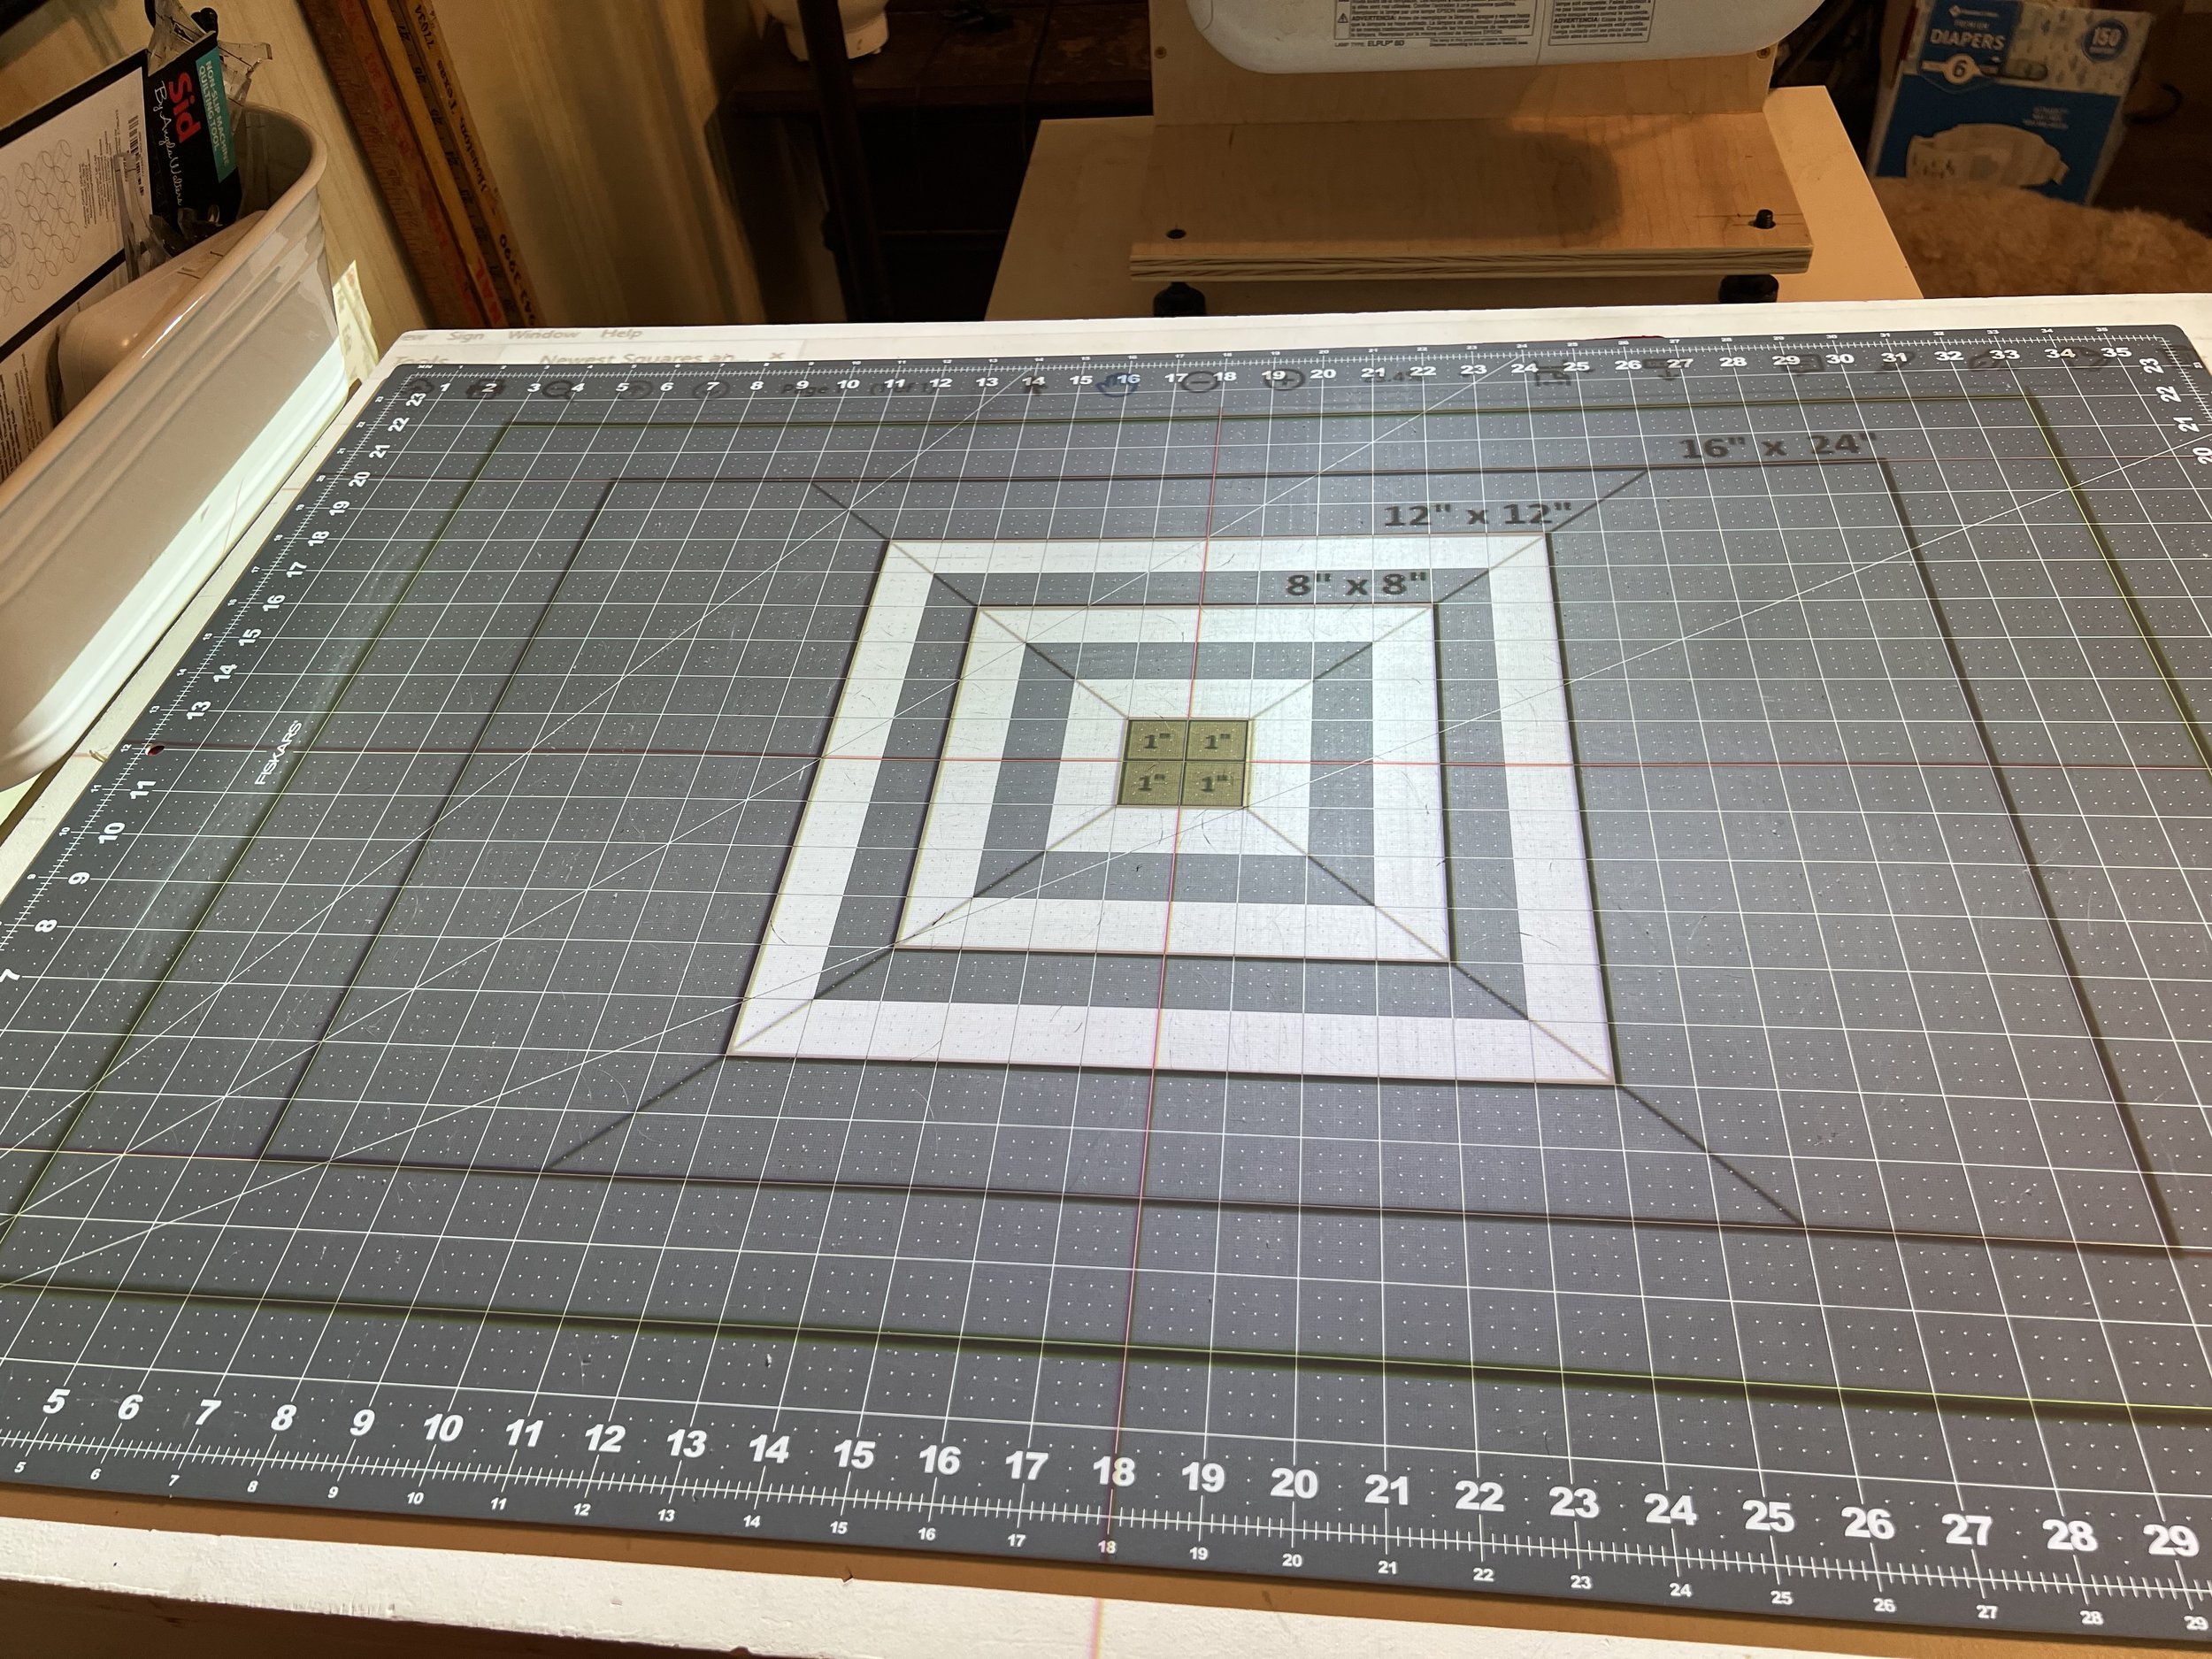
And don’t strive for perfection, 1/4” or less off your 16x24” box is 99% accurate and close enough for most sewing!
‘Till next time friends, happy pattern projecting!
Branalyn

Replacing the Bulb on a UST Projector
UST bulb going out? Scared of the prospect of changing it? No need to worry! I take you step by step through the easy process of replacing an Epson UST lamp!
***This post contains affiliate links. They cost you nothing extra but earn me a very small commission. Thank you for supporting me by using those links!***
Is your projector flickering? Or has it maybe lost some of it’s former brightness, clairty, or crispness? It may just be that the bulb is going out!
While this may sound like a scary prospect, when my Epson 595 UST began showing these symptoms, I jumped in and replaced the bulb, and brough y'all along for the ride. The good news it, it’s really not scary at all and was actually very easy to replace the bulb!
If you want to watch along as I change mine, you can find the video here:
If you prefer the written route, I’ll try to cover it all here.
The problem:
It all started with a little flickering that happened after my projector was on for a long time and just progressively got worse. So I decided I probably needed to replace the bulb when I felt a bit sea sick just trying to cut out a pattern! I posted on Instagram and got a great tip from a follower to clean out the air filter. I tried but it wasn’t very dirty to begin with and definitely did not help the flickering problem in the least.
Buying a replacement
So I went back to option 2 and ordered a replacement. In ordering, I came to realize that what I wanted to replace was the “lamp” or, in other words, the entire housing, and not actually the “bulb,” which is the actual light bulb and more involved to change.
I searched on both Amazon and eBay for a replacement lamp, using the brand name and model number of my projector (Epson 595 in my case) in the search along with “replacement lamp.” This netted me a few results, which I carefully looked through and compared both the way they looked, the compatible projectors listed, the price, and the shipping. I found what I thought was the best deal on eBay and purchased.
Once the bulb arrived, I took some time to look at it closely and see how it seemed to work. At this point, I still hadn’t opened up the projector and I wanted to be armed with the information about how it probaby went together. A few days later, I was able to film so I set up and started changing the bulb!
First, remove the old lamp
The first step was to remove the cover off the projector and then remove the old lamp. There was one screw in the cover on the projector and two holding in the lamp itself (below).

Close up of the screws you have to remove to remove the lamp.
It was relatively quick and easy to remove and I took a little time to compare the old and new lamp, noting they were very similar but the old one had a kind of patina on the bulb area.
Second, replace with the new one
Then, once I’d very gently cleaned out the lamp housing with a dry cloth, I inserted the new lamp and screwed it in with the same two screws.
The finishing touches
Next, I replaced the cover and tested it out. I immediately noticed the flickering was gone and, what’s more, it was crisper, clearer, brighter, and overall just better than it had been before! I reset the lamp hours so I’d have an accurate count and was ready to recalibrate a bit since I’d moved it out of position.
Conclusion
The entire process took maybe 45 mintues total-finding a new bulb, replacing it, testing, resetting, recalibrating. It was very simple to do and well worth it for how nice the projection looks now!
While I had things going, I actually recorded a couple more videos, so look for those coming soon!
‘Till next time friends,
Branalyn

15 Gift Ideas for Your Projector Sewist
Need a gift for the projector sewist in your life? I have 15 ideas here!

***Please note that many links in this post will be affiliate links. While they cost you nothing extra, they do provide a bit of income for me. Income that helps keep me making videos and writing posts, so thank you for supporting me in that way!
Looking for a gift idea for a projector sewist in your life? Looking for something to try yourself? I polled the Projectors for Sewing facebook group and added in some things I enjoy using, too.
If we are going barebones basics, clearly, you’ll need a projector. And a mount, with the exception of some UST set ups. You’ll need some sort of computing device and a way to connect it to your projector. And something to measure your calibration (probably but not necessarily a cutting mat). I’m adding to the list of essentials this quote from Sasha Sewist:
An open mind to learning and absorbing new information. A confidence that the learning curve will feel overwhelming at first, but with time and practice it will become easier.
Those things are hard to buy for someone else. There’s a lot of specifics that go into choosing a projector and mount. People generally use the computing device they already own. And an attitude cannot be gifted, however, joining with friends in Projectors for Sewing or the Dailey Sews & Stuff Friends group can be invaluable for help.
But don’t despair! I have plenty of good gift ideas to share!
So, in no particular order, and with many thanks to the commenters on my post:
Rotary Cutter
28mm Olfa 28mm Fiskars 28mm replacement blades 28mm blade sharpener
45mm safety Olfa 45mm Fiskars 45mm replacement blades 45mm blade sharpener
Cutting Mat
24x36” Fiskars 24x36” Olfa 12x12” Rotating Olfa 12x18” Olfa Metric Olfa
Quilting Ruler
OmniGrid 6x24” OmniGrid 1x6” OmniGrid 3x18” OmniGrid 4x36” InvisiGrip (the stuff whose name I couldn’t remember) Bonus find: Ruler Organizer
Low Profile Weights or Magnets
Marking Pens or Markers
Crayola Ultra Washable, Frixion Pens, Frixion Markers, Soapstone
Pins and/or clips
Wireless Mouse & Keyboard
Software
Cutting Space
Cutting table-find a kitchen table secondhand, or look for sturdy tables with folding legs but a fixed top
A way to organize your cuts
Baggies, join Cathleen’s group for printables, Post Its- regular, mini, full sticky, tape
Fabric Gift Cards
Pattern Gift Cards
Paper for tracing
Hemostats
Trackers for your often lost items…
Bonus:
Time to sew!

Amazon Projector & Basic Niche Mount
Need help setting up your Amazon (or mini) projector for sewing? I have tips, tricks, and how-tos for you inside!
Unboxing & Set Up
***Please note that many links in this post will be affiliate links. While they cost you nothing extra, they do provide a bit of income for me. Income that helps keep me making videos and writing posts, so thank you for supporting me in that way!
Today’s post/video is all about the “Amazon” projectors! Choosing them, mounting them, calibrating them, all the things.
Before we get into the nitty gritty, I need to say that I’m using a Windows 10 computer, the free version of Adobe Reader, a Turewell H3 projector, and a Basic Niche mount for this video. I will try to be as broad as possible in my instructions and phrasing, but any specifics will refer to these parameters.
Let’s jump in!
What is an “Amazon projector?”
We have three basic categories of projectors. These are not “projectors for sewing” terms as much as general projector terms. There are Ultra Short Throws (USTs), which, as you can guess from the name, need very little distance for throwing a good sized projection. For our purposes, these are generally placed with the lens less than 2 feet from the cutting surface. There are also Short Throw projectors (ST), which need more space than USTs but less than usual to create a decent sized projection. For our purposes, these usually need between 2 and 4 feet to give us a great sized projection. And then there are Long Throw projectors, sometimes called Regular Throw projectors. As implied, these need a larger distance from lens to cutting surface in order to get a good sized, focused image. These generally need to be at least 6 feet from the cutting surface, which generally puts them out of range for our purposes. Once you take into account the foot or so of distance from your ceiling to the lens, in a typical American home, you’d have to be cutting on the floor to get the kind of minimum projection size that might work for us. (Side note: Many people have used mirrors to give them more distance between lens and cutting surface with a lot of math but a lot of success!) But a Long Throw just isn’t really ideal for our purposes.
However, a subset of projectors kind of walks the line between Short Throw and Long Throw that do often work for our purposes! These have been termed several things in the Projectors for Sewing group but, personally, I’ve settled on calling them the “Amazon Projectors”. Since usually these projectors are bought from Amazon, the name has seemed most appropriate to me. These projectors do often need at least 5 feet from lens to cutting surface and they tend to be much smaller (hence the other most common term, “mini projectors”) so the distance between the ceiling and the lens is less. With 8 foot ceilings and less than a foot eaten up by the size of the projector, you may just get a low table in. You can also compromise with a taller table and smaller projection size. Or maybe cut on the floor. Or you may have a room with taller than average ceilings, giving you even more options.
Why might you want an Amazon projector?
Newness, Returnability, etc.
Ultra Short Throws and Short Throws are very expensive new so are typically bought used for our purposes. While most of us have had very good experiences buying used, and eBay and other places do have buyer protection policies in place, not everyone is comfortable buying a used electronic. Buying new, usually from Amazon, makes some people more comfortable with buying an electronic, because returning it is usually much simpler. In addition, someone not sure if projector sewing is right for them might really appreciate the no-questions return policy Amazon generally has. It’s also much easier to go on Amazon and buy something right this second than to watch eBay to find a good deal on a used projector.
Weight and Size
Because Amazon projectors are quite small and very lightweight, they lend themselves very well to portable set ups or mounting in unconventional ways and locations. See my previous post on The Trouble with Mounts for a few ideas about unconventional mounts. The group Projectors for sewing is absolutely invaluable on this topic!
Mount and Forget-ableness
If you’re not looking for a portable set up, mounting an Amazon projector to the ceiling can be a really great way to mount the projector and just forget about it. You don’t lose any ability to walk around your cutting table. It’s up out of the way and out of sight until you need it.
For that matter, we have a Projectors for sewing member who purpose-makes mounts for Amazon projectors! Basic Niche is a great, cost effective option for getting your Amazon projector mounted easily, correctly, and without having to force a mount to work in a way it’s just not designed to work.
Wireless connections
While we can add devices to Short and Ultra Short Throws, some Amazon projectors come ready to connect wirelessly to your computer, phone, or tablet. If you’re working from a mobile device, this may be the easiest connection for you.
It can’t all be good…
You’re right. There are some absolute cons when it comes to Amazon projectors.
If sustainability is important to you, you’re buying a new product that won’t biodegrade well when you could be giving new life to an old projector.
Connecting wirelessly can reduce the size of your projection.
Often, Amazon projectors do not have the lumens to work well in bright environments.
You canNOT just buy any old projector on Amazon. You have to buy one with the proper resolution, which can be difficult information to find. The group Projectors for sewing is, once again, invaluable for listing known working and not working models.
You must mount these, unlike USTs. Mounting them will mean dealing with cords from your ceiling or wall.
These are often off-brand or no-name companies that do not have support after you purchase. Manuals as well as replacement parts are difficult to impossible to find online.
What about cost?
The costs are pretty much a wash, in my opinion.
You can find Amazon projectors from $50ish up to $150ish. Mounts range from $10 up to $50.
Short Throws used on eBay can be found for as little as $50 but are often closer to $100. They require mounts that can range from $15 on up. Watch carefully for shipping costs.
Ultra Short Throws generally cost at least $75 and don’t necessarily need a mount. Watch for shipping costs.
Amazon projectors aren’t necessarily the cheapest, but they certainly can be. The used market for STs and USTs can be unpredictable and costs have seemed to rise since projector sewing became more popular. However, there are still good deals to be had if you decide one of the STs or USTs is the right projector for you.
I’ve decided to go for an Amazon projector…now what?
Check the group Projectors for sewing to figure out exactly which one to buy. There are a couple posts saved in the announcements to check out that will help you buy one of the ones we know works well. Add that one to your cart.
Determine how you’ll connect to your computer or mobile device.
If you’re choosing a corded connection, determine what cord you’ll need. Buy one of an appropriate length to reach from projector to computer (often one comes in the package but it’s often too short, 10 foot, 15 foot, 25 foot). Make sure both the projector and computer can use that cord. If not, buy whatever converter you may need if you’re changing from one port to another. The most likely cord will be HDMI. Your computer should have that or a VGA (HDMI to VGA converter). Your mobile device may have a converter (lightning port, USB C) available.
If you’re choosing a wireless connection and the projector comes wifi ready, you’re all set! If you’re choosing wireless and need to purchase something like a Chromecast, add that to your cart as well.
Choose a mount and buy that, too, if necessary. I won’t list all of the possible options here but I’ll link again to the Basic Niche mounts because these are hands down the best choice if you’re mounting to the ceiling. For temporary set ups or the more creative ones, more power to you! But I can’t list every possible combination of what you may need. This is where the Projectors for sewing group or my own group Dailey Sews & Stuff Friends can really help you out!
Start looking through the calibration information found in Sasha’s guide here and definitely download the calibration grid she made (Imperial, Metric).
Open your stuff as soon as it comes and get to testing and calibrating!
Step 1: Open the box!
Don’t wait around forever with the projector staring at you, mocking you from it’s box. Open it up and test it out, even if you can’t mount it right away. You’ll want to make sure everything is working as it should, you’ve got all your connections correct, and you don’t need to buy anything else.
Step 2: Make sure it works
Point it at a cleared wall space, connect to the power, and turn it on! Make sure everything is working, get familiar with the projector, and play around with the settings. Don’t forget to reset everything once you’re done playing around!
Step 3: Connect to your computer
First, make sure all your connections are functioning. You can really just projector your desktop screen if you’d like but it may be super helpful to project the calibration grid at this point. I can’t specify exactly how to do this because it will depend on the connection you choose.
Step 4: Determine your offset and throw distance
This is also the time to see where the projection actually comes out of the lens. I’m stealing my own graphic from the Short Throw post here but this explains the basic concept of “offset.” Most Amazon projectors have little to no offset but you’ll want to be sure before mounting!

Since most often with an Amazon projector you’re planning to mount it “as high as possible,” place your projector the same distance from your wall that it will be from your cutting table when mounted. See how big a projection is possible and make sure you’re OK with that before you get to mounting. If it’s too small, see if you can find a solution such as a mirror set up, cutting on a lower table or the floor, coming to terms with fabric shifting, or maybe deciding to return and go with another projector. In some cases, you may be able to add some height to your throw (some have gone so far as to cut a hole in their ceiling to mount higher!
If you’re someone with vaulted ceilings or some other very tall ceiling, you may use this step instead to figure out exactly how far up you’ll need to mount your projector. Here’s another graphic stolen from the Short Throw post:
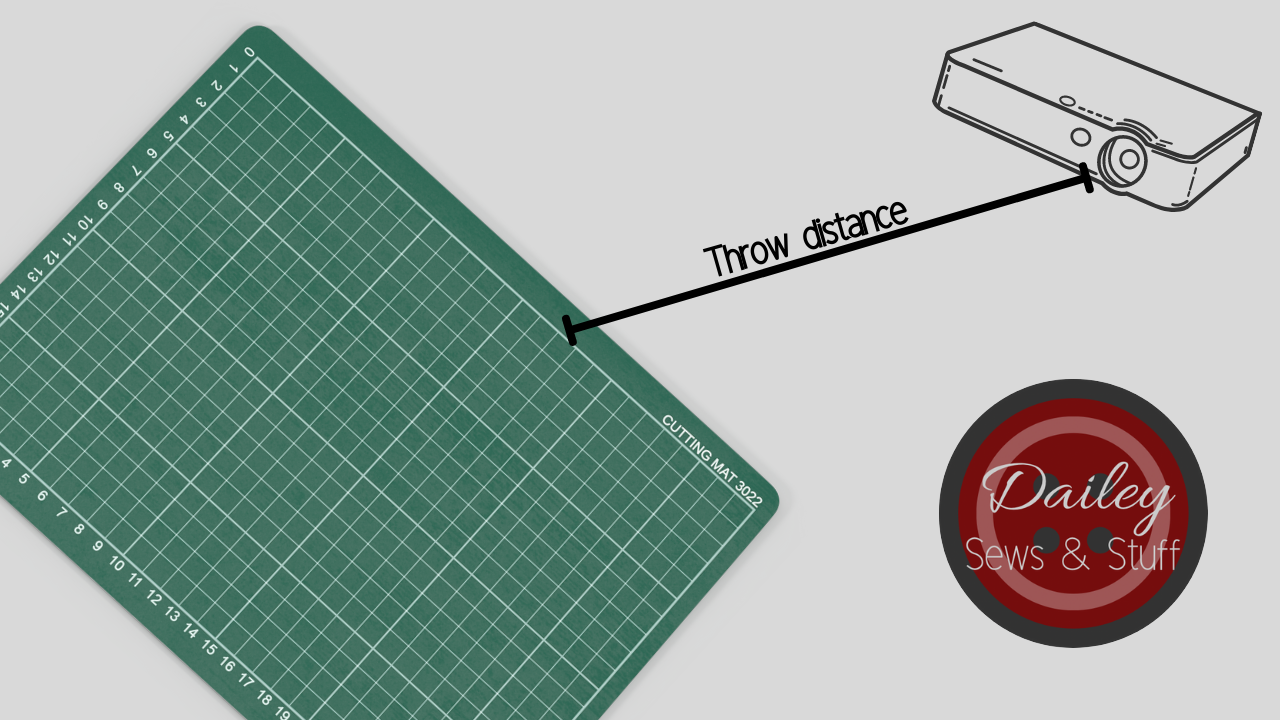
Step 5: Mount the projector
In order to make the next step easy, make sure your projector is pointed straight down at your mat when your mount it. It should be completely perpendicular to the mat. Any tilting here is likely to cause the calibration step to be more difficult than it has to be.
For this step, using the offset and throw distance information, figure out exactly where you’ll mount it. Since these projectors are fairly light, my suggestion is to attach it to the mount, hold it up to your ceiling, figure out exactly where you want it mounted, and mark the ceiling with a pencil.
Then remove the projector from the mount and secure the mount to the ceiling (see this post about secure mounting).
Reattach the projector, connect to power and your computer, and project your calibration grid! (This is found in Sasha’s guide here , Imperial grid, and Metric.)
The video features my using the Basic Niche mount and I really cannot recommend it enough. Most mounts we have used are just being made to work in a way they aren’t designed to work. Projector mounts are not made to project vertically down. That’s why a mount purpose built for projector sewing is so awesome!
Step 6: Calibrate
Everyone is terrified of this stage but you’re most likely making it to be way worse than it actually will be!
Before we even begin to mess with the computer, let’s make sure we’re set up for success. Is your mat totally flat? Is it level? Is the projector completely perpendicular to the mat? If you said “no” to any of these, take the time now to adjust those things. If all three are a “yes,” this step will be easy!
You’ll need the calibration grid (Imperial, Metric) to do this step. You may also want to look at Dan Oen’s graphic here about keystones so you can understand the relationship between the projector position and what the projected image will look like.

It can also help to have your projection Full Screen. First, follow these steps in this Quick Tip video to get your settings correct. Then, use Control L to make Adobe full screen.
The Goal
The ultimate goal of calibration is to have a square image (meaning the corners are 90 degrees) and to have the 16x25” box be within 1/4” all the way around. I go into calibration goals more in depth here.
The graphic above really shows the importance of a square image. And if the 16x24” box is within 1/4” all the way around, you’ll also have a correctly sized image.
So, connect to your computer, open the calibration grid (Imperial, Metric), and let’s tackle this step!
Part A: Keystones
Begin by putting your zoom at about 33% (use Control+Y if in full screen). This isn’t likely to be your final zoom, but it’s a good place to start. Compare the image on your mat to the keystone graphic above. Looking at the biggest box you can see in your projected image, does it look like the center image or one of the outer images?
If it looks like the center image, yay! Move on to the zoom.
If it looks like an outer image, adjust your mount to get your image square. The Basic Niche mounts come with leveling screws that allow you to minutely adjust each corner of your projector to get it square. Turn the screw tighter to raise the corner and make the image in that corresponding corner bigger or loosen it to lower the corner and make the corresponding corner smaller.
Part B: Zoom
Now, if you’re in full screen, use Control+Y to open the zoom window. adjust the zoom percentage up or down until the 1” boxes are fairly close to correct.
Then ignore all of the small boxes and look at the 16x24” box. Begin adjusting up or down until this box is as close to perfect as possible. You can use decimals to adjust by tenths (33.7 for instance) to get a more exact zoom fit. Once your 16x24” box is as perfect as you can get, then you can look at the smaller boxes. Like magic, they all should be lined up, too!
If you’re noticing any keystones at this point, go back and repeat the keystone steps and then the zoom steps until you’re confident your calibration is close enough to use!
Step 7: Test it out
Last but certainly not least, let’s try this new toy out! Load a projector file pattern and start cutting! Louise at Rag Rascal is a new doll designer with excellent projector patterns if you’re looking for a project to try! Her FREE mermaid doll, Shelley, is soon to be released as of this writing and I really enjoyed making them for my girls!
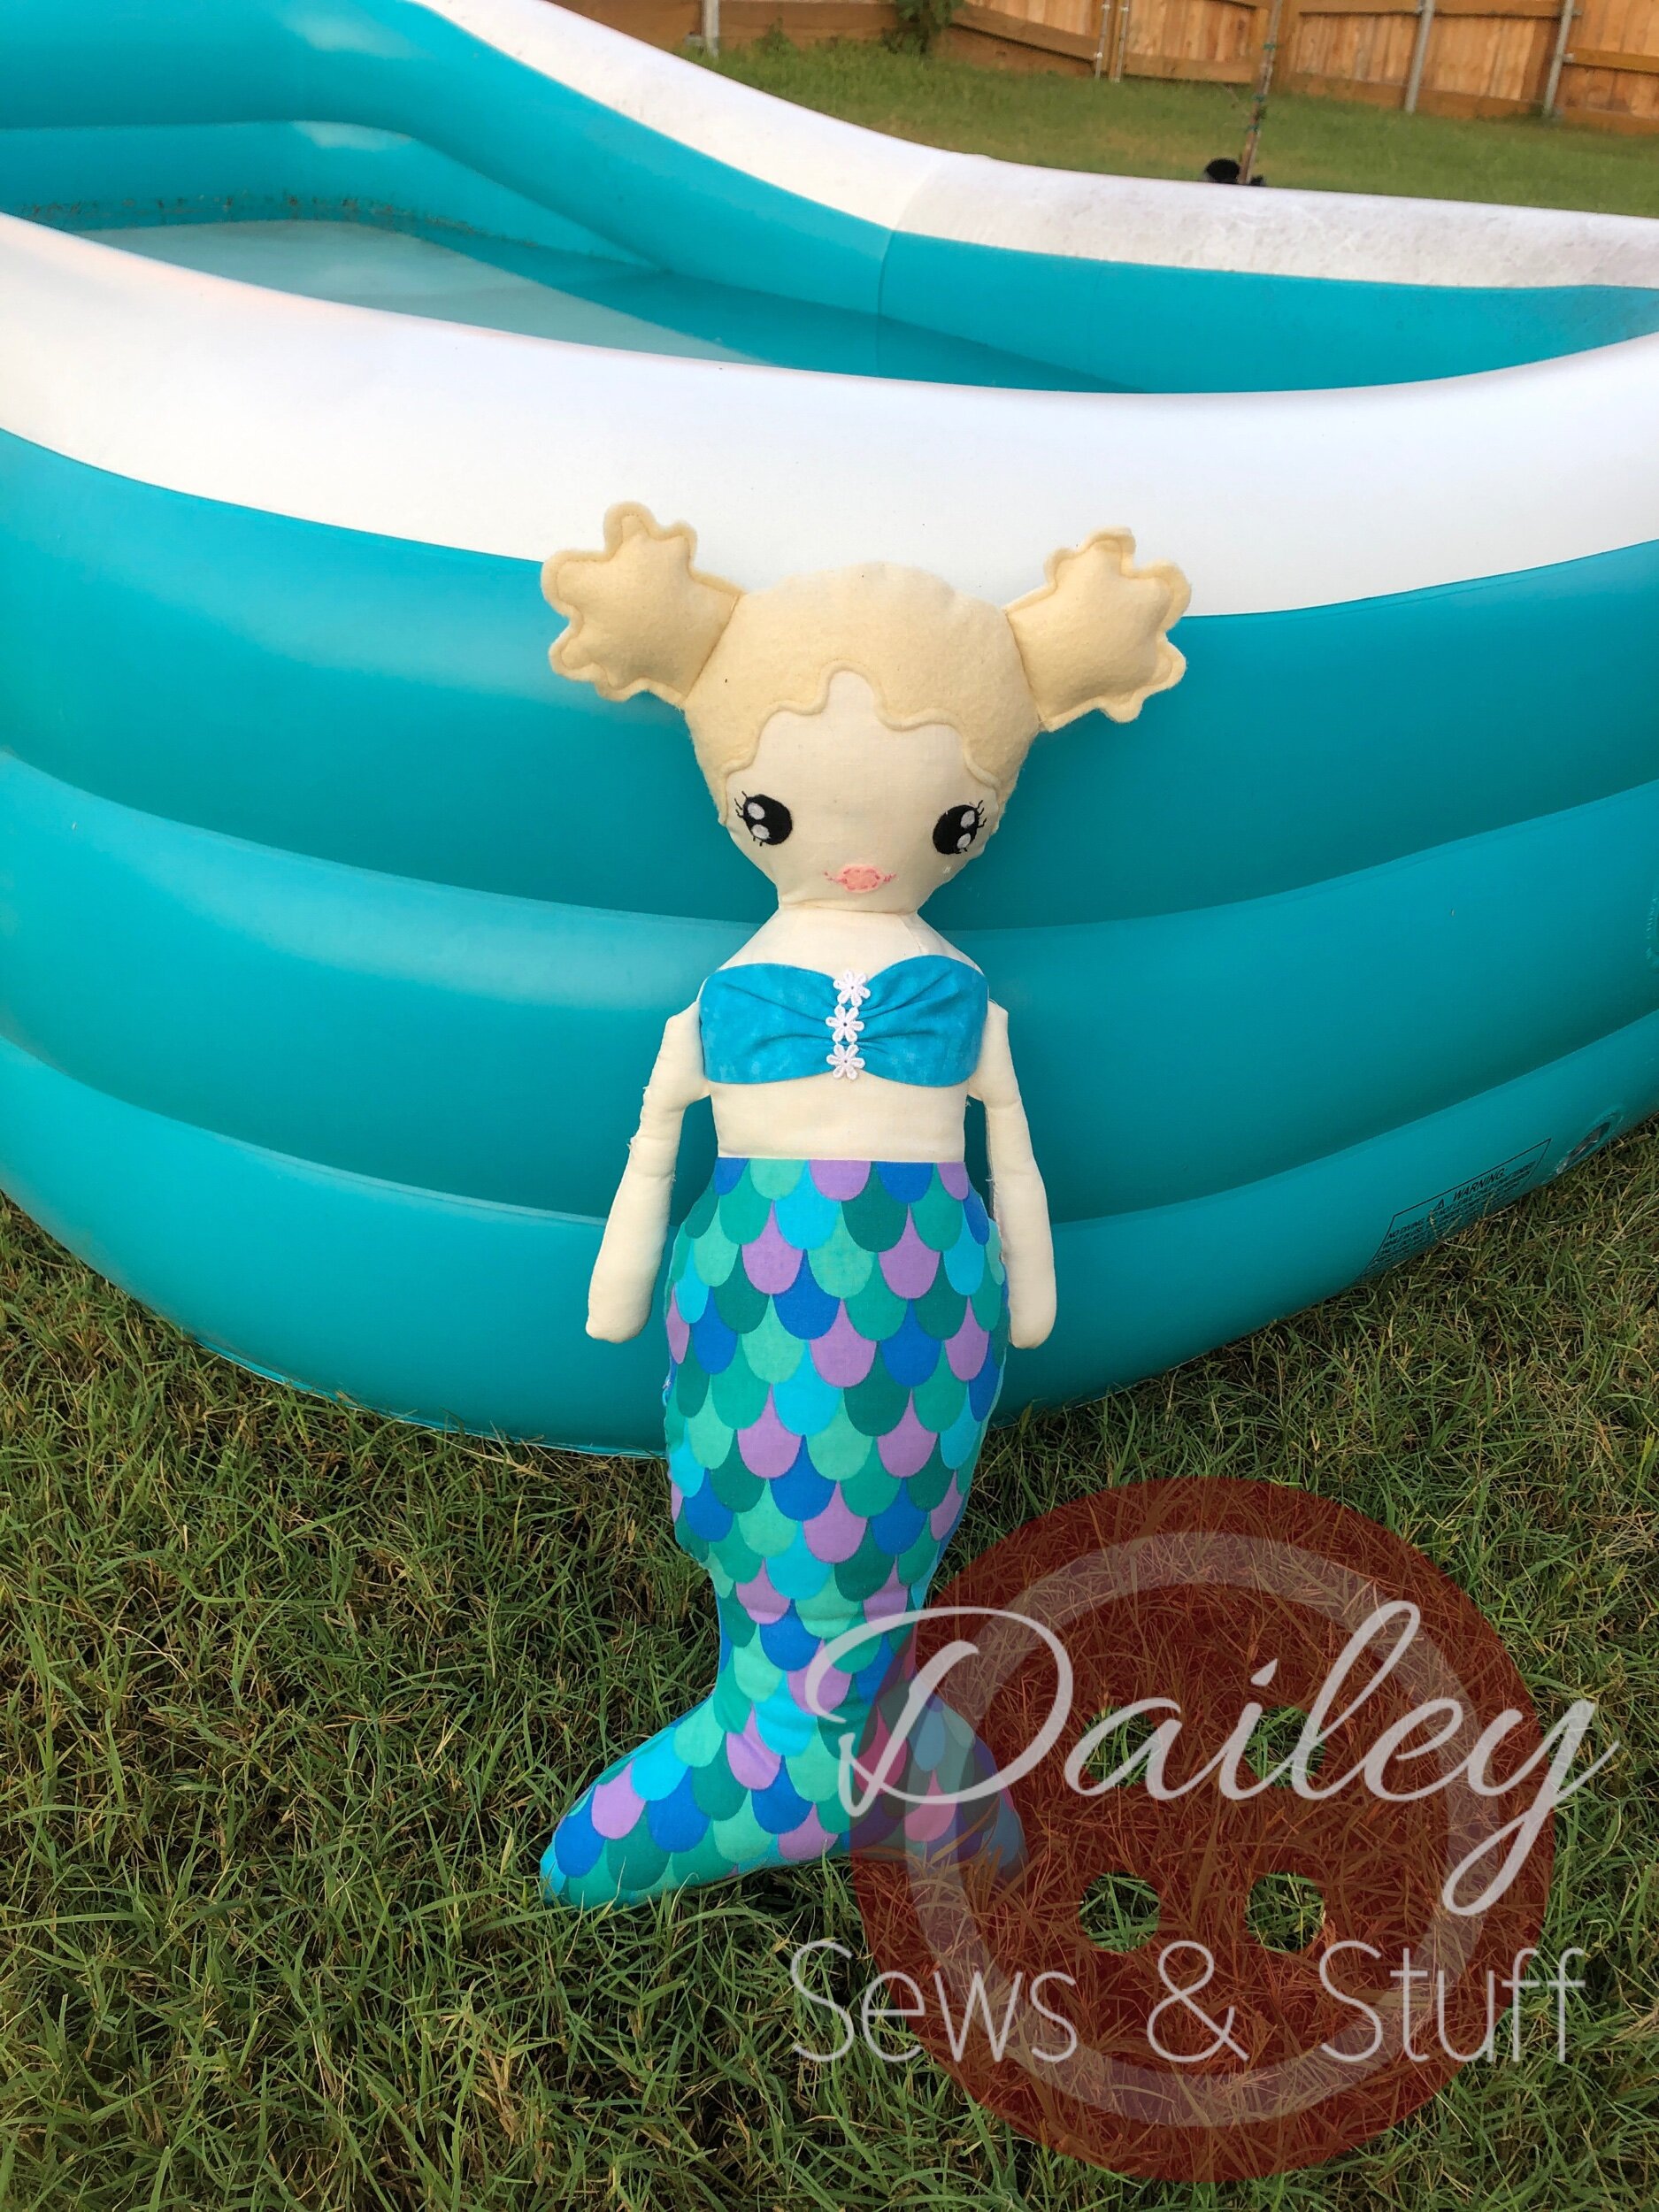

Step 8: Learn more!
First, be sure you’ve joined the projectors for sewing group (want to see how it all began? Watch this!)
Wanting assurance that your calibration is good enough to use? Watch this video.
Want to learn how to use Adobe most effectively for projecting? Check out this playlist.
Want to know how to use PDF Stitcher to make your Letter or A4 patterns into a projector file? Or to enhance your A0 or projector files even more? Check out this playlist.
Want to digitally alter your patterns before cutting? Try this one.
Want some quick tips that will make projecting that much easier? Try this playlist.
New videos are being added to my channel so be sure to subscribe here.
You can also follow me on IG or Facebook and join my Facebook group!
How (and why) to find a stud
Post contains affiliate links. Thank you for supporting my blog/channel in this way without spending any extra money!
***Insert Dad joke about stud finders here***
First, let me explain. The best laid plans and all. Today should’ve been the Amazon projector/Basic Niche video. But as I’ve said many times, a flat surface is the most important step for a well calibrated projector. And, well, 4 year olds.
Mine found my Easy Press sitting out on my floor (in the room she's not supposed to be in). Plugged it in (because I had very intentionally left it unplugged) and "helped" press her in-progress dress sitting on my cutting table, thereby heating my mat up and causing it’s sudden demise. She didn't burn herself, scorch the dress, burn down the house, or any such doomful thing.
But RIP mat.
And old, spare mat stored underneath.
And, also, now I cannot record an Amazon/Basic Niche calibration video until my new one arrives.
See 16 second video below for a visual demonstration of her, errr, helpfulness.
So, I decided to tackle another video in my queue instead: what’s a stud, where is it, how do I find it, and why should I care? I filmed in my husband’s woodshop, which is in various stages of completion, so you could see what I was talking about.
With very few exceptions, homes are built with a frame of studs (for walls) and ceiling joists (for ceilings) as the sort of skeleton of the house and then those are covered by sheets of finishing material. (I mean, this isn’t universal. My uncle built an awesome house from hay bales and adobe!) Inside most modern (and relatively modern) homes, the interior walls and ceilings are covered with drywall. Drywall is made from gypsum (in fact, it is also called “gypsum board,” more info here and here if you care to read further). While it has several properties that make it ideal for this purpose (soundproofing, fireproofing, etc.), it doesn’t hold much weight as it is very crumbly. It’s basically two pieces of paper with soft, crumbly gypsum pressed between them.

Here’s a picture from when we cut a huge hole in our house to make windows into doors. The drywall is the most interior layer, on the far left. You can see how, near the top, the paper tore and the insides just crumbled.

A top down look at a cross section that was removed from our wall. The exterior is by my foot, the stud in the center, and the interior on the right. In most homes, that would be drywall. (And, yes, that’s the electrical wire that got cut by accident, rendering half the plugs in my craftroom useless…)
If you put more weight on the drywall than the paper outside can hold up, the paper tears, the gypsum inside crumbles, and gravity takes over to some fairly disastrous effects. Then you’ve got a mess to clean up, a broken thing to replace, and drywall to repair.
So how can we make sure it’s not our projectors that end up broken on the floor?
You’ve got a few different options.
First, you may not have drywall at all. In my old craftroom as well as my current one, there is wood paneling on the wall. It’s actual, solid wood paneling, not the flimsy 70s pressed board paneling you may be thinking of. The wood is solid enough to hold nails and screws securely, so I don’t have to worry about where studs (or even ceiling joists in the current room) are positioned. I’ll just have to use wood filler to fill in any holes I make and paint to blend it in if I take things down later.
Maybe you’ve conveniently bought a house that is old enough and well-built enough that the walls are shiplapped and someone came through and drywalled over the top. The rest of our house is like that. In the picture above, the drywall is the far left, most interior layer, but just behind it, one layer to the right is shiplap. As long as the nail or screw goes through into that second layer, I can hang anything anywhere I want!
But, if your home is typically drywalled, the drywall is screwed to the studs/ceiling joists with just a void between studs. If the thing you are hanging is light enough, say an “Amazon” projector, you can use drywall anchors. There are many types with different uses and functions but the basic idea of all of them is that they displace the weight of what you’ve hung over a large area on the back of the drywall rather than just in the hole you’ve made with the screw. In the video, I had my husband show several drywall anchors and the ones he prefers.
If you’re hanging something heavy, more like a Short Throw projector, you’ll need to make sure that at least one, if not two, of your screws go into a stud or ceiling joist. Even with an “Amazon” projector, this is the more secure way to hang it. The rest of your screws may have to be secured in anchors as described above.
The final choice is to secure a board to a stud and then you can secure your mount to that board. Below, you can see how my dad did that in the rental we lived in. It did have the 70s pressed board paneling that couldn’t hold any weight.

Boards screwed into the stud

Mount screwed into the boards
In either of the last two options, your first step will be to locate a stud. Again, you’ve got some options here. The most common option is to use a stud finder. And this is my favorite choice (besides giving the job completely to someone else, but I digress). These can vary greatly in usability, accuracy, and, of course, price. My husband’s favorite is this one but it’s pricey. You can find a huge variety of features and price points, though. Definitely read reviews. They’re pretty easy to use and will come with instructions. We demonstrate the one my husband likes in the video.
Another option is to use math and laws of probability. My dad likes to use this method. I do not. But the basic idea is that, since studs are typically on 16” centers (meaning it should be 16 inches from the center of one stud to the next), you find where one stud is by using the end of the wall/a door/a window and measure/count/do math from there. Not all studs are actually on 16” centers (some are 24”, some are just anarchy), they might have used the other corner of the room to begin their pattern rather than the one you chose, I mean, there’s just a lot that can go wrong in my opinion.
Then there’s the “dowsing rod” methods. I’m not knocking (insert rim shot here) these methods but I definitely don’t have the patience or time to use them accurately. However, you can (theoretically) hear the difference when knocking on the drywall covering the void and the drywall covering the solid stud. It make sense to me that this is a thing but I have never been able to do it. People also have success using magnets to locate the screw heads that attach the drywall to the studs. Again, I understand why this is possible but I have not been entirely successful doing it.
And finally, if you don’t mind patching holes, you can just start hammering a nail into your drywall. It’s fairly obvious when the nail just goes easily through drywall and when you have to give it some force to hammer it into the stud.
Usually, the guys in my life who actually know what they’re doing combine the math/probability method with the knocking on the drywall method and then test it by driving a nail in. They’re rarely wrong but also are willing to patch holes if they do make a mistake.
OK, so we’ve covered what studs/ceiling joists are, why we need them to mount our projectors, and how to find them. Hopefully, for the next video I’ll be back on track, showing you how to mount a Basic Niche mount. And, if you didn’t luck out by buying a house that has solid wood ceilings in your craftroom, you can use the information from this post/video to get your projector securely mounted as well!
‘Till next time friends,
Branalyn
Setting Up a Short Throw Projector
***Please note that many links in this post will be affiliate links. While they cost you nothing extra, they do provide a bit of income for me. Income that helps keep me making videos and writing posts, so thank you for supporting me in that way!
I’ve shown you how to set up an Ultra Short Throw projector, both on this blog and on YouTube. And I’ve done several videos over my Short Throw projector on YouTube, but those were some of my earliest videos and not only have I learned a lot about projectors since then, I’ve also learned a lot about making and editing videos (and I’m nowhere near done learning!). So, since we moved and I needed to set up my projector anyways, I decided this week’s video would be a walk through about Short Throw projectors-what they are, how to mount them, how to calibrate them, etc.-just like the one I did for Ultra Short Throw projectors awhile back.
Once again, I’m using a Windows 10 computer to connect to my projector. If you have a Mac, things will be a little different but the basics are the same. The projector I’m using this time is an Epson 410-W.
What is a Short Throw? Which one do I buy?
When I joined the projector world, I had no idea there were so many kinds of projectors or how that would impact my projectors for sewing journey! I am working on a static page that will explain a bit of the basics better, but let me try to explain quickly what makes a Short Throw a Short Throw.
The throw distance is the distance between a projector’s lens and the surface you’re projecting onto. Allow me to demonstrate with this ridiculously campy illustration.

Throw distance is the distance between the projector lens and what we’re projecting onto.
As we learned before, an Ultra Short Throw will need an…ultra…short…throw. They generally need to be less than 2’ from your surface to make a large, focusing image. The name is really self-explanatory, as is a Short Throw.
While exact brands and models might be a little different, in general, the term “Short Throw” is for projectors that work best at distances between 2 and 4 feet for our purposes. It may be up to 8 feet in some brands/models. While regular throw projectors might need at least 5 or 6 feet throw distance to cover your cutting mat and get a focused image, Short Throws will work from a shorter distance. The perfect height will depend on your exact projector, how big your cutting mat is, and what kind of space you have to work with in your room.
Short Throws are generally shaped like your typical projector as shown in my illustration above. They have a lens that projects straight out the front of the projector. Because of this, and because they need to be at least 2 feet from our cutting mat, Short Throws need to be mounted.
Lenses on Short Throws are often big and rounded to allow for the short throw distance. There’s a focus lever near the lens on mine, but this may be a setting in your menu on yours. The bottom has feet that can sit on a table or connect to a mount. Like all projectors, they need airflow through their filters to allow for cooling. Make sure you check how clean yours is when it first arrives. Clean it or find a replacement if needed. I repaired my filter by cutting up an A/C filter that didn’t fit our A/C and gluing it in the housing. Short Throws will have buttons to power on, access the menu, etc. but I find a remote to be a little more essential for my Short Throw than my Ultra Short Throw. That may be because I am very short but, either way, it’s nice not to have to touch the projector and inadvertently move it while calibrating.
I bought my Epson 410W used off eBay early in 2020. Any name brand Short Throw will likely work, but keep in mind that the resolution needs to be at least 720 and throw ratio is what will affect your distance from lens to mat. I’ll link to a few on eBay for you to search for but this is just a starting point. You’ll definitely want to do your own research. The manufacturer’s website, along with Projector Central, will be great resources for each projector and you can check out the sellers on eBay itself. Also be sure to search your local Facebook marketplace or other local selling sites. As always, the Projectors for Sewing Facebook group is a great resource and I’m happy to answer questions on my Facebook group, as well.
Epson 420 Epson 410 Promethean ViewSonic BenQ
A fellow Projectors for Sewing group member wrote this very helpful post about searching for STs. When I bought mine, I simply searched on eBay and bought one of the first I came across. But if your space or situation needs more specific parameters, this will be very helpful!
What do I need to buy in addition to the projector?
You’ll need a mount. Short Throws can generally be mounted with any projector mount with 4 points to connect to the projector. I had this one (scroll down a bit for pictures). It’s fairly universal, it worked, and it’s the right length for my set up. However, it did tend to droop a bit and a quick Amazon search doesn’t really turn up any more substantial alternatives. Over time, it quit holding my projector as securely as it needed to for calibration purposes. So we replaced it with a TV/monitor mount.
NEW MOUNT AND PICS
You’ll also need a way to connect your projector to your computer. You may have bought one with your projector or have one laying around. If not, look at both the projector and your computer to find which ports you have available. Most likely, you’ll need a VGA or an HDMI cord. You may also need some sort of converter dongle if your computer ports don’t match the projector ports. I definitely think a wireless mouse and keyboard come in handy when projector sewing, but those are not strictly necessary.
If your projector didn’t come with a power cable, look at the port on the projector and order one that matches from this search. You may even have one from an old computer, monitor, TV, or even sewing machine that fits.
This isn’t something to buy, but you’ll definitely need to grab the calibration grid Sasha Sewist made. The Imperial one is here and the metric one is here. They are a part of a Calibration Guide she made, which is here. Thank you, as always, Sasha for your talent and giving heart!
Download the Calibration grid to your computer and save it on your desktop or in a folder so you can find it when you need it. Then, open the file so that it opens with Adobe Reader DC and not in a web browser. If you’re unsure about this, you can watch this video for some Adobe Basics and to make sure you’re using the right program.
First things first…
As soon as your projector arrives, open it up, plug in the power cable, and turn it on! You should get a blue screen (other brands may have a different color). To quote myself from the UST post, “you’re going to want to do this soon after it arrives so you can be sure to return or file a claim within the window if it doesn’t. While the vast majority of us who have ordered from eBay have done it with no issues at all, we are buying a used electronic from a stranger on the internet so it’s best to just double check things. Place the projector on its bottom and aim it at the floor or at your table that it’s sitting on. Plug it into power and turn it on! If you’ve got a big blue rectangle on your surface, all is well! Take this opportunity to reset all settings. It should be “menu” “reset” “reset all” “yes” for an Epson. Take the time to scroll through the settings and play around with them. You can always reset when you’re done! And this will get you familiar with your projector.”
Connecting to your computer.
Now connect it to your computer. If the projector doesn’t automatically figure out which port you’ve used, try using a “source search” or selecting the specific source you used. On your computer, you’ll have to tell it if you want it to duplicate your screen or extend it. If you have a Windows computer, hold down the Windows key and press the P key. Projecting options will pop up on the right hand side of the screen. Press P again to choose the next option and continue pressing it to cycle through all the options. Many who projector sew prefer to duplicate their screen. With a duplicated screen, you’re able to view the same thing on the computer monitor and the projected image. People prefer this because they can sometimes use the computer screen to read what they can’t on the projected image. I prefer to extend my image instead. Extending the image means I have fewer issues with aspect ratio or resolution issues…basically, it means it’s easier to set up and use each time for me. Neither choice is right or wrong, just do what you prefer. If you do set it up to extend, be aware that you'll have to drag the window you want to see projected over to that screen. Just grab the top of the program, like Adobe, and pull it off your computer monitor screen to the right. It will appear on the projected screen!
Go ahead and open up the Calibration Grid in Adobe, have it on your projected image, and go on to the next steps!
Where should I mount my Short Throw?
Since most of our ceilings are farther than 4 feet from our cutting tables, a ceiling mount might not be the best option for a Short Throw projector. (The short side of a vaulted ceiling might be a notable exception, as would someone with a very tall cutting table or very short ceiling height.) If you do choose to mount to your ceiling, you’ll have to make sure you’re screwing into a ceiling joist or into solid wood connected to a ceiling joist similar to how I describe using studs in the next part.
Remember that your projector must be pointed directly at your mat, it cannot be tilted at all. Test the mount you’ve bought to see how to manipulate it to point the projector straight down. This may not be possible when mounting to the ceiling, depending on the projector
Usually, a wall mount will work best. Again, you’ll want the projector pointing straight down at your mat. This will likely mean having it point down at a 90° angle from your wall. Play with the mount a bit until you understand how it works and where the mount connects to the wall in relation to the projector.
Short Throws also tend to have fairly significant offsets, so you’ll want to test yours and know where to mount it before you begin. The offset is how far from the center of the image you need to be to project an image straight down. I know this sounds really confusing but I’m hoping my campy little image helps again.
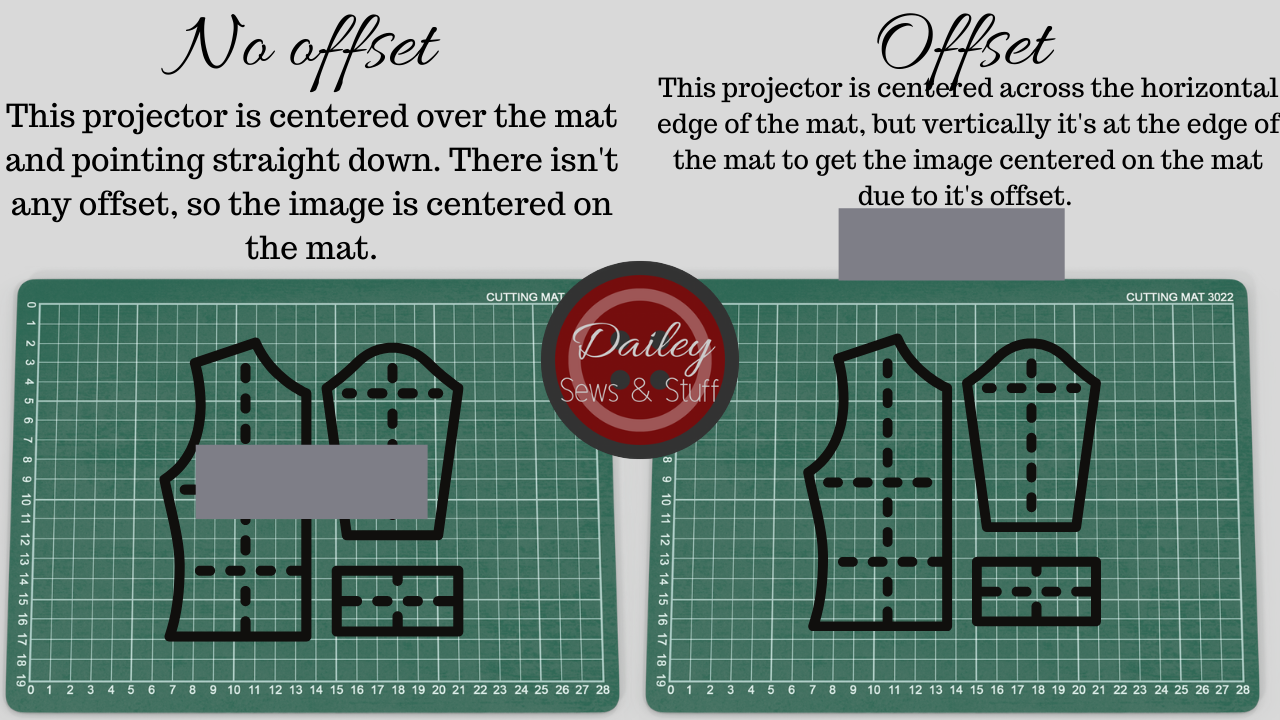
Offset is how far off center a projector needs to be to get a centered image.
How do you figure out your offset? Shine your projector at the wall and see where the image lands in relation to the projector. It’s very likely similar to the righthand image and you’ll want to mount your projector off to what will be the top of your projected image rather than centered over your table.
While you’ve got it shining at the wall, go ahead and move it closer to and further from the wall. Note how the projected image changes-it gets larger as you go away and smaller as you get near the wall. You can tilt your projector all around and notice the shape of the image changes. This will be important as we go to calibrate it soon. For now, determine how big you want your projected image to be and how far from the wall you have to move your projector to get that size. This will tell you how far to mount your projector from your mat.
Now that you know about where your projector needs to be placed in relation to your cutting mat, let’s talk about where in the room to mount it. Short throws tend to be on the bigger and heavier side, so you’ll really want to make sure you’re screwing your mount into a ceiling joist, a wall stud, or a solid piece of wood that is connected to two studs or joists. In my old craftroom, the walls were shiplap and since the shiplap was solid wood connected to each stud, they could hold heavy weights anywhere we screwed into them. In the new Vanilla Craftroom, the walls are a vertical solid wood paneling, and the same is true-I can pretty much mount anything anywhere.
However, in the rental we lived at in between, the walls were a very 70s era pressed wood paneling that could NOT hold up anything, similar to drywall. In that case, my dad screwed a couple 2x4 scraps into a couple studs and then we could screw the mount to the 2x4s and it was secure. While this was a temporary fix so we weren’t concerned about looks, you could use 1/2” plywood or nicer wood scraps, cut them to size a bit more, and paint them to match your wall so that it looks much neater. You may also be able to arrange your room around where you want to mount your projector.


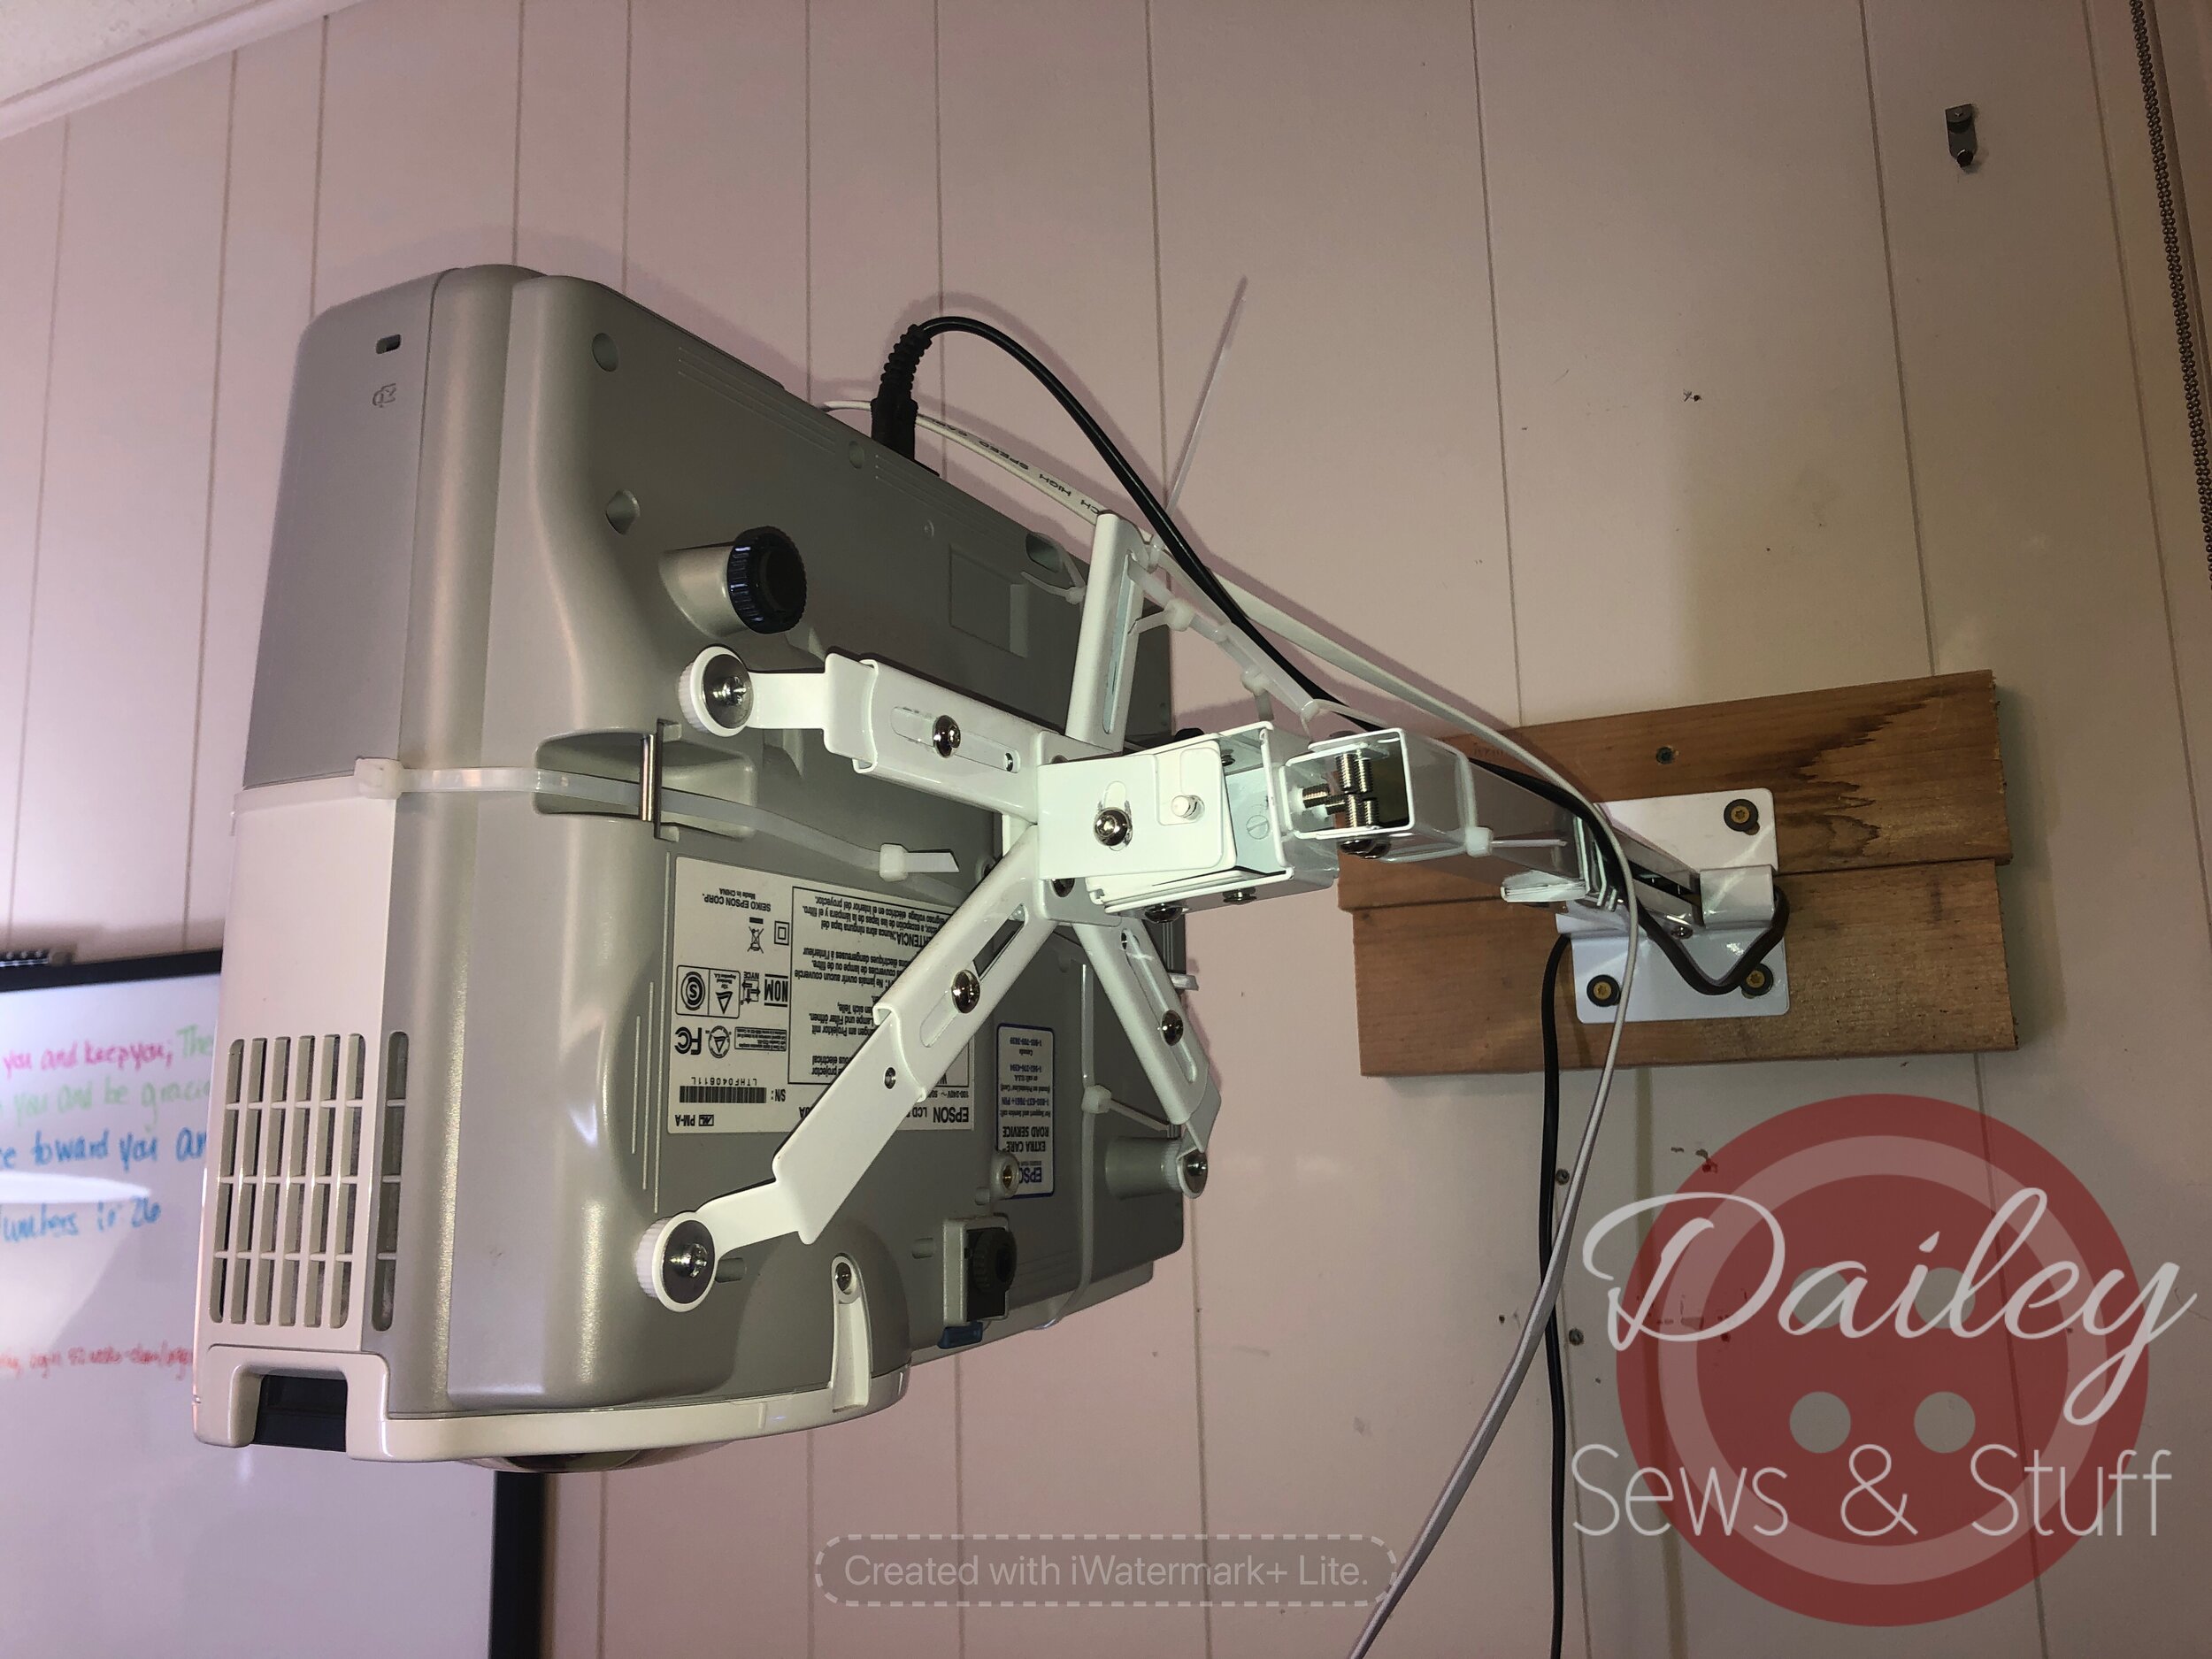
A few other things to keep in mind when deciding where to mount your projector:
You likely only want to have one side of your cutting table against the wall, and it needs to be the short side. Projectors only project in landscape and you may need to move your body around the cutting mat to reach all sides of it.
You must connect your projector to your computer. Think about the position of your computer and your projector and if you can easily connect them.
A corded connection is best but, if your projector has an HDMI port, you can get a casting device. It may affect image size, quality, or aspect ratio.
HDMI cords should not be over 25’.
VGA cords should not be over 100’.
Dongles can degrade image quality or make aspect ratio difficult.
You may want something to neaten the cord on the wall or to keep you from tripping over it.
Your cutting mat needs to be as level and flat as possible. The flatter it is, the easier calibration will be. 9 times out of 10, an issue with calibration is an issue with a wavy or unlevel cutting mat!
Your projector needs to be parallel and square to the cutting mat.
Mount your projector
You know your projector works.
You know where you want to mount it.
You have tested your mount to make sure it fits your projector (I may have forgotten to mention this before, but you should totally do that now…).
So go ahead and get it up on the wall! You will very likely need a second set of hands for this as the Short Throw projectors tend to be pretty heavy and it works best to attach the mount to the projector before attaching the mount to the wall.
Once it’s secure, get it plugged in, connected to the computer, turned on, and projecting the Calibration grid again. Go ahead and make the Adobe window maximized (taking up the whole screen). Connecting to your computer may change the size of your projected image and we want to account for that.
Note that you don’t have to perfectly match the size of your cutting mat! That’s an unrealistic goal. I would err on the side of “a little too big” rather than “a little too small” and I would try to keep it close to the size of your cutting mat (an image much larger than your cutting surface becomes difficult to navigate) but don’t stress about this being an exact match.
If possible, don’t let your second set of hands leave quite yet!
It’s time to calibrate now isn’t it?
Yes, we’ve reached the dreaded step. Dun dun duuuunnnnnn.
No, really, everyone dreads this, but I promise it’s not so bad and you can do it!
Set your zoom in Adobe to 25% or 33%. We’re not going for precision right this second, but trying to get it somewhat close to the right size.
Now you’re going to physically move the projector (or have your second person do this while you stand where you can easily see the calibration grid projection) and possibly your table and/or mat to get the projected lines to be square to the lines on your cutting mat. The corners should be 90 degrees and make squares and rectangles, not trapezoids. While I show this process in the video, the easiest way to illustrate it otherwise is this link that we can once again thank Sasha Sewist and also Projectors for sewing group member Dan Oen for creating this Keystone graphic.
If it is completely impossible to physically square things, you may adjust the projector’s keystone settings but know that this can degrade your image some.
You’re almost done now! If your mat is flat and level and you’ve squared everything up, all you have to do now is figure out the precise zoom percentage that makes your 1” square be 1”. It may be counter-intuitive, but it’s easier to start with one of the larger boxes and get it the correct size before you worry about the small boxes. In fact, I go over this and more in greater detail and also talk about just how perfect you have to be with your calibration here so I won’t repeat myself too much.
The basic idea is to get the biggest box you can fit on your mat as close to accurate as possible. You may discover as you’re changing the zoom you need to adjust your projector a bit again. That’s OK. There can be some back and forth. But, once you’re satisfied, make sure your projector is tightened and not going anywhere and make sure you write down your zoom percentage. I recommend making a sticky note and sticking it on your projector so it’s always handy!
The great thing about this kind of set up is that anytime you want to project a pattern, you just connect to your computer, turn things on, and go! You’ll have to make sure you enter your zoom percentage each time. It shouldn’t change but we’ve had instances of updates to computers or Adobe changing things so it’s a good idea to quickly double check each time you begin a new cutting session.
Now what?
Now you cut out a pattern and sew it up! You are really and truly done! You’re welcome to post on Projectors for Sewing or Dailey Sews & Stuff Friends for confirmation of a job well done but there is nothing stopping you from projector sewing now! As with everything in our wonderful sewing hobby, there is always more to learn! I have a playlist of Dailey Quick Tips here that will help you do things like go full screen, use magnets to hold your fabric in place, rotate patterns on your screen, or cut a pattern piece bigger than your projection size. I have another playlist here all about the things we can do right in the free Adobe you’re already using to digitally adjust patterns to fit our bodies better. And all of these plus many more videos about projector sewing can be found here on this general projector sewing playlist.
If you’re looking for patterns with projector files, may I recommend this pattern from Sunny Mountain Patterns if you have littles? The Toddler Adventure Backpack is an amazing projector file! If you don’t have a little who would love a backpack, Pattern Niche has some great projector files, too. My one qualm with these patterns is I do wish there was a wide margin around them. This is easily remedied with the PDF Stitcher. Several other companies have projector files, as well, Love Notions, Patterns4Pirates, Ellie & Mac, Made4Mermaids, Little Lizard King, just to name a few! There’s a more robust list in the Projectors for sewing group and new designers are getting on the projector bandwagon every day! Layered A0 files often work as is or with a little help from the PDF Stitcher and Letter/A4 files can now be made into large format using the program as intended! The sky is really the limit now.
I hope this demystified the process of setting up a Short Throw projector for you!
‘Till next time, friends,
Branalyn
Recovering a Chair Cushion
Post contains affiliate links. Thank you for supporting my blog/channel in this way without spending any extra money!
So, uhh, I guess you could say this is an “& Stuff” video this week. Ha! It’s not projecting or sewing, though it does involve fabric…
I bought a couple dining room chairs from an estate auction. We needed a third chair for our kitchen table (the first two are already mismatched) and my husband had been asking for a chair by the front door for putting on his shoes. So, for a whopping $12 and some odd cents, I bought a pair of chairs! The cushions were covered in a very late 80s/early 90s peach colored fabric. (That’s me going off early childhood memories, feel free to correct my decades there…) It a) isn’t really by style, b) was quite worn in the corners, and c) really didn’t go with the colors in the entry way.
But, coming from a long line of DIYers, I was not too worried about this. I have recovered many a chair in my day! And I decided to bring y'all along for the ride.
Now, please note that I am in no way a professional upholsterer. There are possibly better ways to do this. There are people that do it better than I do. And, especially when it comes to the corners, there are lots of acceptable ways to do the same job. But this should get any beginner started!
Also note I tried to get fancy with using vinyl to cover my fabric before covering my seat and that failed miserably. See video for details. I have some thoughts on why it failed and how you might have more success.


Tools you’ll need:
A chair with a cushion you no longer like
Fabric-enough to cover the cushion plus a little-that you do like (see more below)
A screwdriver to remove the seat cushion and later put it back-probably flat or Phillips head
A pair of pliers (needlenose is what I prefer) to pull the staples out
Helpful but not strictly necessary-a rotary cutter, mat, large quilting ruler, iron, hammer

Fabric considerations:
The biggest consideration is obviously something that works in your space and you like. Mine came from here.
You’ll want a woven fabric here. Knits will stretch and, over time, stretch out.
Think about the thickness you want. A canvas or heavy quilting cotton, maybe a duck cloth, upholstery fabric, those kinds of things are perfect. I chose a heavy quilting cotton for mine. The thicker and tighter the weave, the more difficult it will be to get staples through, BUT the longer it will last and the more resistant it will be to holes.
The last thing to consider is the design. Is this something you’ll need to cut with a design centered? Something you want a specific part of? Stripes or checks to keep lined up? Or is it plain that you’ll just cut a piece off without worrying about it?
If you’re buying rather than choosing from your extensive stash, eh hem, you’ll need something at least 24x24”. Since 1/2 yd is 18”, I would probably just buy a whole yard, personally. Then you’ve got plenty to work with and extra for your stash! Depending on the width of your fabric and of your chairs, a yard will likely cover two chairs. You may also be able to find a “fat half” piece that could cover your seat, again, depending on seat and fabric width. This is the only bit of math involved so either save yourself the math and buy a full yard or do a little math to save a little money.
Let’s jump in:
First, remove the staples holding the backing fabric on. If there is none, cool! Skip this step. Either save it to reuse, save it to pattern a new backing, or throw it away and skip the backing.
Then, remove the staples holding the fabric you’re replacing. Note that you can skip this step and just add another layer of fabric. I’ve done this before! But a couple things bear thinking about before making this decision:
the fabric does start to pile up after awhile
you’re not getting rid of any mold or bacteria you might want to if your chair has had many, many spills or an unknown past
stains, darker parts of the fabric, or stark contrasts may show up through your new layer of fabric, especially if it’s light and/or thin fabric
if it’s stretched out and then you pull the new layer taut, you can make wrinkles in the old layer, which can be hard to get rid of
(Now is probably a good time to iron your pretty new fabric if you haven’t yet. Just to get any fold lines out. Don’t stress about it.)
Next, lay out the new fabric and place the old fabric on top. If you’re “fussy cutting”-worried about centering a design, trying to capture the perfect scene- or you have a striped or checked fabric to make sure looks straight, be extra thoughtful about where you’re laying your fabric “template”. (This is why a full yard is just easier to work with.) Give yourself a little margin as you cut and go for it! I love a rotary cutter, mat, and quilting ruler for this but scissors work just fine. There’s no real need for precision in your cutting job. I like to audition it over the seat cushion now to be sure I cut it well and have what I want showing on the seat.


Now, put it back together!
Start with the pretty fabric. Staple one side about the middle. Pull the fabric taut (that’s a fun word that means tight enough it’s not loose but not so tight it’s really pulling back against you) and staple the opposite side about the middle. Then do the other two sides. Keep working around to get the fabric evenly pulled and stapled, leaving the corners for last. Lots of options for the corners but I basically eased mine in the best I could. You can miter them, you can fold them, you can cut out part of the fabric on the back and ease it in differently than I did…whatever you choose. If you have no idea about any of that, just go ahead and copy what I did.
Trim away any excess fabric. Not too close to the staples, you don’t want them to pull through the fabric, but you don’t want floppy fabric hanging down either. Pay special attention to where the screws will go through your chair seat. You really don’t want to put them through the fabric if you don’t have to. Pre-make a hole with your scissors if this is necessary.
Put the backing fabric back on…or don’t.
Screw the seat back onto the chair.

You’re done!


On a small personal note here, the channel is very close to monetization and has been for months. However, since it’s 4,000 watch hours in one year, now that we’ve passed my first anniversary, I lose hours watched last year as I gain hours watched this year. That means I’m not quite as close as I thought to monetization. Whomp whomp. It will happen, I know it will. I’m just being a little impatient!
Bringing back to where it matters to you, I plan to do the Amazon projector/Basic Niche mount video very soon. Followed by take 2 of the Short Throw video. Then I’ll do a few comparison videos and probably a new “how to choose a projector” video. At that point, it will be very silly for me to have FOUR projectors. And I have every intention of doing a giveaway for TWO projectors and everything (minus a computer) that you’ll need to get started and/or upgrade!
The best way you can help make this happen is to 1) watch my videos! and 2) share my videos with others. I try to make the videos to answer common questions, that way I can share them rather than type out long responses when someone has a projector question. Also, it helps YouTube decide my videos are worth suggesting to people when you subscribe to my channel, like the videos, and comment on them. It’s an easy, free way for you to help support me and get us that much closer to the giveaway!

In the video, I’m wearing a shirt I made with the Pattern Niche Rivera Raglan pattern and a triblend from Surge Fabric Shop. My pants are Peg Leg Add Ons from Patterns for Pirates made from Copperboom fabric I bought from Eden Elle.
Until next time, friends!
Help! My Pattern Piece Doesn’t Fit!
Some links are affiliate links. Thank you for supporting my blog/channel by using them. They cost you nothing extra and pay me just a little bit.
What do you do when you use a projector and the pattern piece you want to cut is bigger than the projection on your mat? This month’s Dailey Quick Tip focuses on just that!
First troubleshooting tip: Try to rotate your pattern. Maybe it fits the other direction! Usually, I right click and then choose “rotate clockwise” but here’s a video detailing that, as well. This is a super simple solution!
If that doesn’t work, if you rotate and it’s still not fitting, you’ll have to move your fabric and pattern together. Sometimes, a pattern has markings that make this easy, such as a lengthen/shorten line or a distinctive shape that can line back up. But if neither of those are options, make your own marks using the comment tool on Adobe. See how here:
A wireless mouse and Frixion Fineliner markers make this so easy!. (Though there is great debate about using Frixion products in our sewing projects. I live where freezing is an extremely rare occurrence so I’m really not worried about it. Read up on the great debate if you’re unfamiliar and/or unsure.)
Until next time, friends!

The Trouble with Mounts
This post contains affiliate links! Using the links helps me just a bit to run this blog and YouTube videos at no extra cost to you!
This is not the post/video I intended to come out this week. I’ve been working on a video to show how I set up my Short Throw projector. But, as the title suggests, I’m having mount trouble.
See, the trouble with mounts, for us projector sewists, is that projector mounts are made to hold projectors pointed at a vertical surface but we are asking them to hold a projector pointed at a horizontal surface. So the mounts are engineered to be strong and hold steady with the weight of the projector pulling them in one direction don’t necessarily deal well with the weight of the projector pulling them in a direction 90 degrees different.

Basic Niche is a great mount because it’s custom built to hold a projector that’s pointed down. It wouldn’t work well at all for someone wanting to point their projector at a vertical surface because none of the adjustments would work. But for someone pointing their projector down on a horizontal surface, it’s perfect! Karisa, the owner/maker at Basic Niche, is a projector sewist herself so she was able to create something purpose-built for our needs. She’s got 4 designs fitting 5 of the most popular “Amazon” projectors (Vivimage Explore 2, Apeman LC350, Apeman LC550, Bomaker, and Turewell H3), plus an additional piece that makes your mount work with a vaulted ceiling, and I absolutely recommend her mounts if you have one of those projectors.

But if you’re working with another “Amazon” projector (Wevivi, Mooka, Vimgo…), a Short Throw or an Ultra Short Throw, that’s not your solution. So…what is?
You can use a regular projector mount.
I did for over a year with my Short Throw. The problem was, I periodically had to readjust it and we moved twice during that time and each time we changed it again, the mount held less and less securely. The wear on the mount that wasn’t made to work this way took it’s toll until we couldn’t get it to hold any longer. But it was a $20 mount and you could certainly start out that way and, if you don’t do crazy things like move twice in one year, it may serve you for a long time.

With an Ultra Short Throw mount, one self-tapping metal screw and a block of wood seems to have solved the problem of using a regular Epson UST mount. The downside here is that they can be quite expensive, have a big footprint, and still may not adjust just like you need it to. Plus we had to be pretty precise with the depth of that wooden block and not everyone has a way to safely cut precise slivers off wood.

Or, you can have a handy person in your life (which could be you!) make a mount for you or engineer something that was intended for another purpose.
For “Amazon” projectors, this can be very simple because they don’t weigh much at all. Check out the group Projectors for sewing for many permanent and temporary options. I’ve seen tension poles, light stands, camera tripods, L brackets, hinged plywood, zipties and more holding these lightweights up! Here’s a super simple solution posted by Corinne Elizabeth in the Projectors for sewing group.
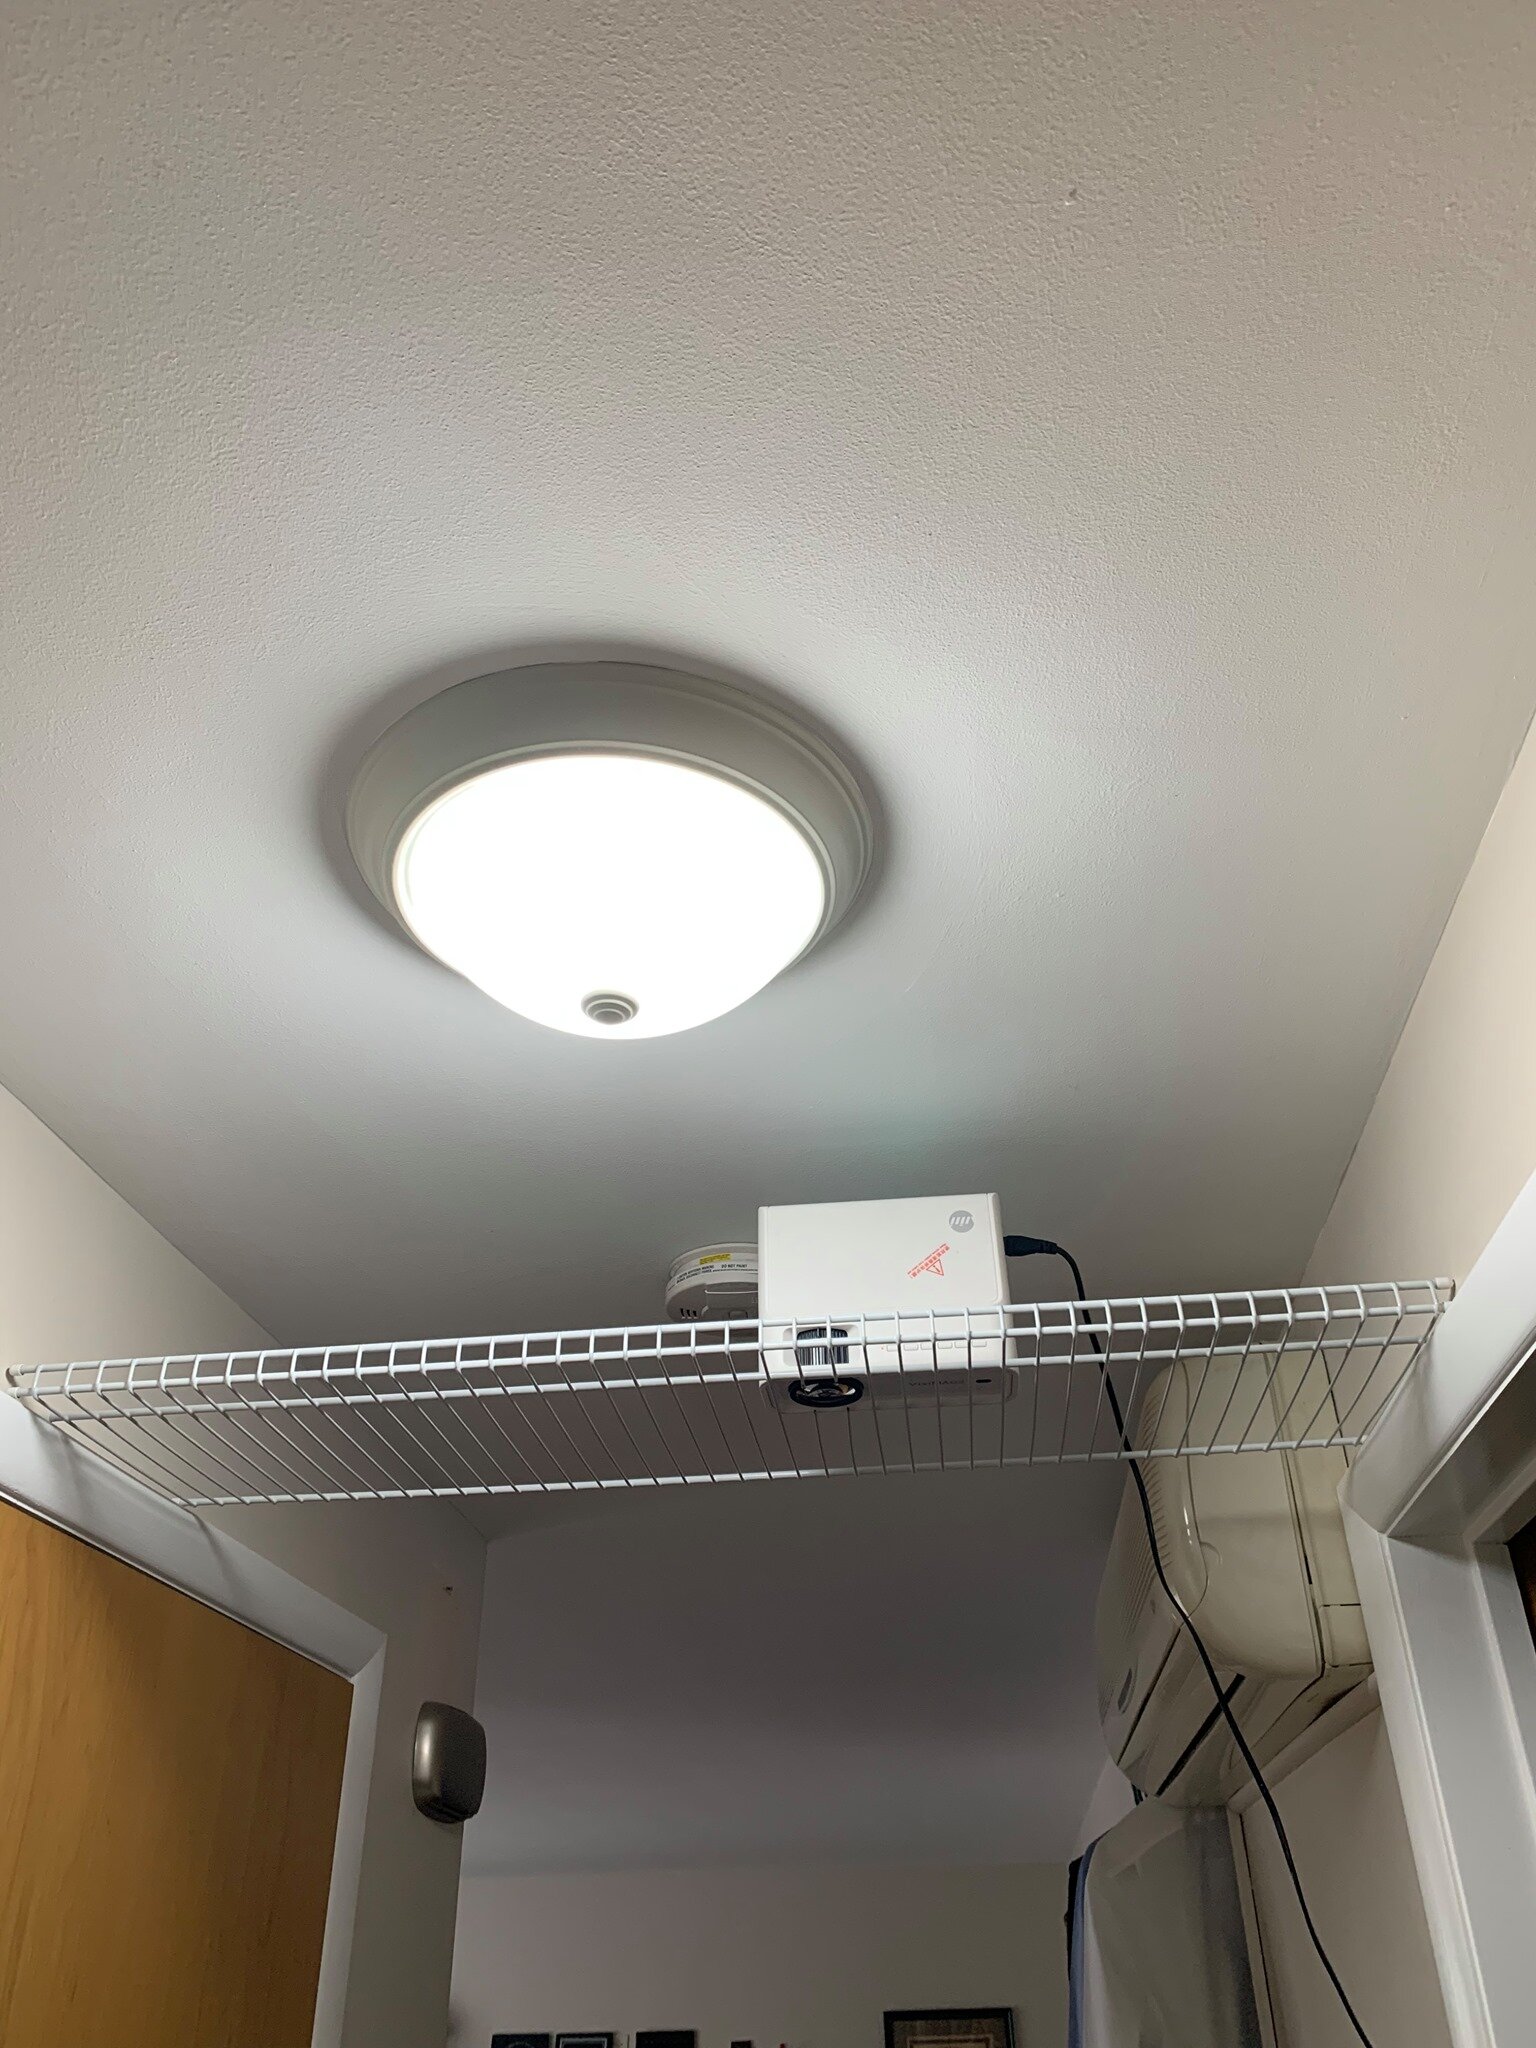
For Short Throws, this is a little more complicated as they are very heavy. One idea I’m testing out as soon as it arrives is a TV mounting arm. They are made to hold the weight in the same orientation as we have our projectors, however, I’m not totally sure it will hold as secure as I want nor am I sure it will attach to the projector in the right places.
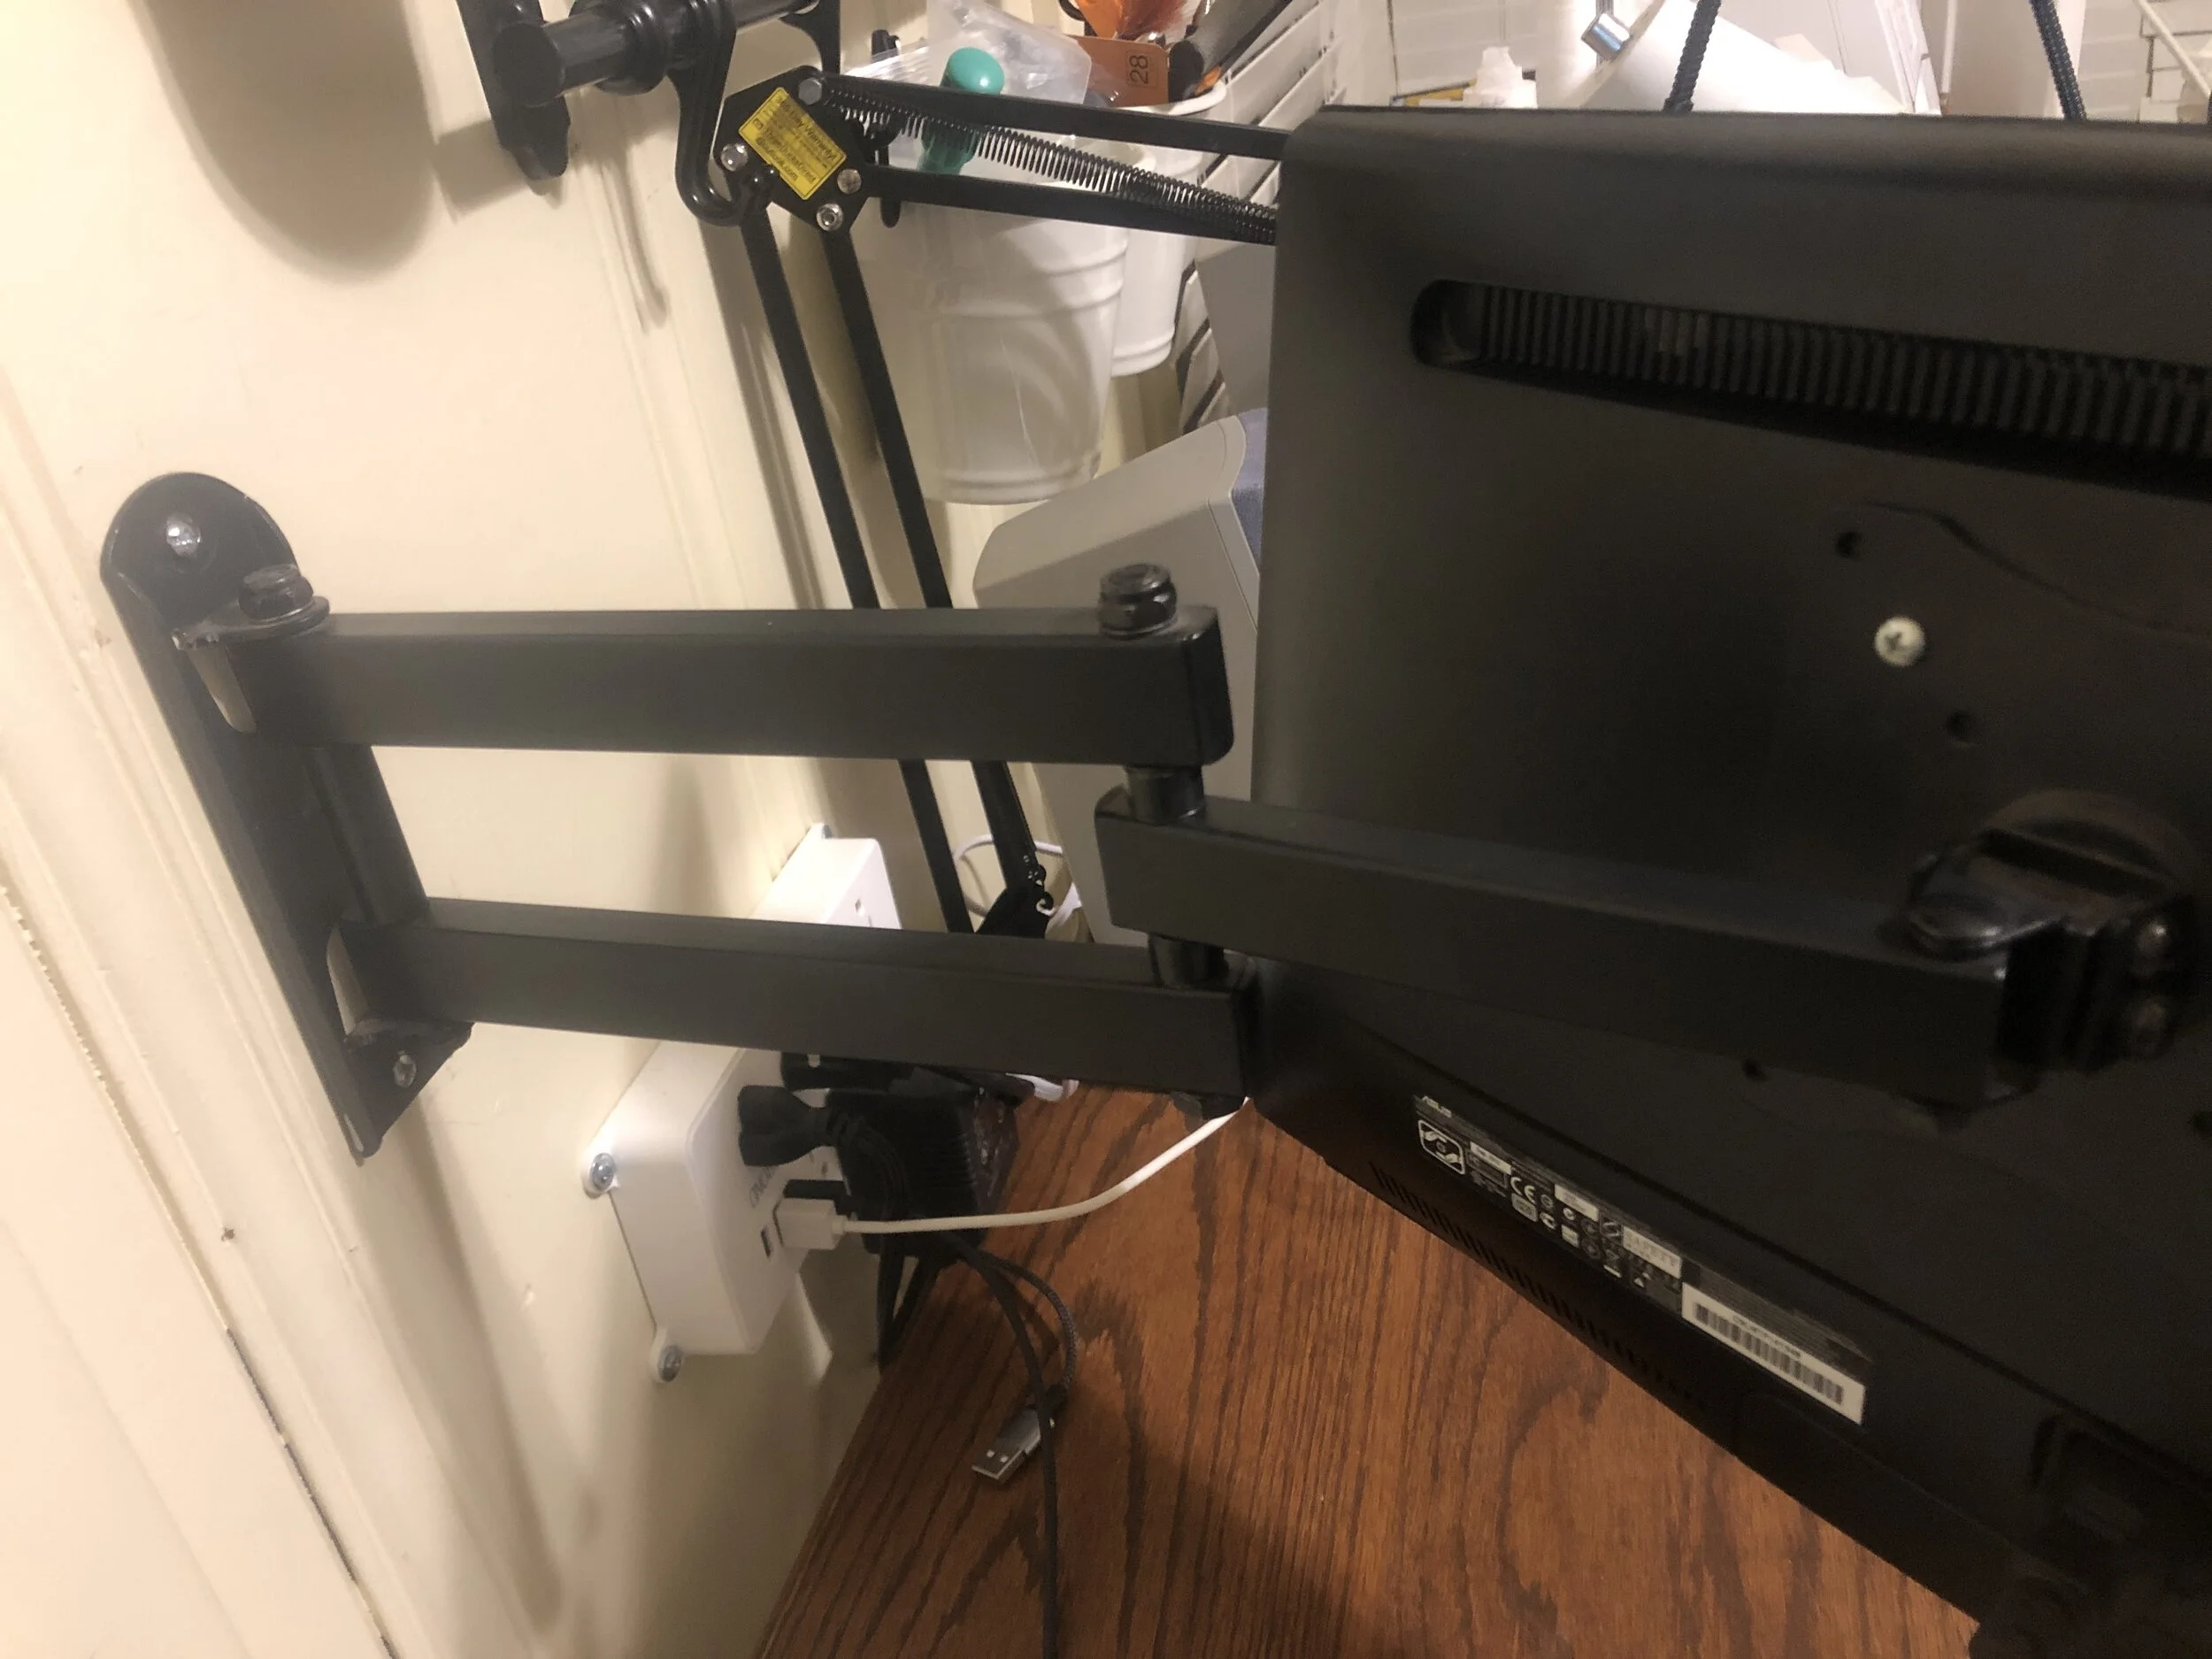
For Ultra Short Throws, you don’t have to use a mount at all. Propping it up on books and pieces of folded paper works perfectly well…but that’s not always a permanent solution. See the video here for how I did this. My husband has promised to make a mount and plans for others to make their own but life has been busy and he hasn’t gotten to it yet.

My hope is that, as I find/we make solutions that will work for both Short Throw and Ultra Short Throw projectors, I will add to this post and a collection of helpful solutions will exist. Right now, I feel like I’m leaving you on a bit of a downer and I don’t want to discourage anyone from trying a projector if that’s what they really want to do. But it makes sense because I’m a bit discouraged about my mount right now.
Fabric Shifting Dailey Quick Tip #4
Help! My pattern piece doesn’t fit in my projection!
***This post contains affiliate links. ***
Lately, I’ve seen this question come up a lot in the Projectors for sewing group. What do you do when your pattern piece is bigger than your projection? Some pattern pieces are just huge-the Gala gown from Patterns4Pirates skirt pieces come to mind. Sometimes, it’s more that your cutting mat or your projection is too small. And I decided to make a video answer. It’s this month’s Dailey Quick Tip!
Today, I’m using the Pattern Niche Knoxville Top, Twist version. In my size, even the shirt version is both too wide and too long to fit on my mat in a traditional way. So, I rotated the pattern to fit the width of shirt across the length of my mat and showed you how I marked my pattern and my fabric to move both together and cut the rest of the pattern. I use Frixion Fineliner markers to mark my fabric. (I know, there’s great debate about Frixion pens in the sewing/quilting world but I’ve been happy with them for years. That said, do your research about them and maybe do some tests yourself before you use them on your expensive fabric.) I mark my pattern in Adobe using a line like I show in this video if you aren’t sure how to use the line tool.
And, really, that’s the whole thing. You mark your fabric and your pattern and shift them both to line them back up and finish cutting. Super easy!
Another quick tip to sneak in: When I show the lengthen/shorten line, you can totally use that and shifting the fabric to add or take away length from a pattern without using digital alterations!
A0 vs Projector Files
I see these questions a lot:
A0 vs Projector files-what’s the difference?
Can I use an A0 file for projecting?
So this week’s post/video is attempting to answer those questions!
I’ll start with the second, yes! you can use an A0 file for projecting. When projector sewing first became a thing, those are the files we used! Now that projectors are more popular, more companies are offering projector-specific files. A0 files often need a little optimizing for projecting and we can use PDF Stitcher to do that. (For that matter, some projector files need a little optimizing, too…we’ll get to that.)
A0 files are also sometimes called Copy Shop files. They are designed for a specific sized, very large sheets of paper. For example, A0 is 16 times larger than A4. A4 is roughly the size of Letter paper for my fellow Americans. The image below shows the comparisons.

By User:Bromskloss - This file was derived from:A size illustration2.svgA size illustration.png., CC BY-SA 3.0, https://commons.wikimedia.org/w/index.php?curid=1374775
Since the patterns are on such large sheets of paper, they usually have the pattern pieces as whole pieces, rather than tiled into a puzzle when you print at home. A few exceptions are very large skirts, such as the Gala Gown by Patterns4Pirates, or wide legged or very long pant pants, but most patterns will come with the full pieces. The intention with A0 files is to have a printer print them on the giant paper and then you cut the pieces out, just skipping the puzzle step of A4/Letter sized pages; It’s more like the tissue paper patterns that can be bought at a store. This is generally convenient for projecting, since we’ll have full pattern pieces, but, because designers are trying to fit everything on one set page size, sometimes pieces will be at odd angles, forcing you to rotate your fabric rather than your pattern, and that’s not convenient for projecting. There may also be several “cut on fold” pieces but they aren’t lined up in such a way that you can just fold your fabric once and cut. Several companies don’t utilize layers in their A0 files, which is also frustrating when projecting. And often printed files have fairly thin lines for conservation of ink and precision when cutting. That’s great if you’re printing, but can make for faint and difficult to see lines when projecting. Many of these issues can be solved with PDF Stitcher but not all of them.
PDF Stitcher was originally created to stitch together A4 or Letter sized patterns when A0 wasn’t available or if the A0 didn’t have layers, back when we didn’t really expect a lot of designers to have projector files. Several iterations later, PDF Stticher can do that, add margins, change lines-sizes, types, colors- and generally fix most of the issues you have with a pattern that makes it difficult to project. The one thing it can’t do is move individual pieces like when you need to rotate pieces whose grainlines might be going at an odd angle or move pieces where their fold lines line up. You can first use PDF Stitcher and then use Affinity Designer or Inkscape to solve those issues, but they are more labor intensive than a simple run through PDF Stitcher (or being setup well for projecting in the first place…).
Once projector sewing really began taking off, many pattern designers jumped on board with this new trend and began offering projector files! Some designers began using projectors themselves and understood what was needed, some asked projector users what we wanted/needed, and some just repackaged their A0 files as projector files because it was the new trend and they weren’t quite sure what to do.
Ideally, a projector file would be different from an A0. It would take into account the grainlines and fold lines, having all the pieces lined up. It would use as much space as possible to give us plenty of white space around the pattern and a more convenient arrangement of pieces. It might be less economical with space but more thoughtful with layout, maybe not having any cut on folds or minimizing them. Bold, easy to read fonts and bold/thick lines would be available with markings very clear. There would be layers and one of those will be a grid layer to check calibration. (If you’re a pattern designer, check out this video by my friend Cathleen at Sunny Mountain Patterns where she discussed the minimums needed in a projector file and tells you about her paid course to help even more!) But not all projector files include those features. Again, PDF Stitcher or PDF Stitcher combined with a vectoring program can really help to resolve those problems.
So to answer the first question, it depends. Sometimes, there’s no difference between an A0 file and a projector file. Sometimes, there’s a profound difference that makes the projector files much easier to use! But I do believe that, between PDF Stitcher, vectoring programs, or just determinedness, we can make just about any file work for projecting. The question really is, “how much work are you willing to put into making it work?” And that’s important for pattern designers to answer, too. How much work are your customers going to put into making this work vs finding another designer with better projector patterns?
Till next time, friends,
Branalyn