Calibration: How close is close enough?
TL;DR: 1/4” off one line of the 16x24” box is 99% accurate across your whole mat. Use this: Setup and Calibration Guide, Section 10 to get your calibration grid.
And now, the rest of the story:
I had to wear my “Finished is better than perfect” shirt for this week’s video. I am a huge fan of Angela Walters and this saying of hers is one of my favorites. In fact, I have said it in several of my videos referencing your calibration and saying it doesn’t have to be perfect…but I never really have defined at what point you can call yourself “finished”. I’m remedying that in this week’s blog post and video. The video will go live 5/2/2021 at 1:30 pm Central time. You can find the video here when it goes live but I’m also going to attempt below in written form.
Let’s first back up a bit to explain calibration a little bit. You remember when you were printing patterns and you needed to check that the 1 inch square (or 2 inch or 4 cm or whatever) was actually the size it was supposed to be to make sure your pattern printed accurately? Well, in printing, we could pretty much count on making our settings “print at 100%” and things would be accurate. Occasionally, there’d be a little adjusting to do depending on your printer, but it was generally how things worked. In projecting, the process of calibration is to figure out our projector settings that will give us that same accuracy. But the variables in projecting-aspect ratio, resolution, throw distance, throw ratio, etc. means we each have to figure out the setting that works best for our set up.
A printer in good working order will always print a square image. But since projectors are rather infinitesimally adjustable, our first goal of calibration is to get a square image. This is something I cover in this post and the connected video. But, to keep this shortish, the reason our image needs to be square is fairly obvious in the picture below that a Projectors for sewing group member created. If that were a pattern piece rather than a rectangle, you can see that an image that isn’t square would cause your pattern piece to be distorted.

Thanks, Dan Oen!
The second main goal of calibration is to figure out the zoom percentage that makes your pattern an accurate size. With printing, this is easy-100%. With projecting, part of that percentage is determined by your projector’s throw ratio and partly by the distance from your lens and is probably combined with some other factors I don’t understand at all! So we have to do a bit of trial and error to figure out what zoom percentage to use.
We use a calibration grid, shown in the picture below, to figure out the zoom percentage. Since 1 digital inch is 1 digital inch across any file you open in a given program, we can use this to figure out the zoom. The calibration grid has gone through several iterations, making it easier to use and more accurate. This type of grid allows us to focus on the important parts without being too distracted by grid lines. I’m adding a picture of the calibration grid here for demonstration purposes but just, as an aside, this version of the calibration grid IS NOT accurate. Please use the version found here if you’re actually needing to download and use it. Thanks, Sasha Sewist, for creating it! So you can see on your screen that those tiny squares in the center should be 1”. I can almost guarantee they are not 1” on your screen right now. It becomes pretty self-evident that the right zoom percentage is necessary for accurate sizing when you look at this.
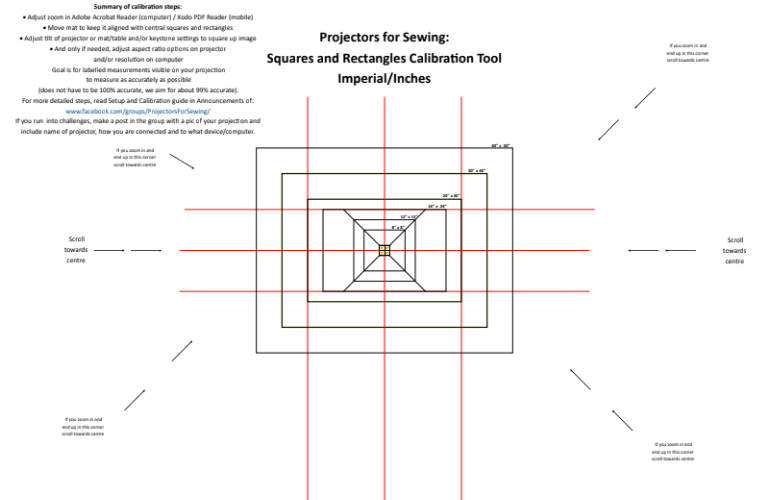
Do not use this screen shot version to calibrate. Find the accurate, PDF version here.
OK, so, now we understand why we need to calibrate. And an accurate calibration seems pretty important if we want well-fitting patterns. But just how accurate do we have to be? Is this the time to pull out the perfectionist in you? Is this the time to say “eh, close enough”? That’s the meat of what I want to talk about today!
Like many of our discussions surrounding projectors, there’s a bit of nuance here depending on your needs and set up.
A historical costumer working with the small pieces of a corset but using 8 pieces to make the one garment is going to need to be more precise than someone using 2 small pieces to make a child’s shirt. 8 pieces that are each 4/25ths off sewn together with perfect seam allowance will end up being off by about an inch and a quarter by the time the garment is done! 2 pieces off by 4/25th each would only be about a third of an inch off in the end. It’s that exponential effect again.
Someone sewing well-fitting wovens will likely need to be more precise than someone who sews more with knit or sews loose-fitting clothes.
And then we have human error…
I am the first to admit that my cutting and sewing is really not that precise. To me, getting an absolutely perfect calibration is a little bit silly when I know my sewing won’t be perfect. To you, maybe that perfect calibration gives you the wiggle room in your cutting and sewing to be a little less perfect.
Approaching the point here.
Forgive my lack of mathiness here but, basically, there’s a kind of exponential effect with any misalignment during calibration. Something that is only a little bit off in one part of your image will get more and more “off” the farther it gets from the spot where it’s misaligned. And the bigger the pattern piece, the more “off” it will be. For instance, if something is 8 inches and 2% off, it’s 4/25ths of an inch off. That’s fairly infinitesimal. But if something is 24 inches and 2% off, that’s almost half an inch off. That would make a big difference! This is why, in printing, that 1” square needs to be bang on-the bigger the pattern piece in relation to that 1” square, the more exponential the effect of it being slightly off.
The general rule of thumb is that the smaller the box, the more it needs to be perfect. I mean, I feel like Mel Gibson really sums it up here:
Fuyo Amy Wantanabe, an admin on the Projectors for sewing group, once said “ the squares need to be right on, the rectangles being a bit off is OK.” And Sasha Sewist added “The amount of misalignment on the rectangles will not be very much if the squares are accurate.”
The smaller the box is, the more exact it needs to be. So the bigger boxes can be a little off. How much off? By Sasha’s calculations, if you’re 1/4” off one line of the 16x24” box, you’re at 99% accuracy! That’s kind of the minimum we’re looking for when you ask “is this calibration good enough?” in the group. And it’s why you’re often asked to show the biggest rectangle possible on your mat when you ask for help. I generally look at that highlighted line, the 20x30” box, to see if it’s 1/4” or less off. That’s usually attainable and over 99% accurate!
It can be a lot of work to get your projector calibrated, especially the first time. There’s a lot of factors that play into each other for us to get accurate projections. But the end result is so worth it! I hope if you’ve been worried about getting your projection completely accurate, this eases your mind some and you’re able to relax some about it. And I hope that if you’ve heard me say “finished is better than perfect” before about calibration but weren’t quite sure if you were close enough, you have a better idea of what you’re aiming for. And if you read this and are now thinking that your set up isn’t quite accurate enough, it’s easily remedied! Ask for help from the Facebook group if you need it. I have full faith that you can do it!
‘Till next time, friends,
Branalyn