
Setting Up a Short Throw Projector
***Please note that many links in this post will be affiliate links. While they cost you nothing extra, they do provide a bit of income for me. Income that helps keep me making videos and writing posts, so thank you for supporting me in that way!
I’ve shown you how to set up an Ultra Short Throw projector, both on this blog and on YouTube. And I’ve done several videos over my Short Throw projector on YouTube, but those were some of my earliest videos and not only have I learned a lot about projectors since then, I’ve also learned a lot about making and editing videos (and I’m nowhere near done learning!). So, since we moved and I needed to set up my projector anyways, I decided this week’s video would be a walk through about Short Throw projectors-what they are, how to mount them, how to calibrate them, etc.-just like the one I did for Ultra Short Throw projectors awhile back.
Once again, I’m using a Windows 10 computer to connect to my projector. If you have a Mac, things will be a little different but the basics are the same. The projector I’m using this time is an Epson 410-W.
What is a Short Throw? Which one do I buy?
When I joined the projector world, I had no idea there were so many kinds of projectors or how that would impact my projectors for sewing journey! I am working on a static page that will explain a bit of the basics better, but let me try to explain quickly what makes a Short Throw a Short Throw.
The throw distance is the distance between a projector’s lens and the surface you’re projecting onto. Allow me to demonstrate with this ridiculously campy illustration.

Throw distance is the distance between the projector lens and what we’re projecting onto.
As we learned before, an Ultra Short Throw will need an…ultra…short…throw. They generally need to be less than 2’ from your surface to make a large, focusing image. The name is really self-explanatory, as is a Short Throw.
While exact brands and models might be a little different, in general, the term “Short Throw” is for projectors that work best at distances between 2 and 4 feet for our purposes. It may be up to 8 feet in some brands/models. While regular throw projectors might need at least 5 or 6 feet throw distance to cover your cutting mat and get a focused image, Short Throws will work from a shorter distance. The perfect height will depend on your exact projector, how big your cutting mat is, and what kind of space you have to work with in your room.
Short Throws are generally shaped like your typical projector as shown in my illustration above. They have a lens that projects straight out the front of the projector. Because of this, and because they need to be at least 2 feet from our cutting mat, Short Throws need to be mounted.
Lenses on Short Throws are often big and rounded to allow for the short throw distance. There’s a focus lever near the lens on mine, but this may be a setting in your menu on yours. The bottom has feet that can sit on a table or connect to a mount. Like all projectors, they need airflow through their filters to allow for cooling. Make sure you check how clean yours is when it first arrives. Clean it or find a replacement if needed. I repaired my filter by cutting up an A/C filter that didn’t fit our A/C and gluing it in the housing. Short Throws will have buttons to power on, access the menu, etc. but I find a remote to be a little more essential for my Short Throw than my Ultra Short Throw. That may be because I am very short but, either way, it’s nice not to have to touch the projector and inadvertently move it while calibrating.
I bought my Epson 410W used off eBay early in 2020. Any name brand Short Throw will likely work, but keep in mind that the resolution needs to be at least 720 and throw ratio is what will affect your distance from lens to mat. I’ll link to a few on eBay for you to search for but this is just a starting point. You’ll definitely want to do your own research. The manufacturer’s website, along with Projector Central, will be great resources for each projector and you can check out the sellers on eBay itself. Also be sure to search your local Facebook marketplace or other local selling sites. As always, the Projectors for Sewing Facebook group is a great resource and I’m happy to answer questions on my Facebook group, as well.
Epson 420 Epson 410 Promethean ViewSonic BenQ
A fellow Projectors for Sewing group member wrote this very helpful post about searching for STs. When I bought mine, I simply searched on eBay and bought one of the first I came across. But if your space or situation needs more specific parameters, this will be very helpful!
What do I need to buy in addition to the projector?
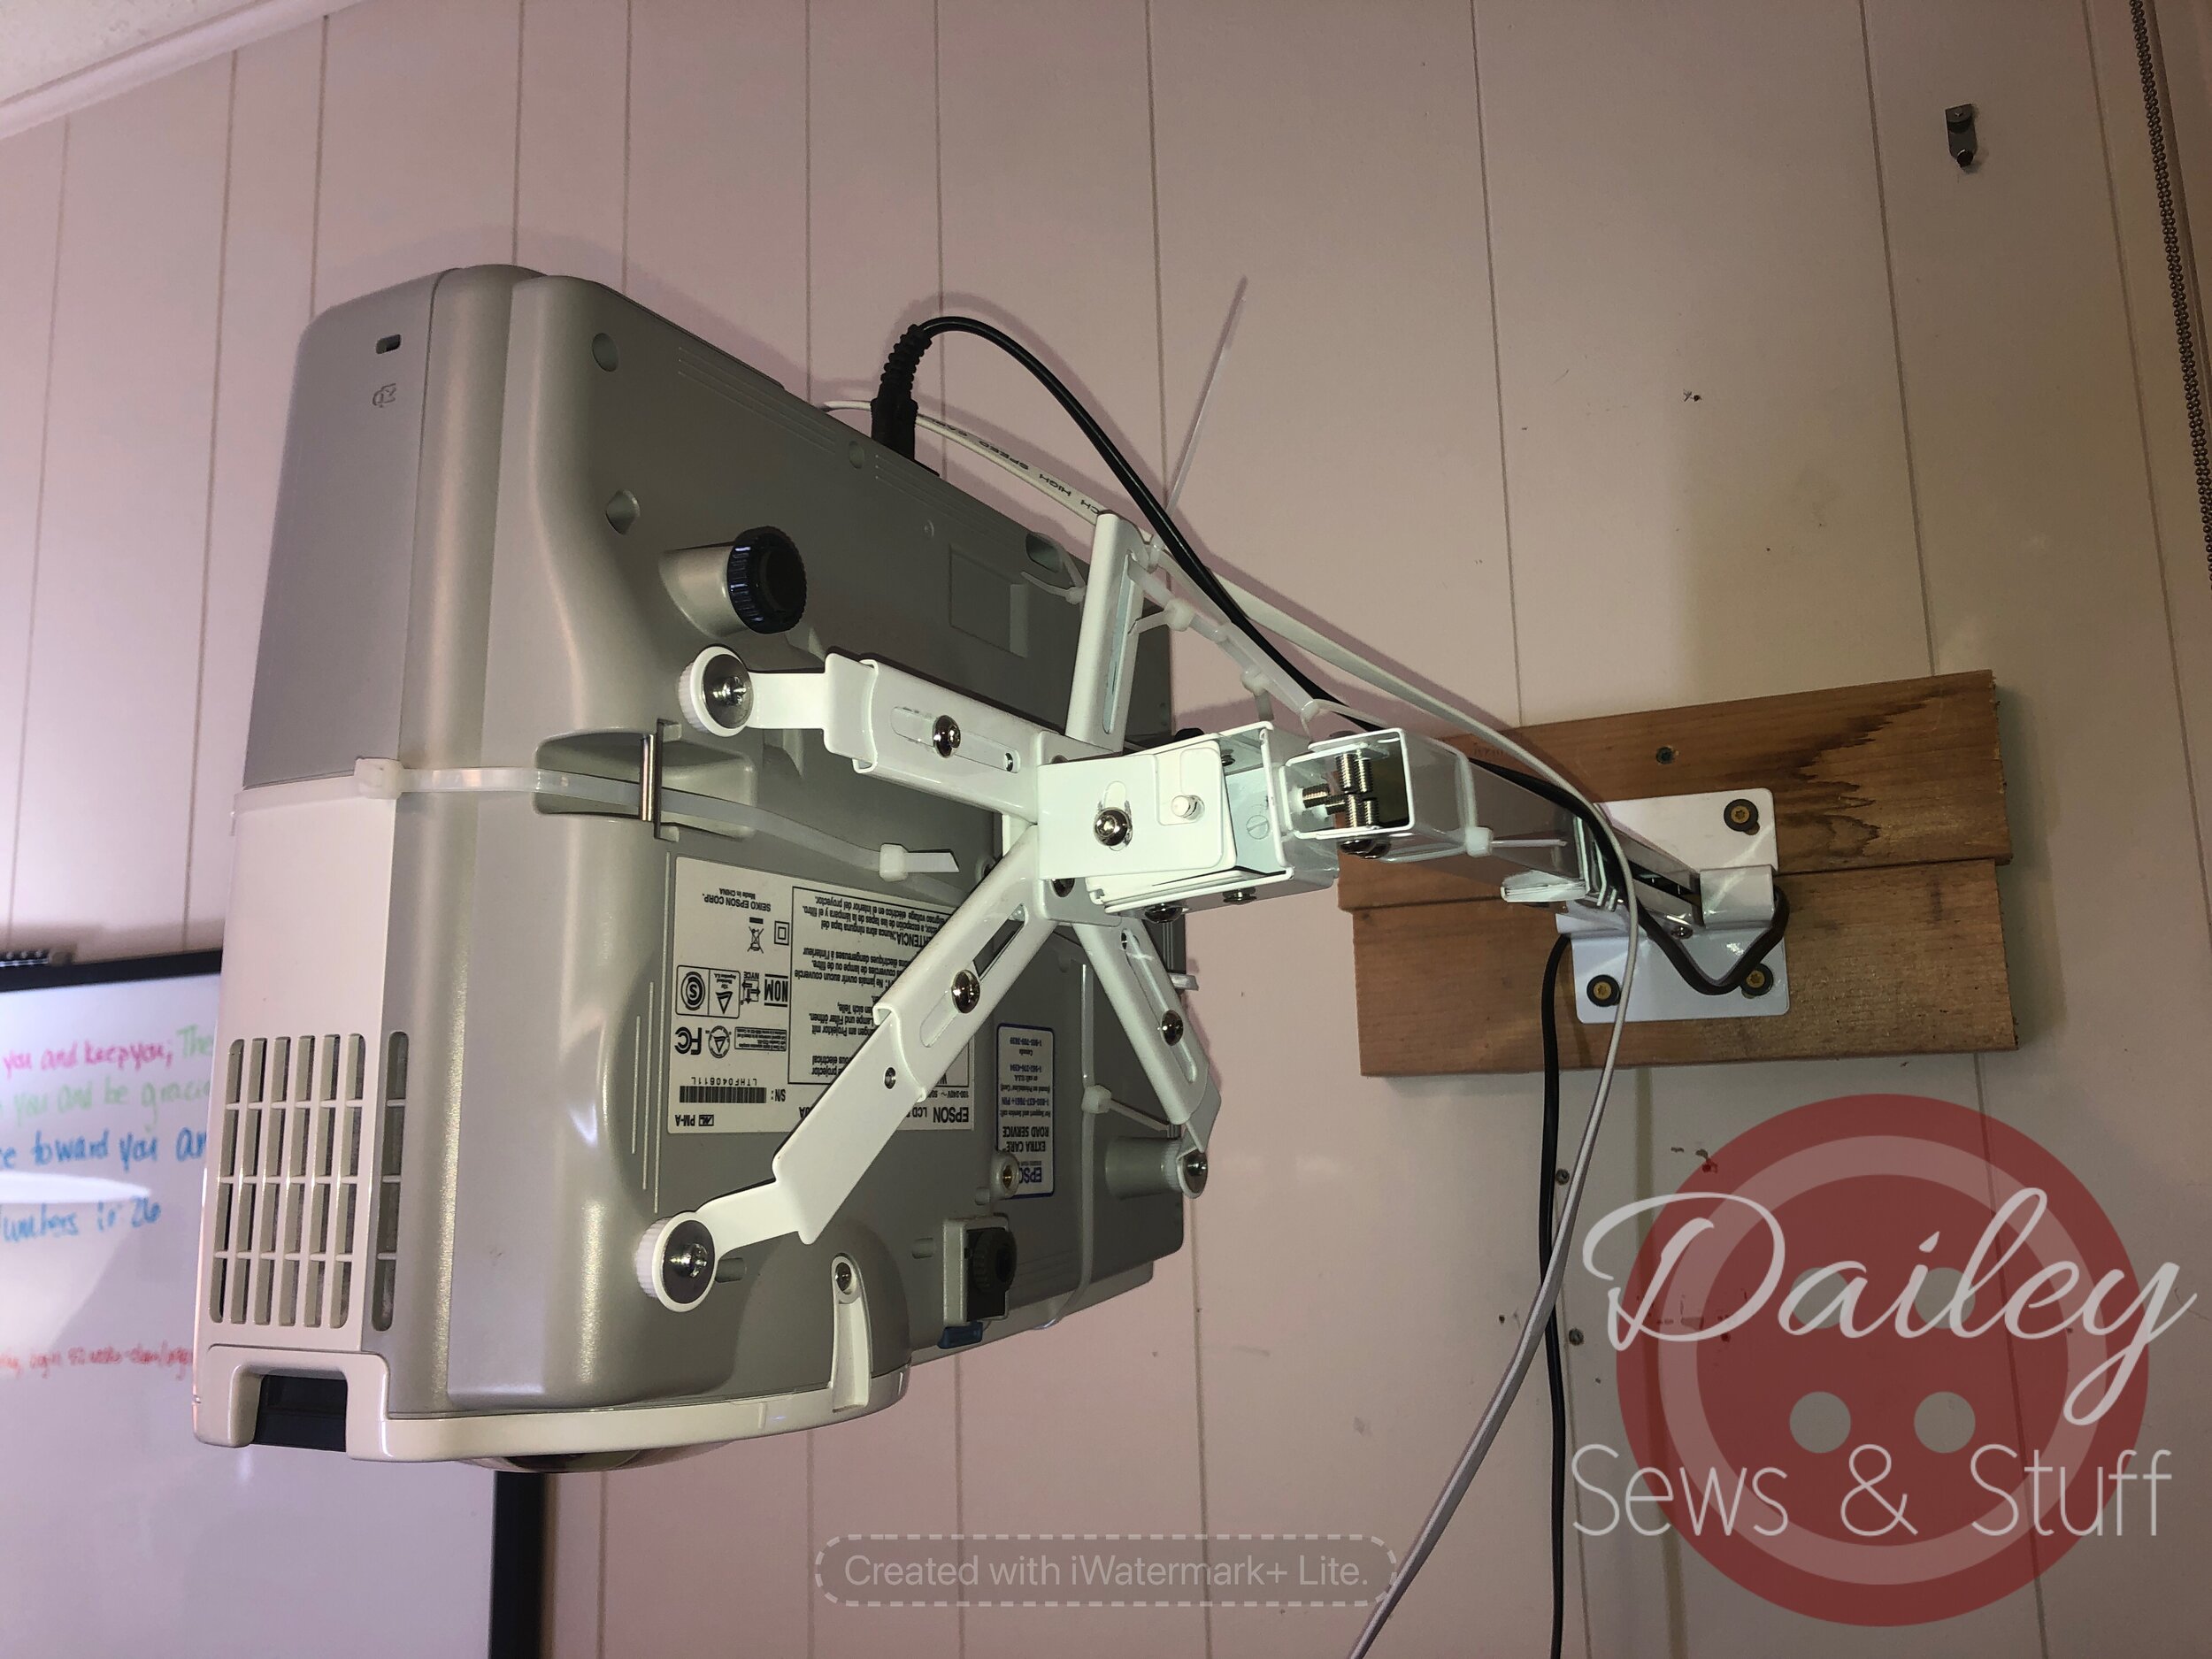
You’ll need a mount. Short Throws can generally be mounted with any projector mount with 4 points to connect to the projector. I had this one (scroll down a bit for pictures). It’s fairly universal, it worked, and it’s the right length for my set up. However, it did tend to droop a bit and a quick Amazon search doesn’t really turn up any more substantial alternatives. Over time, it quit holding my projector as securely as it needed to for calibration purposes. So we replaced it with a TV/monitor mount.
NEW MOUNT AND PICS
You’ll also need a way to connect your projector to your computer. You may have bought one with your projector or have one laying around. If not, look at both the projector and your computer to find which ports you have available. Most likely, you’ll need a VGA or an HDMI cord. You may also need some sort of converter dongle if your computer ports don’t match the projector ports. I definitely think a wireless mouse and keyboard come in handy when projector sewing, but those are not strictly necessary.
If your projector didn’t come with a power cable, look at the port on the projector and order one that matches from this search. You may even have one from an old computer, monitor, TV, or even sewing machine that fits.
This isn’t something to buy, but you’ll definitely need to grab the calibration grid Sasha Sewist made. The Imperial one is here and the metric one is here. They are a part of a Calibration Guide she made, which is here. Thank you, as always, Sasha for your talent and giving heart!
Download the Calibration grid to your computer and save it on your desktop or in a folder so you can find it when you need it. Then, open the file so that it opens with Adobe Reader DC and not in a web browser. If you’re unsure about this, you can watch this video for some Adobe Basics and to make sure you’re using the right program.
First things first…
As soon as your projector arrives, open it up, plug in the power cable, and turn it on! You should get a blue screen (other brands may have a different color). To quote myself from the UST post, “you’re going to want to do this soon after it arrives so you can be sure to return or file a claim within the window if it doesn’t. While the vast majority of us who have ordered from eBay have done it with no issues at all, we are buying a used electronic from a stranger on the internet so it’s best to just double check things. Place the projector on its bottom and aim it at the floor or at your table that it’s sitting on. Plug it into power and turn it on! If you’ve got a big blue rectangle on your surface, all is well! Take this opportunity to reset all settings. It should be “menu” “reset” “reset all” “yes” for an Epson. Take the time to scroll through the settings and play around with them. You can always reset when you’re done! And this will get you familiar with your projector.”
Connecting to your computer.
Now connect it to your computer. If the projector doesn’t automatically figure out which port you’ve used, try using a “source search” or selecting the specific source you used. On your computer, you’ll have to tell it if you want it to duplicate your screen or extend it. If you have a Windows computer, hold down the Windows key and press the P key. Projecting options will pop up on the right hand side of the screen. Press P again to choose the next option and continue pressing it to cycle through all the options. Many who projector sew prefer to duplicate their screen. With a duplicated screen, you’re able to view the same thing on the computer monitor and the projected image. People prefer this because they can sometimes use the computer screen to read what they can’t on the projected image. I prefer to extend my image instead. Extending the image means I have fewer issues with aspect ratio or resolution issues…basically, it means it’s easier to set up and use each time for me. Neither choice is right or wrong, just do what you prefer. If you do set it up to extend, be aware that you'll have to drag the window you want to see projected over to that screen. Just grab the top of the program, like Adobe, and pull it off your computer monitor screen to the right. It will appear on the projected screen!
Go ahead and open up the Calibration Grid in Adobe, have it on your projected image, and go on to the next steps!
Where should I mount my Short Throw?
Since most of our ceilings are farther than 4 feet from our cutting tables, a ceiling mount might not be the best option for a Short Throw projector. (The short side of a vaulted ceiling might be a notable exception, as would someone with a very tall cutting table or very short ceiling height.) If you do choose to mount to your ceiling, you’ll have to make sure you’re screwing into a ceiling joist or into solid wood connected to a ceiling joist similar to how I describe using studs in the next part.
Remember that your projector must be pointed directly at your mat, it cannot be tilted at all. Test the mount you’ve bought to see how to manipulate it to point the projector straight down. This may not be possible when mounting to the ceiling, depending on the projector
Usually, a wall mount will work best. Again, you’ll want the projector pointing straight down at your mat. This will likely mean having it point down at a 90° angle from your wall. Play with the mount a bit until you understand how it works and where the mount connects to the wall in relation to the projector.
Short Throws also tend to have fairly significant offsets, so you’ll want to test yours and know where to mount it before you begin. The offset is how far from the center of the image you need to be to project an image straight down. I know this sounds really confusing but I’m hoping my campy little image helps again.
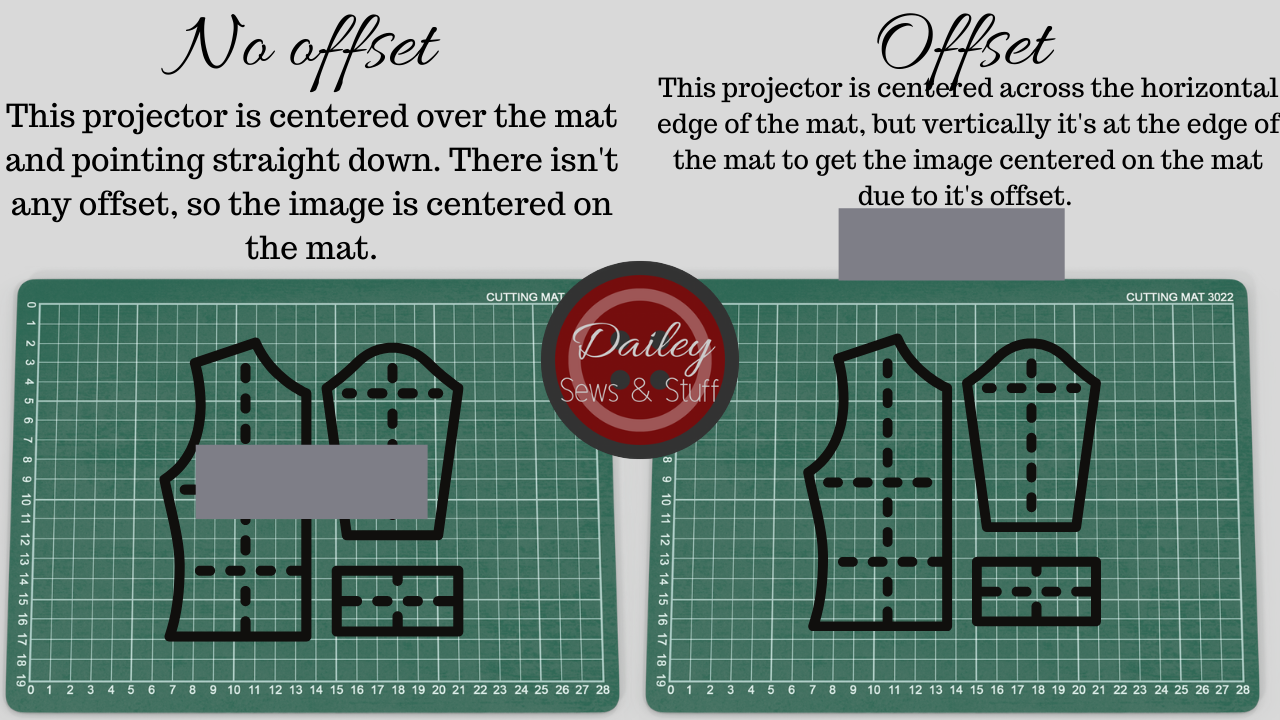
Offset is how far off center a projector needs to be to get a centered image.
How do you figure out your offset? Shine your projector at the wall and see where the image lands in relation to the projector. It’s very likely similar to the righthand image and you’ll want to mount your projector off to what will be the top of your projected image rather than centered over your table.
While you’ve got it shining at the wall, go ahead and move it closer to and further from the wall. Note how the projected image changes-it gets larger as you go away and smaller as you get near the wall. You can tilt your projector all around and notice the shape of the image changes. This will be important as we go to calibrate it soon. For now, determine how big you want your projected image to be and how far from the wall you have to move your projector to get that size. This will tell you how far to mount your projector from your mat.
Now that you know about where your projector needs to be placed in relation to your cutting mat, let’s talk about where in the room to mount it. Short throws tend to be on the bigger and heavier side, so you’ll really want to make sure you’re screwing your mount into a ceiling joist, a wall stud, or a solid piece of wood that is connected to two studs or joists. In my old craftroom, the walls were shiplap and since the shiplap was solid wood connected to each stud, they could hold heavy weights anywhere we screwed into them. In the new Vanilla Craftroom, the walls are a vertical solid wood paneling, and the same is true-I can pretty much mount anything anywhere.
However, in the rental we lived at in between, the walls were a very 70s era pressed wood paneling that could NOT hold up anything, similar to drywall. In that case, my dad screwed a couple 2x4 scraps into a couple studs and then we could screw the mount to the 2x4s and it was secure. While this was a temporary fix so we weren’t concerned about looks, you could use 1/2” plywood or nicer wood scraps, cut them to size a bit more, and paint them to match your wall so that it looks much neater. You may also be able to arrange your room around where you want to mount your projector.


A few other things to keep in mind when deciding where to mount your projector:
You likely only want to have one side of your cutting table against the wall, and it needs to be the short side. Projectors only project in landscape and you may need to move your body around the cutting mat to reach all sides of it.
You must connect your projector to your computer. Think about the position of your computer and your projector and if you can easily connect them.
A corded connection is best but, if your projector has an HDMI port, you can get a casting device. It may affect image size, quality, or aspect ratio.
HDMI cords should not be over 25’.
VGA cords should not be over 100’.
Dongles can degrade image quality or make aspect ratio difficult.
You may want something to neaten the cord on the wall or to keep you from tripping over it.
Your cutting mat needs to be as level and flat as possible. The flatter it is, the easier calibration will be. 9 times out of 10, an issue with calibration is an issue with a wavy or unlevel cutting mat!
Your projector needs to be parallel and square to the cutting mat.
Mount your projector
You know your projector works.
You know where you want to mount it.
You have tested your mount to make sure it fits your projector (I may have forgotten to mention this before, but you should totally do that now…).
So go ahead and get it up on the wall! You will very likely need a second set of hands for this as the Short Throw projectors tend to be pretty heavy and it works best to attach the mount to the projector before attaching the mount to the wall.
Once it’s secure, get it plugged in, connected to the computer, turned on, and projecting the Calibration grid again. Go ahead and make the Adobe window maximized (taking up the whole screen). Connecting to your computer may change the size of your projected image and we want to account for that.
Note that you don’t have to perfectly match the size of your cutting mat! That’s an unrealistic goal. I would err on the side of “a little too big” rather than “a little too small” and I would try to keep it close to the size of your cutting mat (an image much larger than your cutting surface becomes difficult to navigate) but don’t stress about this being an exact match.
If possible, don’t let your second set of hands leave quite yet!
It’s time to calibrate now isn’t it?
Yes, we’ve reached the dreaded step. Dun dun duuuunnnnnn.
No, really, everyone dreads this, but I promise it’s not so bad and you can do it!
Set your zoom in Adobe to 25% or 33%. We’re not going for precision right this second, but trying to get it somewhat close to the right size.
Now you’re going to physically move the projector (or have your second person do this while you stand where you can easily see the calibration grid projection) and possibly your table and/or mat to get the projected lines to be square to the lines on your cutting mat. The corners should be 90 degrees and make squares and rectangles, not trapezoids. While I show this process in the video, the easiest way to illustrate it otherwise is this link that we can once again thank Sasha Sewist and also Projectors for sewing group member Dan Oen for creating this Keystone graphic.
If it is completely impossible to physically square things, you may adjust the projector’s keystone settings but know that this can degrade your image some.
You’re almost done now! If your mat is flat and level and you’ve squared everything up, all you have to do now is figure out the precise zoom percentage that makes your 1” square be 1”. It may be counter-intuitive, but it’s easier to start with one of the larger boxes and get it the correct size before you worry about the small boxes. In fact, I go over this and more in greater detail and also talk about just how perfect you have to be with your calibration here so I won’t repeat myself too much.
The basic idea is to get the biggest box you can fit on your mat as close to accurate as possible. You may discover as you’re changing the zoom you need to adjust your projector a bit again. That’s OK. There can be some back and forth. But, once you’re satisfied, make sure your projector is tightened and not going anywhere and make sure you write down your zoom percentage. I recommend making a sticky note and sticking it on your projector so it’s always handy!
The great thing about this kind of set up is that anytime you want to project a pattern, you just connect to your computer, turn things on, and go! You’ll have to make sure you enter your zoom percentage each time. It shouldn’t change but we’ve had instances of updates to computers or Adobe changing things so it’s a good idea to quickly double check each time you begin a new cutting session.
Now what?
Now you cut out a pattern and sew it up! You are really and truly done! You’re welcome to post on Projectors for Sewing or Dailey Sews & Stuff Friends for confirmation of a job well done but there is nothing stopping you from projector sewing now! As with everything in our wonderful sewing hobby, there is always more to learn! I have a playlist of Dailey Quick Tips here that will help you do things like go full screen, use magnets to hold your fabric in place, rotate patterns on your screen, or cut a pattern piece bigger than your projection size. I have another playlist here all about the things we can do right in the free Adobe you’re already using to digitally adjust patterns to fit our bodies better. And all of these plus many more videos about projector sewing can be found here on this general projector sewing playlist.
If you’re looking for patterns with projector files, may I recommend this pattern from Sunny Mountain Patterns if you have littles? The Toddler Adventure Backpack is an amazing projector file! If you don’t have a little who would love a backpack, Pattern Niche has some great projector files, too. My one qualm with these patterns is I do wish there was a wide margin around them. This is easily remedied with the PDF Stitcher. Several other companies have projector files, as well, Love Notions, Patterns4Pirates, Ellie & Mac, Made4Mermaids, Little Lizard King, just to name a few! There’s a more robust list in the Projectors for sewing group and new designers are getting on the projector bandwagon every day! Layered A0 files often work as is or with a little help from the PDF Stitcher and Letter/A4 files can now be made into large format using the program as intended! The sky is really the limit now.
I hope this demystified the process of setting up a Short Throw projector for you!
‘Till next time, friends,
Branalyn